
Single-Dock Plans
Project members can click  to enter the task plan library to view task plans. Administrators can create and manage Single-Dock tasks.
Create Plans
Click Create Plan to enter the plan creation page.
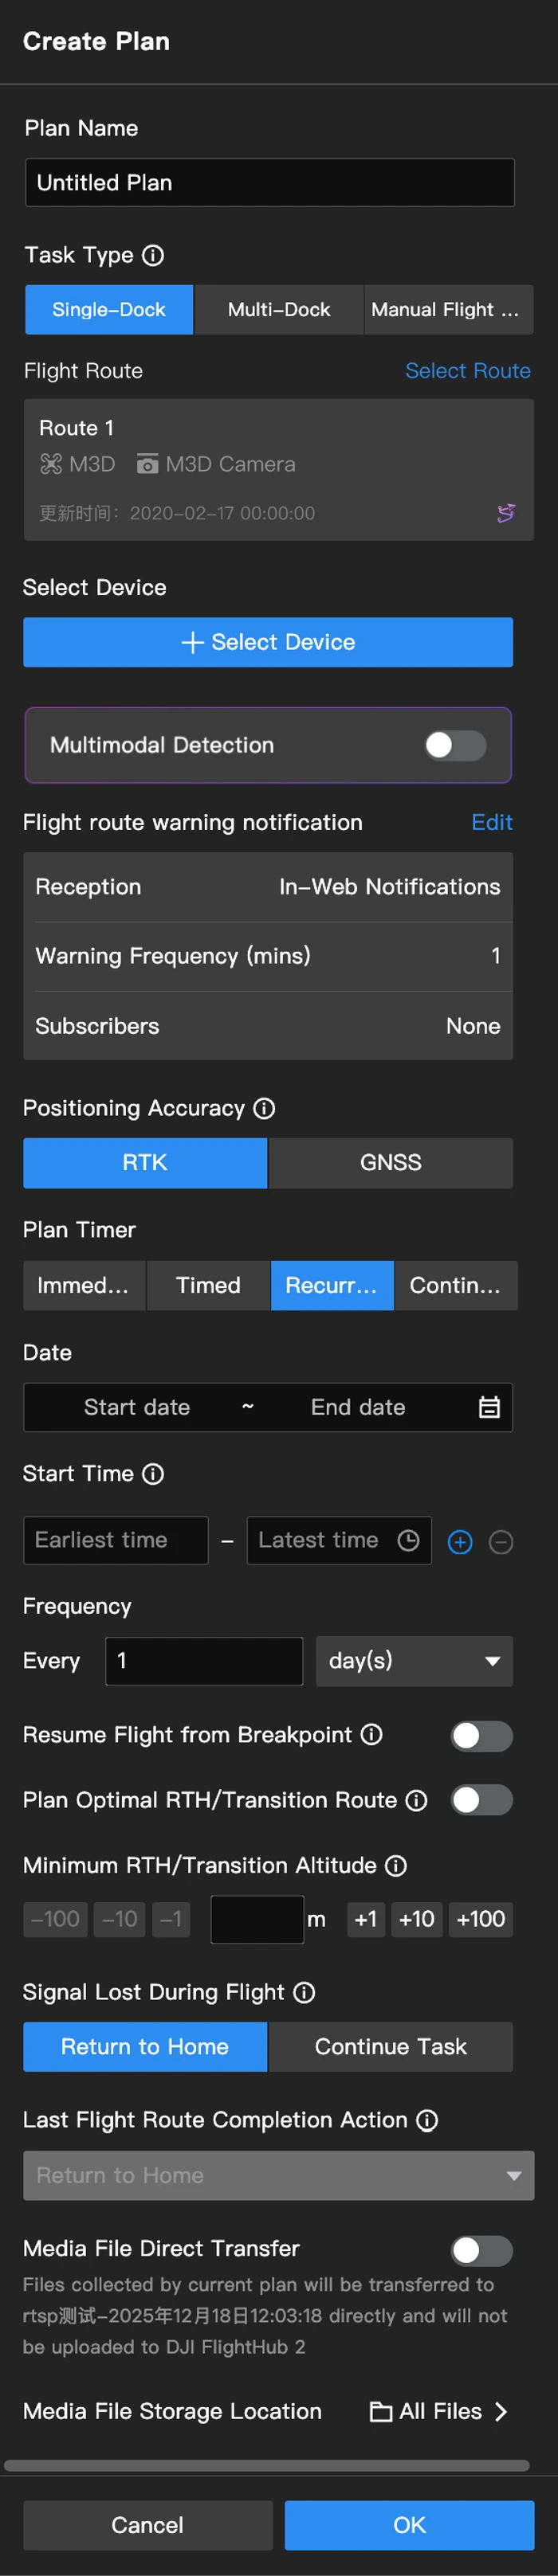
1. Plan Name
Enter a plan name (within 50 characters).
2. Task Type
Select Single-Dock.
3. Flight Route
Select a flight route supported by the aircraft type of the dock. A flight route duplicate will be created automatically after selection.
- The duplicate cannot be modified after the plan is created, and the duplicate will be deleted after the plan is deleted.
- Modifying the flight route in the flight route library will not affect the flight route duplicate. Users need to create a new plan to perform the edited flight task.
4. Select Device
Only docks can be selected.
5. Multimodal Recognition Configuration
You can enable the Multimodal Recognition configuration.
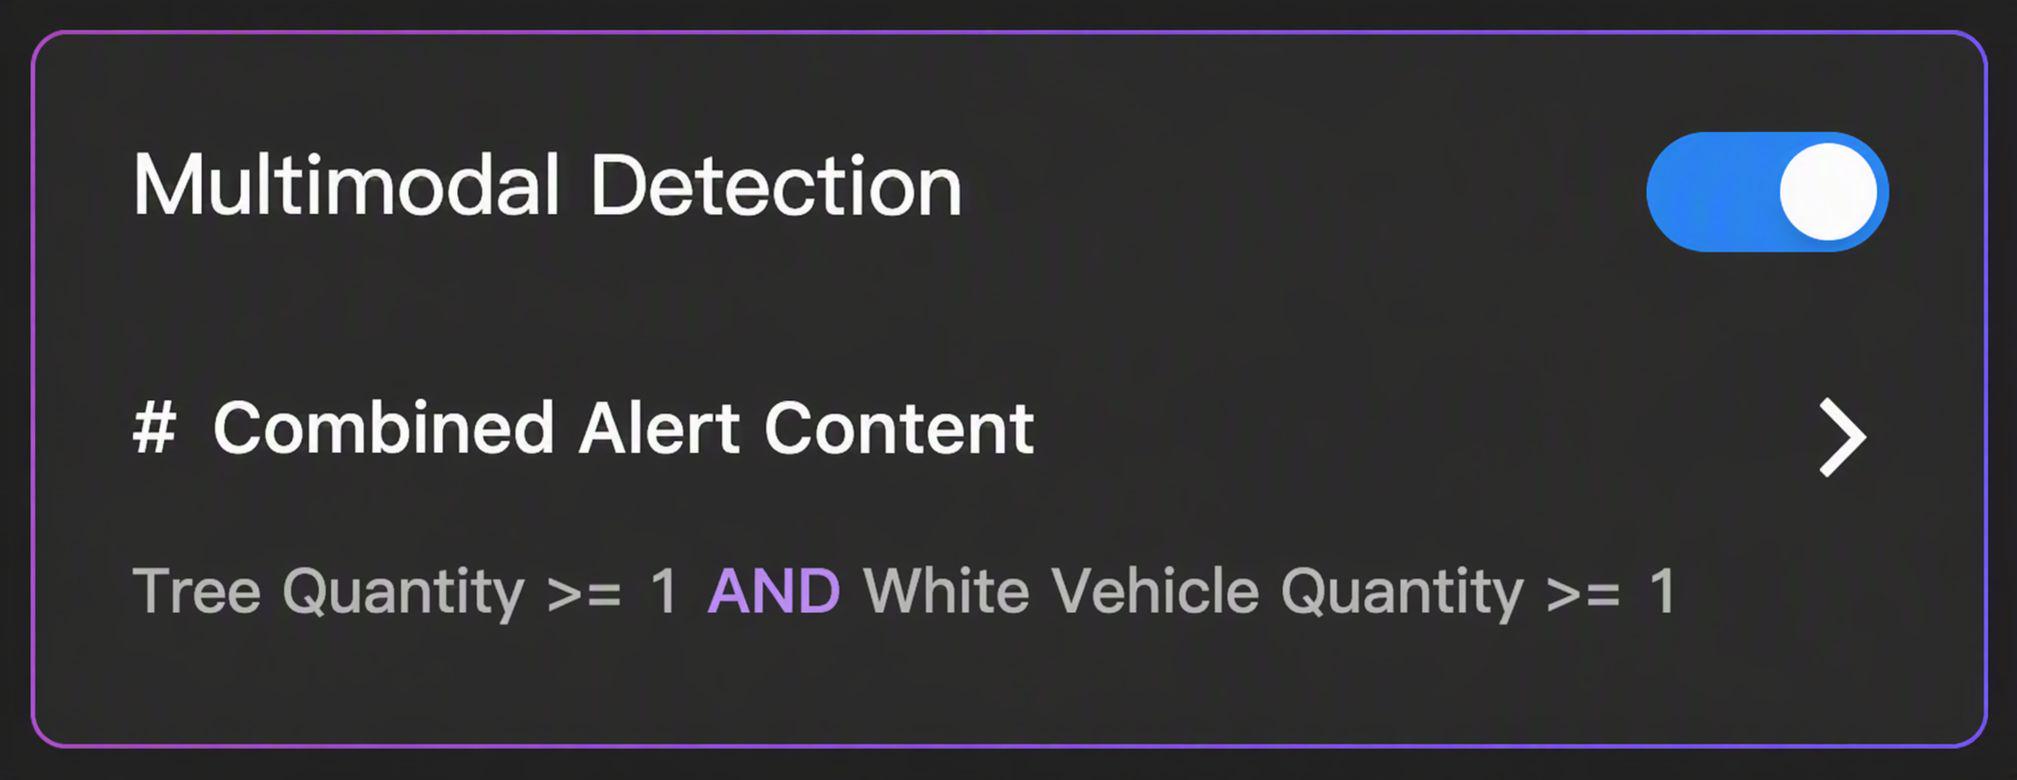
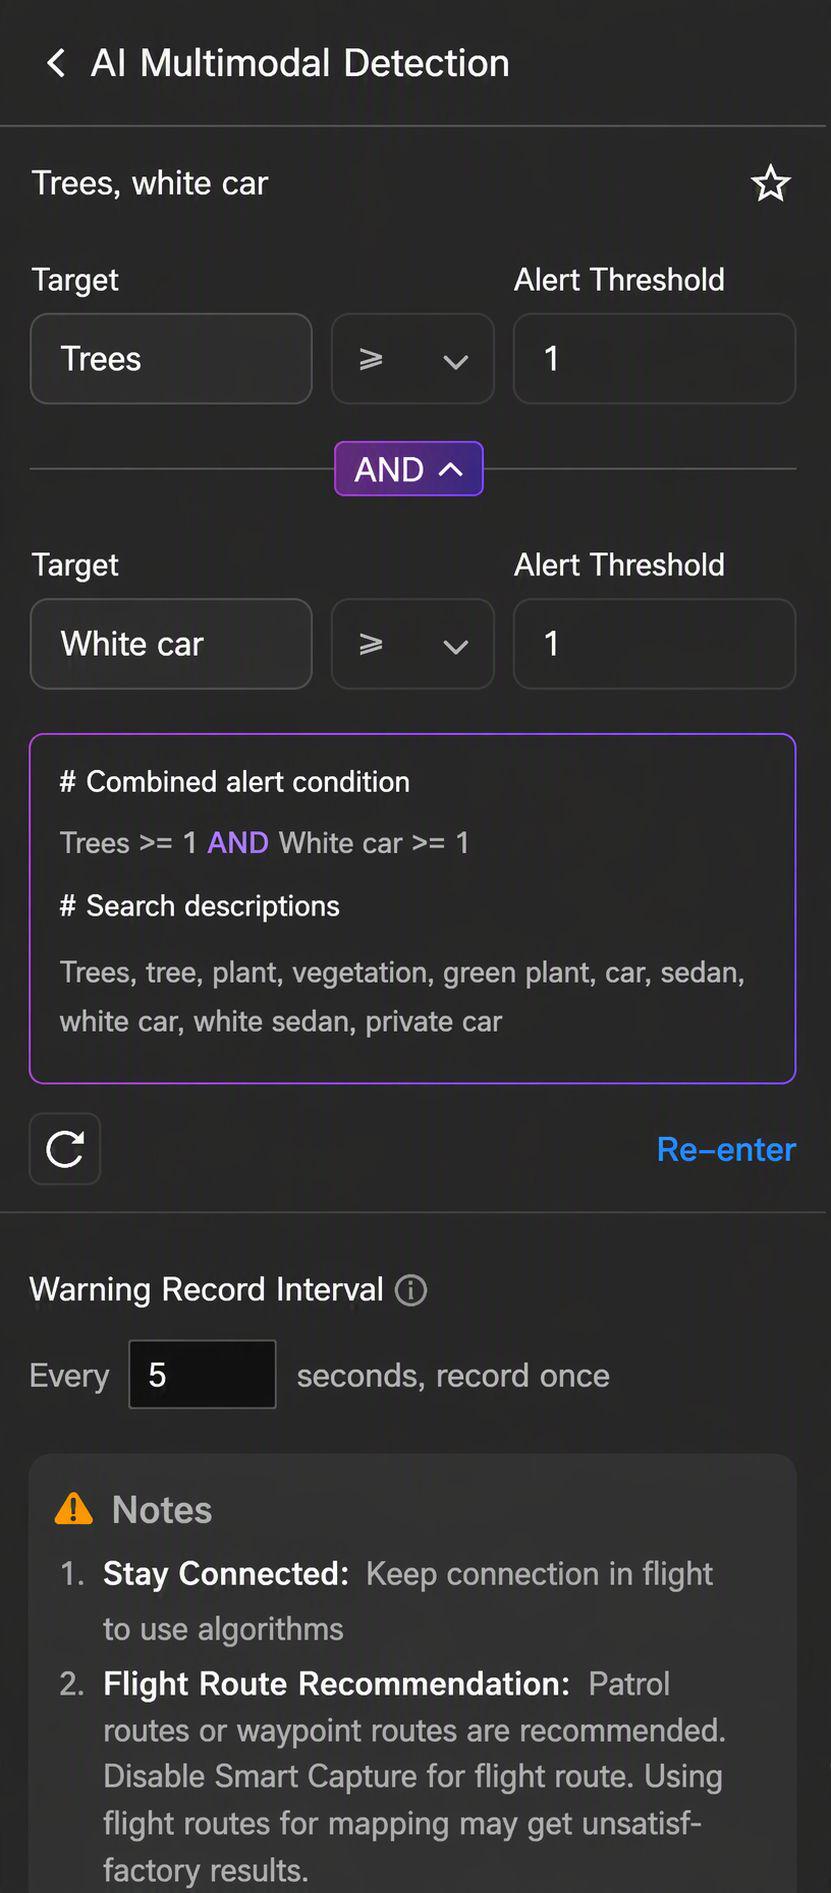
You can configure multimodal search targets. After entering the search content, the AI model will analyze the input intent and output summarized alert target tags (up to 10 tags). Alert threshold settings are supported for each tag (1–128), and multi-target combined search is also supported. Tags cannot be edited or modified after creation.
You can also set the interval for AI model recognition. The minimum interval is 2s.
6. AI Route Warning Notification
Note: Only DJI Dock 3 and DJI Dock 4 support this feature.
After selecting the AI route, users need to configure the alert notification's receiving method, frequency, and subscribers when the alert conditions are met during tasks.
- Reception: You can choose in-web, SMS, or email notifications. If the organization has configured a Webhook URL, you can also choose to push alert messages to the reserved webhook.
- Warning Frequency: If the warning frequency for in-web and webhook notifications is set to 0, notifications will be pushed as soon as the alert conditions are met. For all other receiving methods, the warning frequency must be set to more than 1 minute.
- Subscribers: Subscribers are only effective for in-web, SMS, and email notifications. The members added must have maintained their mobile numbers and email addresses in User Center > Basic Information.
- Webhook URL: When an alert occurs, the system pushes two notifications to the configured Webhook URL. The first is an instant notification, which will be sent immediately. The second is sent after photo generation and includes the photo captured at the time of the alert. Each notification contains the following information:
| Information | Description |
|---|---|
notify_type | Identifies the type of notification. The type of this notification is alert_notification. |
title | The alert title customized by the user. |
content | The alert content customized by the user. |
dateTime | The time when the alert occurs. |
location | The location of the alert subject when the alert occurs. If multiple alert subjects are recognized simultaneously, this is the center of the frame. |
mediaUrl | The URL of the captured media file. If Media File Direct Transfer is enabled, this is the file name of the media file. |
flight_id | Identifier for the flight during which the alert occurs. |
organization_uuid | Identifier for the organization associated with the alert. |
project_uuid | Identifier for the project associated with the alert. |
After setting the warning frequency to Y minutes, only one alert will be pushed every Y minutes, and the pushed content will only contain the latest alert information within the Y minutes.
7. Positioning Accuracy
Note: Supported by DJI Dock 2, DJI Dock 3, and DJI Dock 4.
Positioning accuracy includes High-Precision RTK and GNSS.
- High-Precision RTK: After takeoff, the aircraft will wait in the air to converge the RTK data before performing the task. The task cannot be paused during the convergence. It is recommended to use this mode for high-precision flight tasks.
- GNSS: The aircraft will perform tasks directly without waiting for the RTK to converge. It is recommended to use this mode for flight tasks with relatively low accuracy requirements.
After enabling Auto Connect to Recommended Ground Station, you do not need to select the positioning accuracy.
8. Plan Timer
The plan timer can be set to Immediate, Timed, Recurring, or Continuous.
- Immediate: After an immediate task is created, the aircraft will perform the flight task immediately.
- Timed: Set the execution date and execution time period (earliest start time - latest start time). After the earliest start time is reached, the system will deliver the task to the device. If the device is idle within the time period, the task is performed immediately. If the device is still busy after the latest start time, the task fails.
- Recurring: Set the execution period, execution time period, and repeat frequency. Each additional execution time period adds one execution of the task, and the system checks whether the time periods conflict.
- Continuous: After setting the execution date, execution time, battery level for starting the task, repeat frequency, and rules, the aircraft will perform the flight task when the execution time is reached and the battery level meets the set value.
- When single time period is selected in Resume Flight from Breakpoint, if the task is interrupted, such as due to insufficient battery, the aircraft can continue flight from the breakpoint within the set time period. However, the task will start from the beginning for the next time period.
- When cross time periods are selected in Resume Flight from Breakpoint, the breakpoint location will be saved automatically. Then, at the start of the next time period, the aircraft will continue flight from the breakpoint.
9. Resume Flight from Breakpoint
When a task cannot be completed by one single flight, a new task will automatically be generated, and the aircraft will resume the flight from the breakpoint and complete the task after being fully charged.
Note: Tasks resuming from breakpoint will automatically expire if the tasks are not performed for more than 3 days.
10. Optimal RTH/Transit Route Planning
When Optimal RTH/Transit Route Planning is enabled, the aircraft will intelligently adjust its flight altitude and speed based on the environment (wind speed and direction, obstacles, etc.) during RTH or transit, making the RTH or transit more efficient and energy-saving.
- When the environment is suitable for the vision system to work properly or Obstacle Data is enabled, the aircraft will automatically plan an optimal route to improve efficiency and preserve battery life.
- When the environment is not suitable for the vision system to work properly and Obstacle Data is disabled, the aircraft will fly based on the set task altitude and RTH altitude. If it encounters an obstacle, it will increase its flight altitude.
- It is recommended to enable Obstacle Data in Task Area Management for the optimized route planning. See Obstacle Data for more details.
- When the environment is not suitable for the vision system to work properly or other issues occur when the aircraft is returning to home, the aircraft will not be able to plan an optimal route based on sensor data. If Obstacle Data is also disabled, the aircraft can only fly based on the set altitude and will not be able to avoid obstacles along the route. Users should set an appropriate RTH altitude before the aircraft returns to home.
- When Optimal RTH Route Planning is disabled but the environment is suitable for the vision system to work properly or Obstacle Data is enabled, the aircraft can still fly horizontally or vertically to avoid obstacles.
- If the maximum flight altitude is lower than the current aircraft altitude, the aircraft will descend directly to the maximum flight altitude before continuing tasks. If the maximum altitude is higher than the current aircraft altitude, the aircraft will stop ascending when the aircraft reaches the maximum flight altitude.

- When there are obstacles such as wires and electric towers that are hard for the vision sensors to detect, users should disable Optimal Route Planning and make sure the set task altitude and RTH altitude are higher than the obstacle altitude along the route.
11. RTH Altitude (Relative to Dock)
The aircraft altitude relative to the dock when the aircraft is returning to the dock. The RTH altitude should be set based on the actual flight condition, surrounding environment, and GEO information. It is recommended that the altitude is set higher than the highest geographical point in the flight area and should be lower than the maximum flight altitude.
- For DJI Dock, DJI Dock 3, and DJI Dock 4, the RTH altitude range is 20 - 1500 m.
- For DJI Dock 2, the RTH altitude range is 15 - 1500 m.
12. Signal Lost During Flight
The aircraft will return to home or continue the flight task when it is disconnected from the dock.
13. Action After Last Route Completion
When creating a plan, only Return to Home is supported as the completion action.
14. Media File Direct Transfer
When enabled, media files collected by the current plan will be directly transferred to third-party platforms.
Perform Plans
Users can view the status of the Single-Dock task plan in the dock panel after the task starts. Click the device status window to view the device details and livestream. See Online Project Information for more details.
Task Management
In the task plan library, users can view details of both automated and manual flight tasks, including planned and actual execution time, execution status, type, plan name, route name, device name, creator, and media upload status. Users can also perform operations related to these tasks.
Click the Incomplete tab to view planned or ongoing flight tasks.
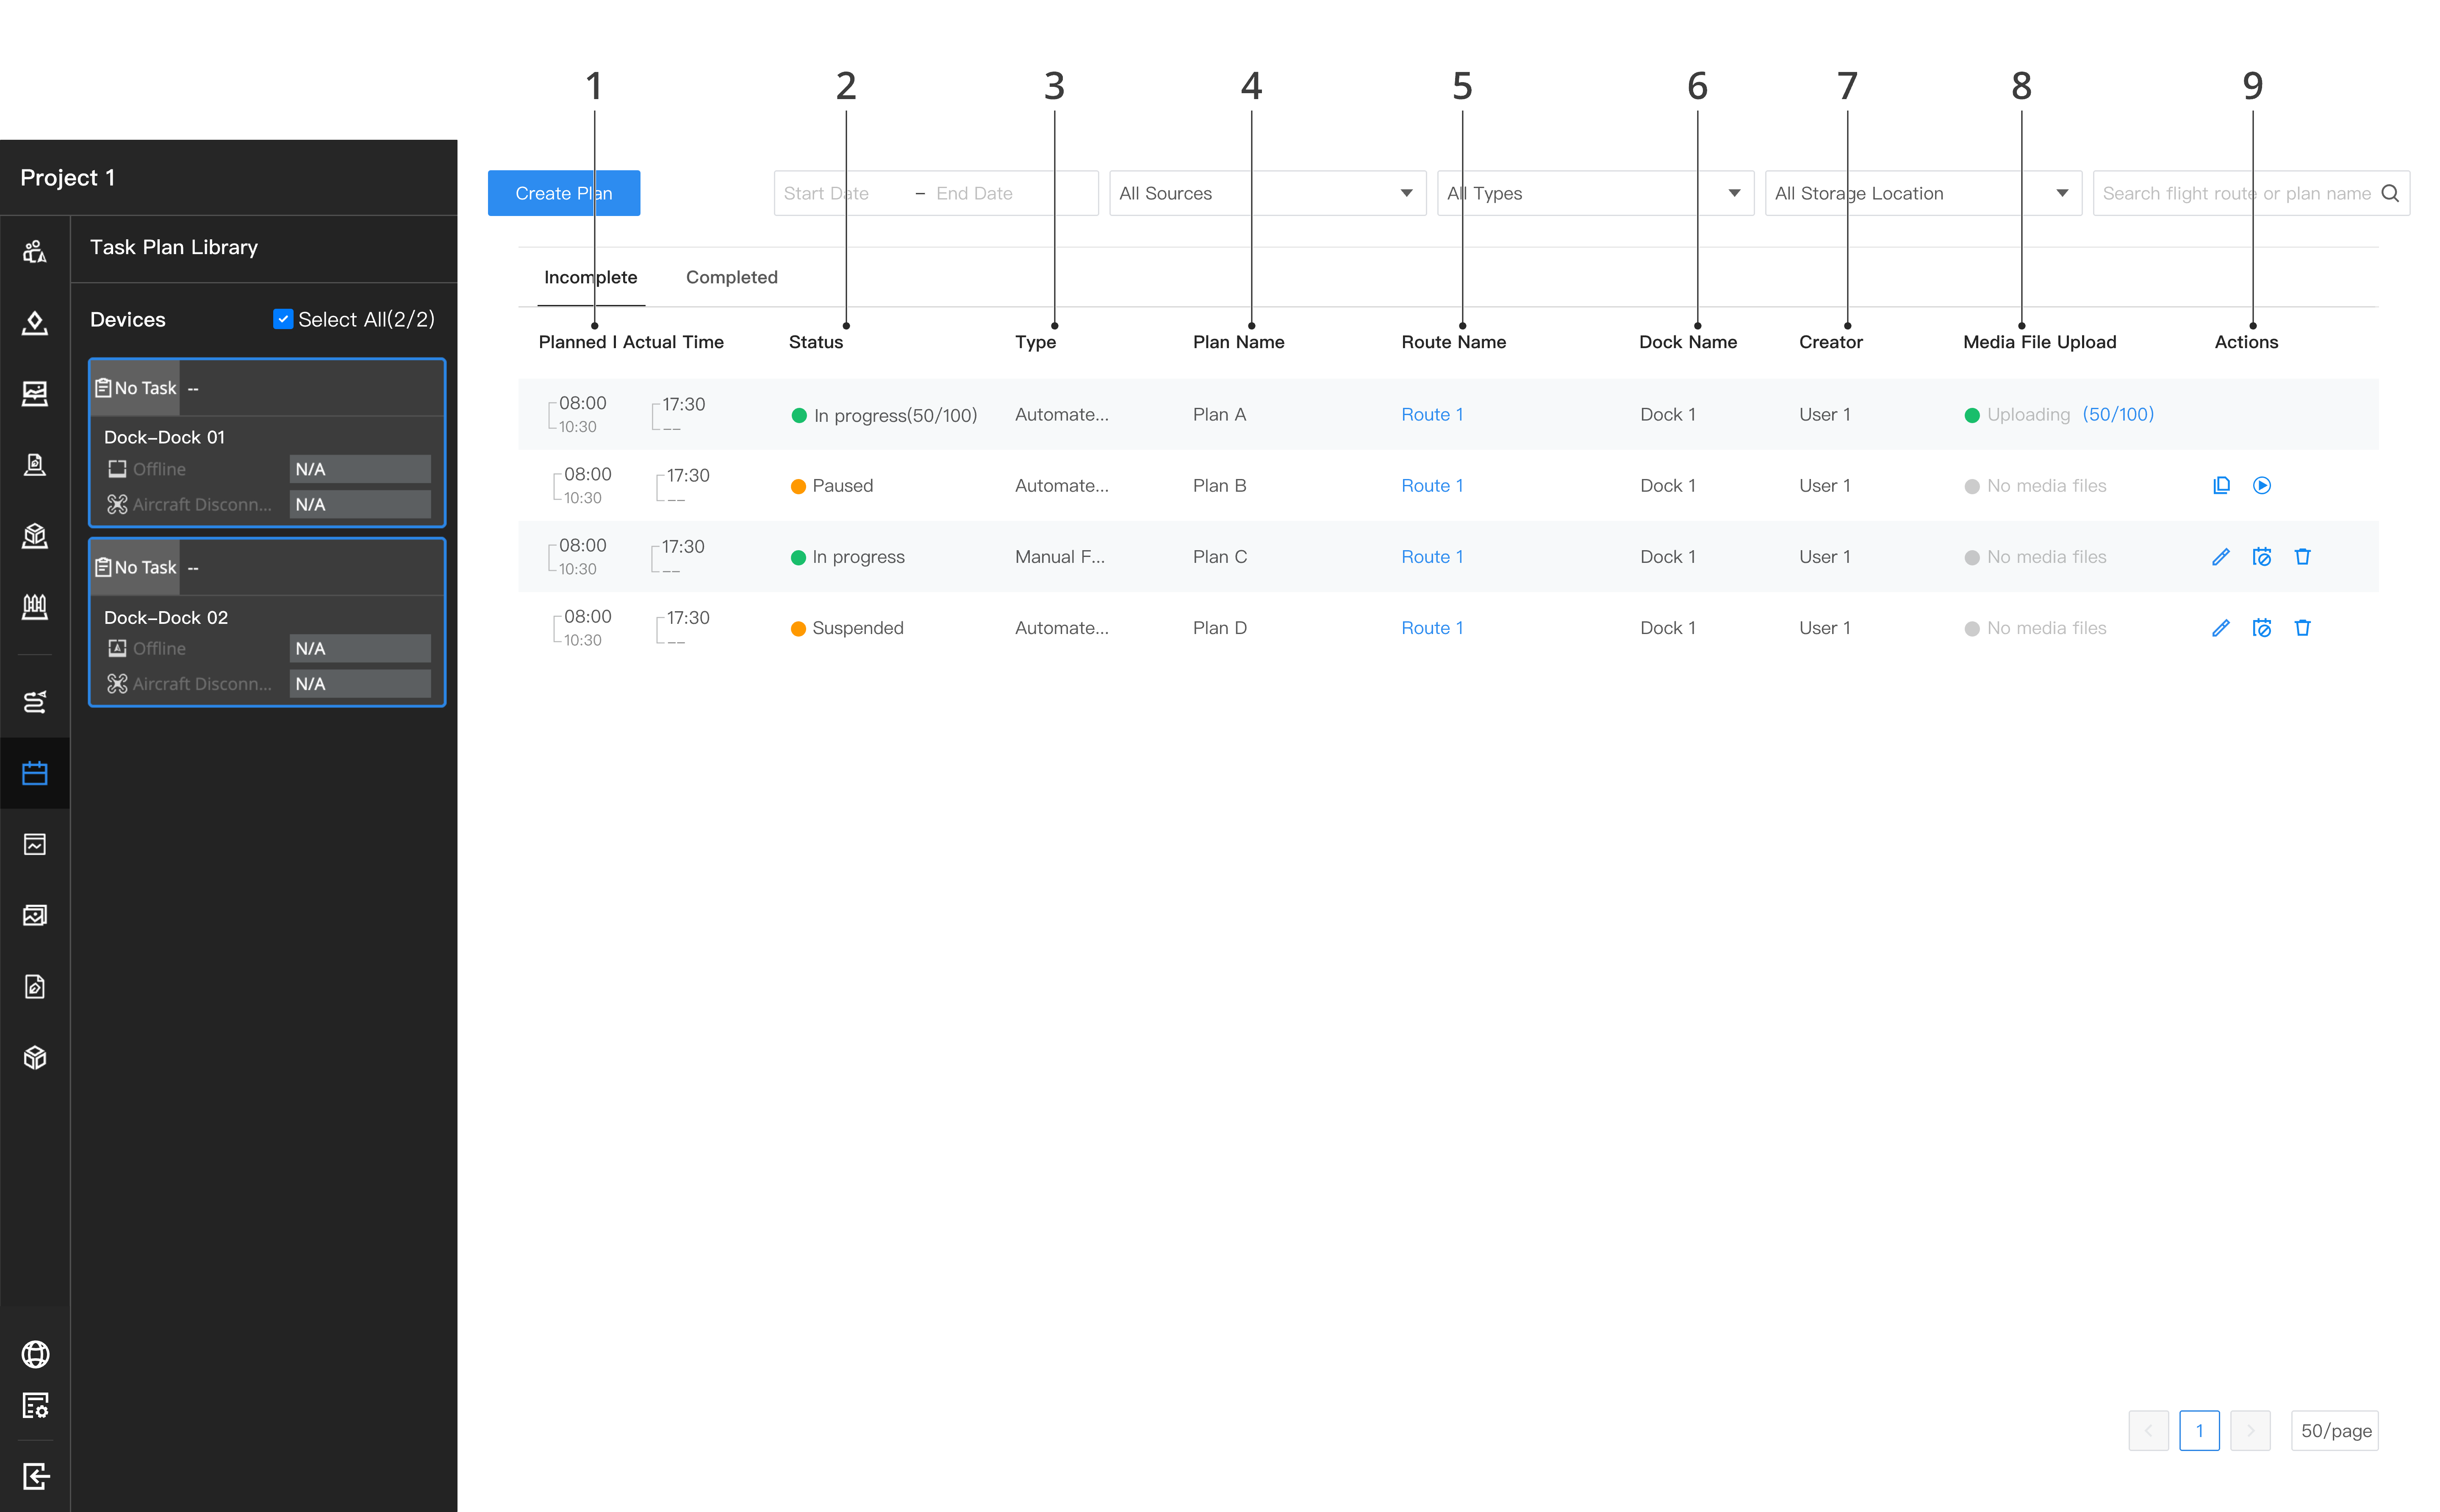
Click the Ended tab to view completed flight tasks.
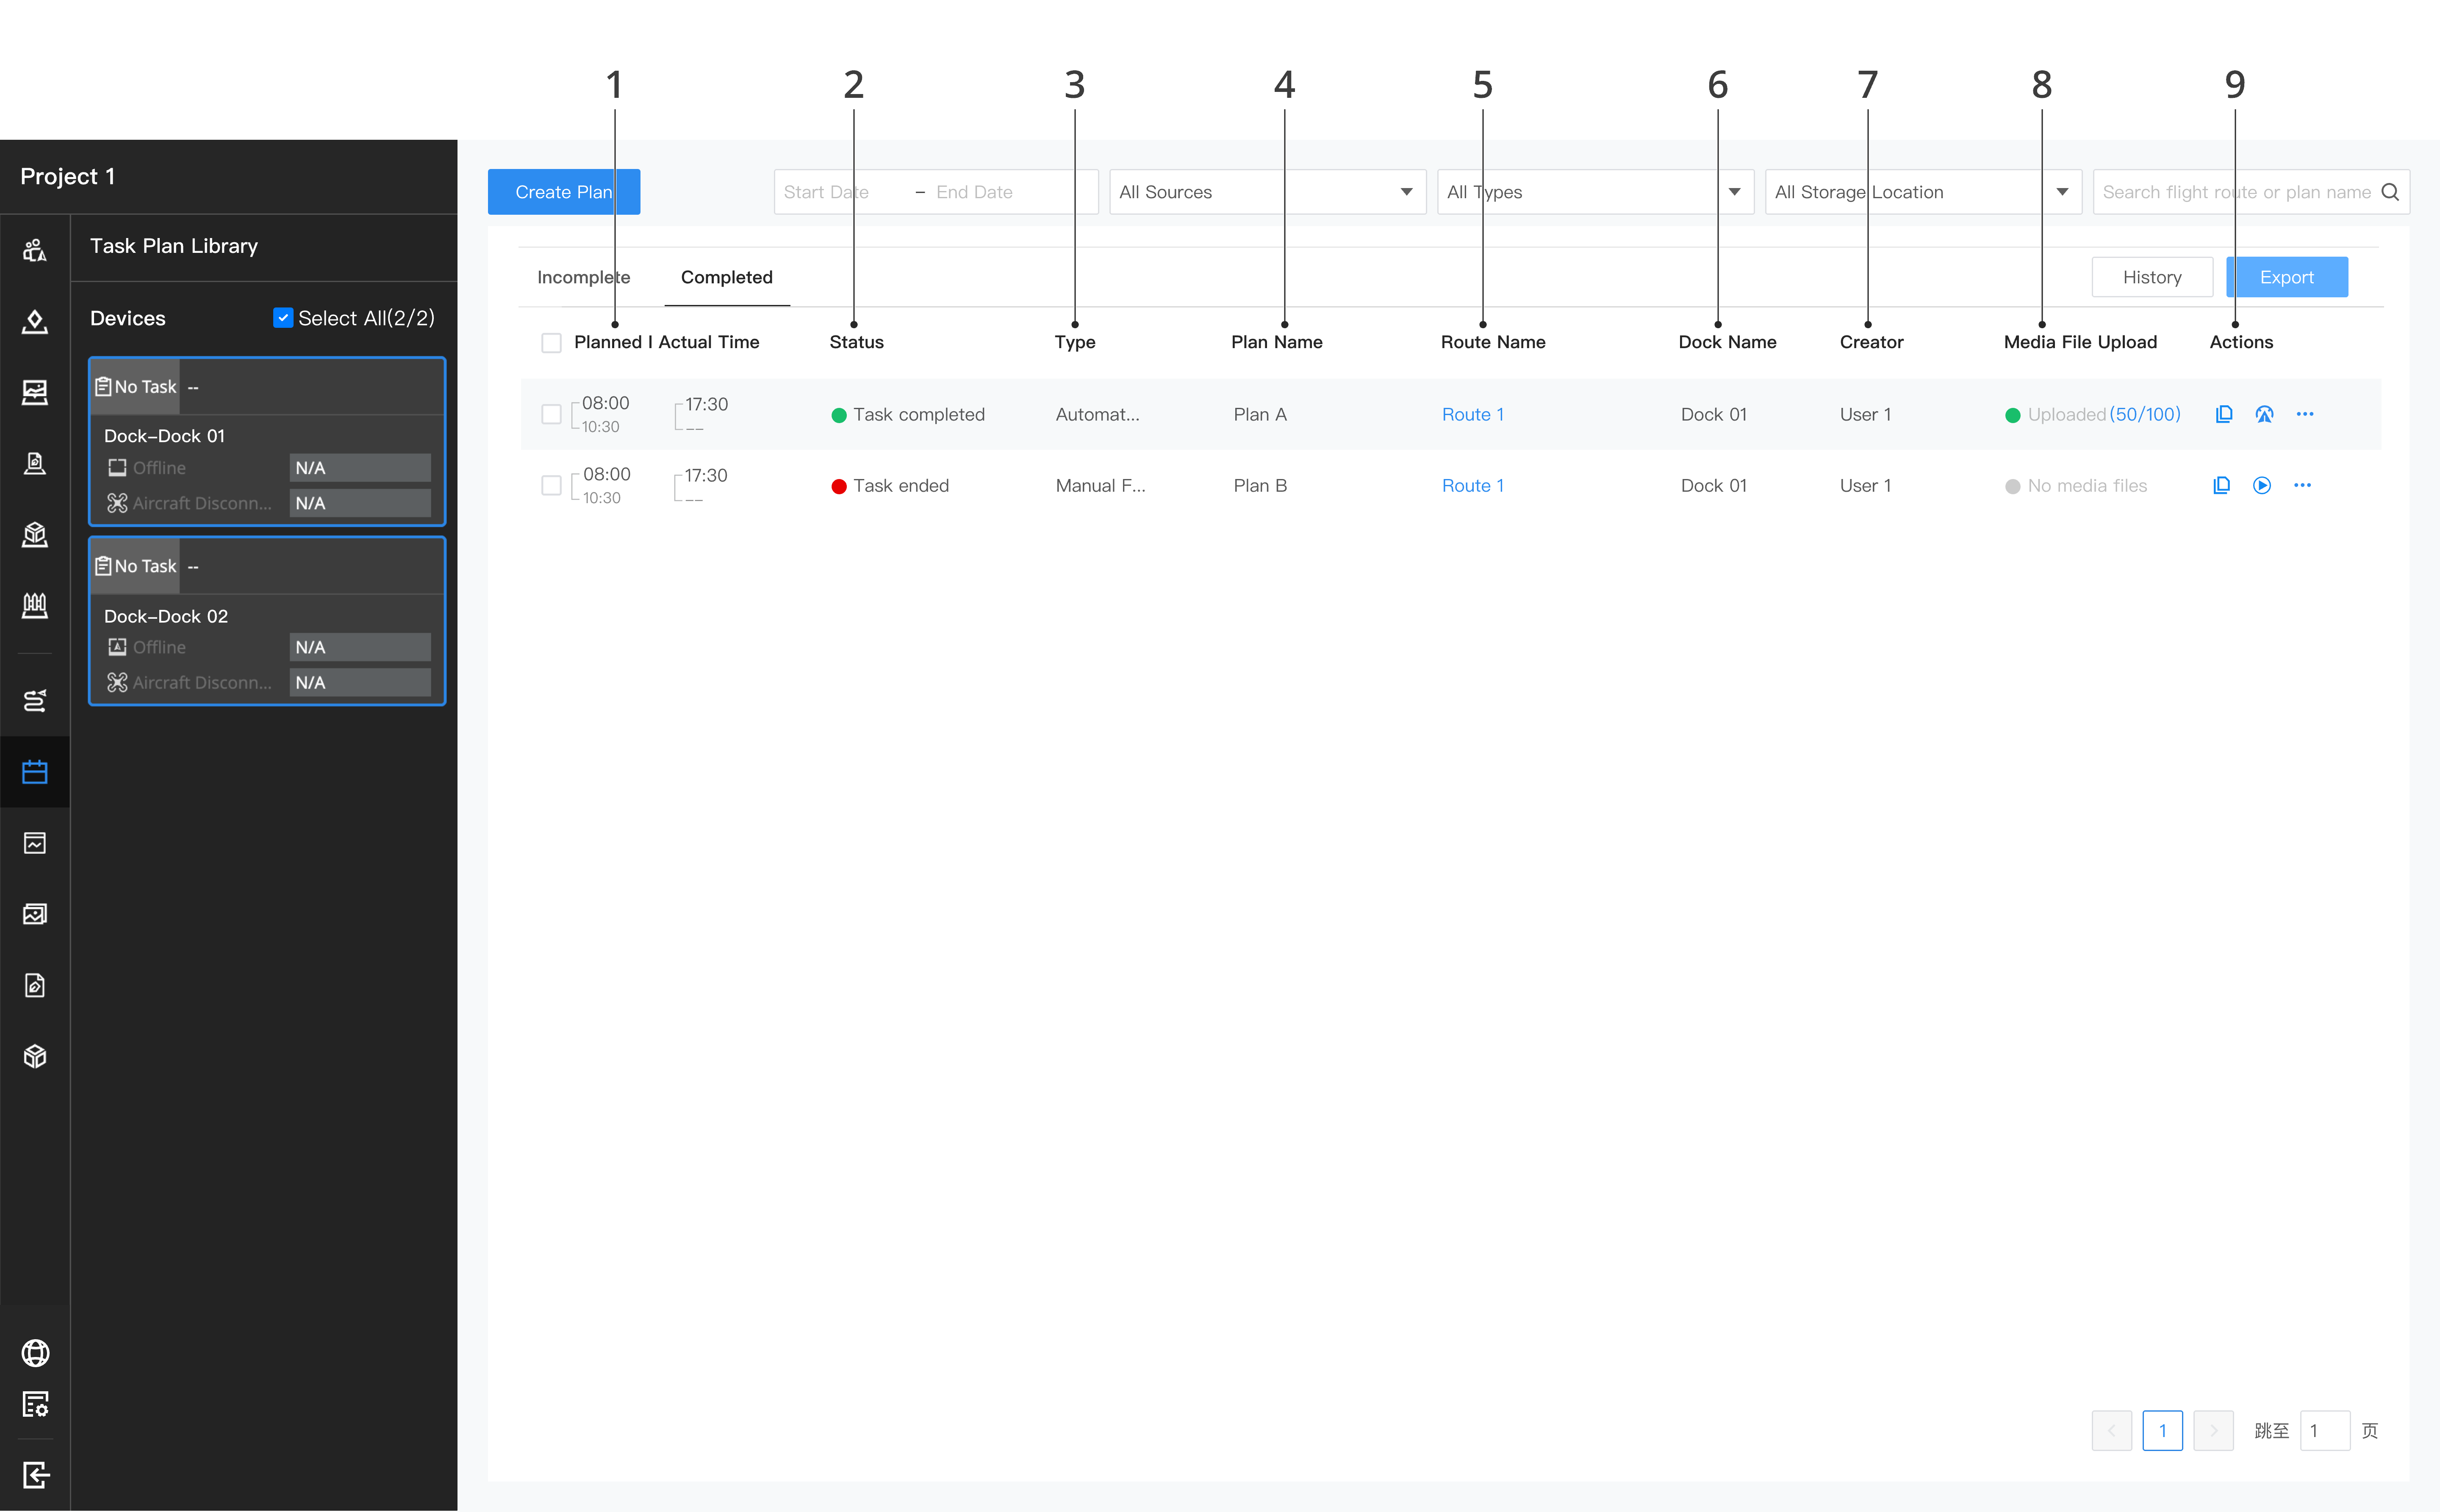
1. Planned/Actual Time
Displays the planned and actual execution times of flight tasks, where the planned execution time is an estimate and the actual execution time is the real execution time of the flight task.
2. Status
- Incomplete tasks include: To be performed, In progress, Paused, and Suspended.
- Completed tasks include: Partially performed, Task completed, Task failed, and Task interrupted.
3. Type
- Automated tasks: Tasks distributed from the Task Plan Library.
- Manual flight tasks: Flights controlled by the dock or a remote controller.
4. Plan Name
Displays the name defined by the user when creating the task.
5. Route Name
Displays the flight route duplicate of the flight task. Click the flight route duplicate to view the route. The flight route duplicate cannot be edited or saved.
6. Dock Name
Displays the names of the devices participating in the task.
7. Creator
Displays creator information.
8. Media File Upload
Displays the upload status and progress of media files captured by the aircraft during the task, including the number of uploaded files and the total number. Media upload statuses include Waiting to upload, Uploading, and Upload complete. Click the upload progress to jump to the Media Files library to view media files. The media file upload sequence is as follows:
- Media files of the Immediate task are uploaded first; media files of Timed and Recurring tasks are uploaded in order of their actual completion time.
- Click the Upload Now icon on a media file waiting to upload to upload it immediately.
- Only the media upload information of automated tasks is displayed.
9. Actions
- For the flight tasks that are to be performed, users can edit, suspend, or delete the tasks. After the flight tasks are suspended, the aircraft will not perform the tasks. Users can resume the task so that the aircraft can continue performing the task. If the flight task exceeds the planned time, the task will be shown as failed.
- For the flight tasks that are performed, users can copy the task plan and view the flight trajectory. Click
 to copy the plan, enter the flight route editor, and edit to create a new task plan. When the task is completed, users can click
 to view the flight trajectory.
- For the flight tasks that are partially performed, users can choose to resume the flight from the breakpoint. After clicking
 , a new task will automatically be generated, and the aircraft will resume the flight from the breakpoint and complete the task after being fully charged.
10. View and Export Flight Records
10.1 View Flight Records
Click the Ended tab, and then click to view the flight record after a single flight task. You can view the detailed operation information of the corresponding flight task.
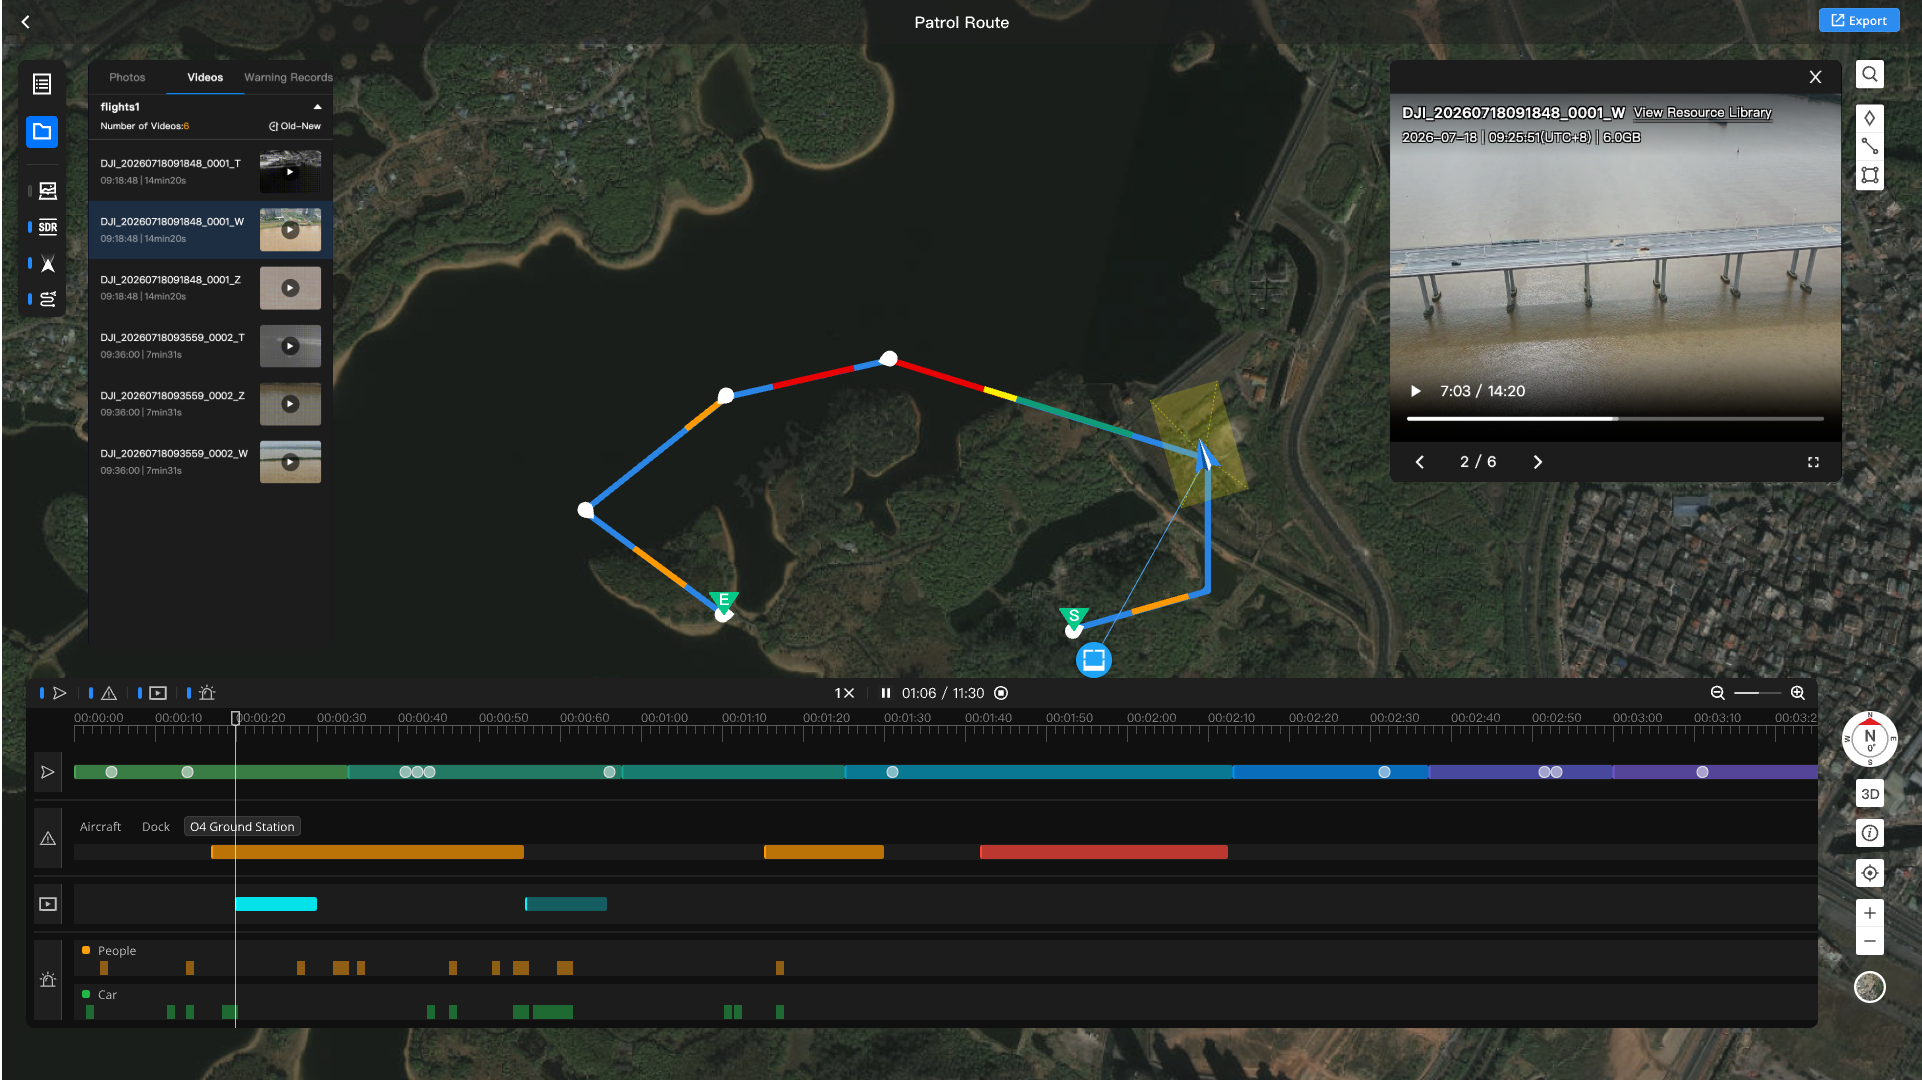
The left toolbar of the flight record page is divided into two groups: the information panel and the visibility toggles.
| Information Panel | Description |
|---|---|
 | Data Record: You can view task details, flight status, and device information:
|
 | Media Record: You can view all media files in this flight record, divided into three tabs: Photos, Videos, and Alerts:
|
| Visibility Toggle | Description |
|---|---|
 | Media: show or hide photo capture points and video PIN points on the map. |
 | Video Transmission: view the OcuSync video transmission quality corresponding to the flight trajectory on the map. |
 | FOV: see the aircraft's view on the map during trajectory playback. |
 | Route: show or hide the flight trajectory on the map. |
10.2 Progress Bar

The progress bar of the flight record is at the bottom of the page. Click  to replay the flight trajectory. You can adjust the playback speed, play/pause, and drag to seek. The progress bar contains the following tracks:
- Flight Track: replays the flight trajectory on the map, with the aircraft icon moving along the trajectory.
- Alert Track: displays the alert events generated by the aircraft, dock, and ground station during the flight. You can switch the device type to view.
- Video Recording Track: displays the video recording periods during the flight and supports showing video files captured by the aircraft. Click a color band to open the preview window of the corresponding video.
- AI Target Alert Track: displays the periods when AI recognizes alert targets, shown in separate rows by target type.
10.3 Media Preview
Click a photo capture point or video PIN point on the map, or click a video recording color band on the progress bar, to open the media preview window on the right side of the page.
- Photo preview: displays the captured media photos and supports switching files via the switcher at the bottom.
- Video preview: previews video files in a video player, supporting play/pause, dragging the progress bar, and switching files. The video playback progress is bidirectionally synchronized with the timeline of the flight record progress bar.
- The media preview window supports jumping to the Media Files library to view the complete media file.
10.4 Export Flight Records
- Single Export: Click the upper right corner of the flight record details to choose to export the summary or detailed information of the flight. When exporting detailed information, you can select the required fields. You can view past exported records or check the export progress in History.
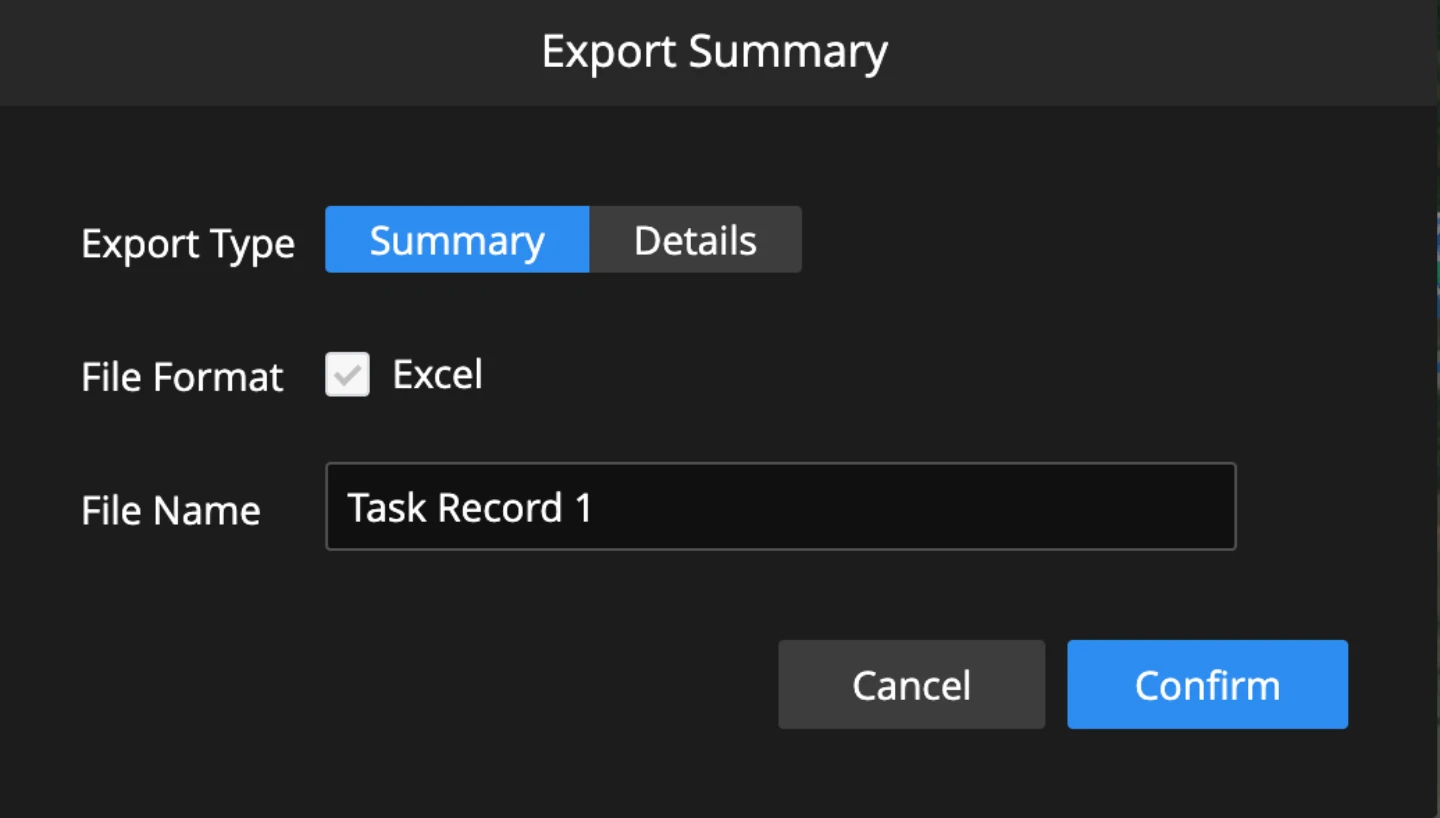
- Batch Export: In the Completed list of the task plan library, check the flight records you want to export, click Export, and choose to export the summary or detailed information of the flight.
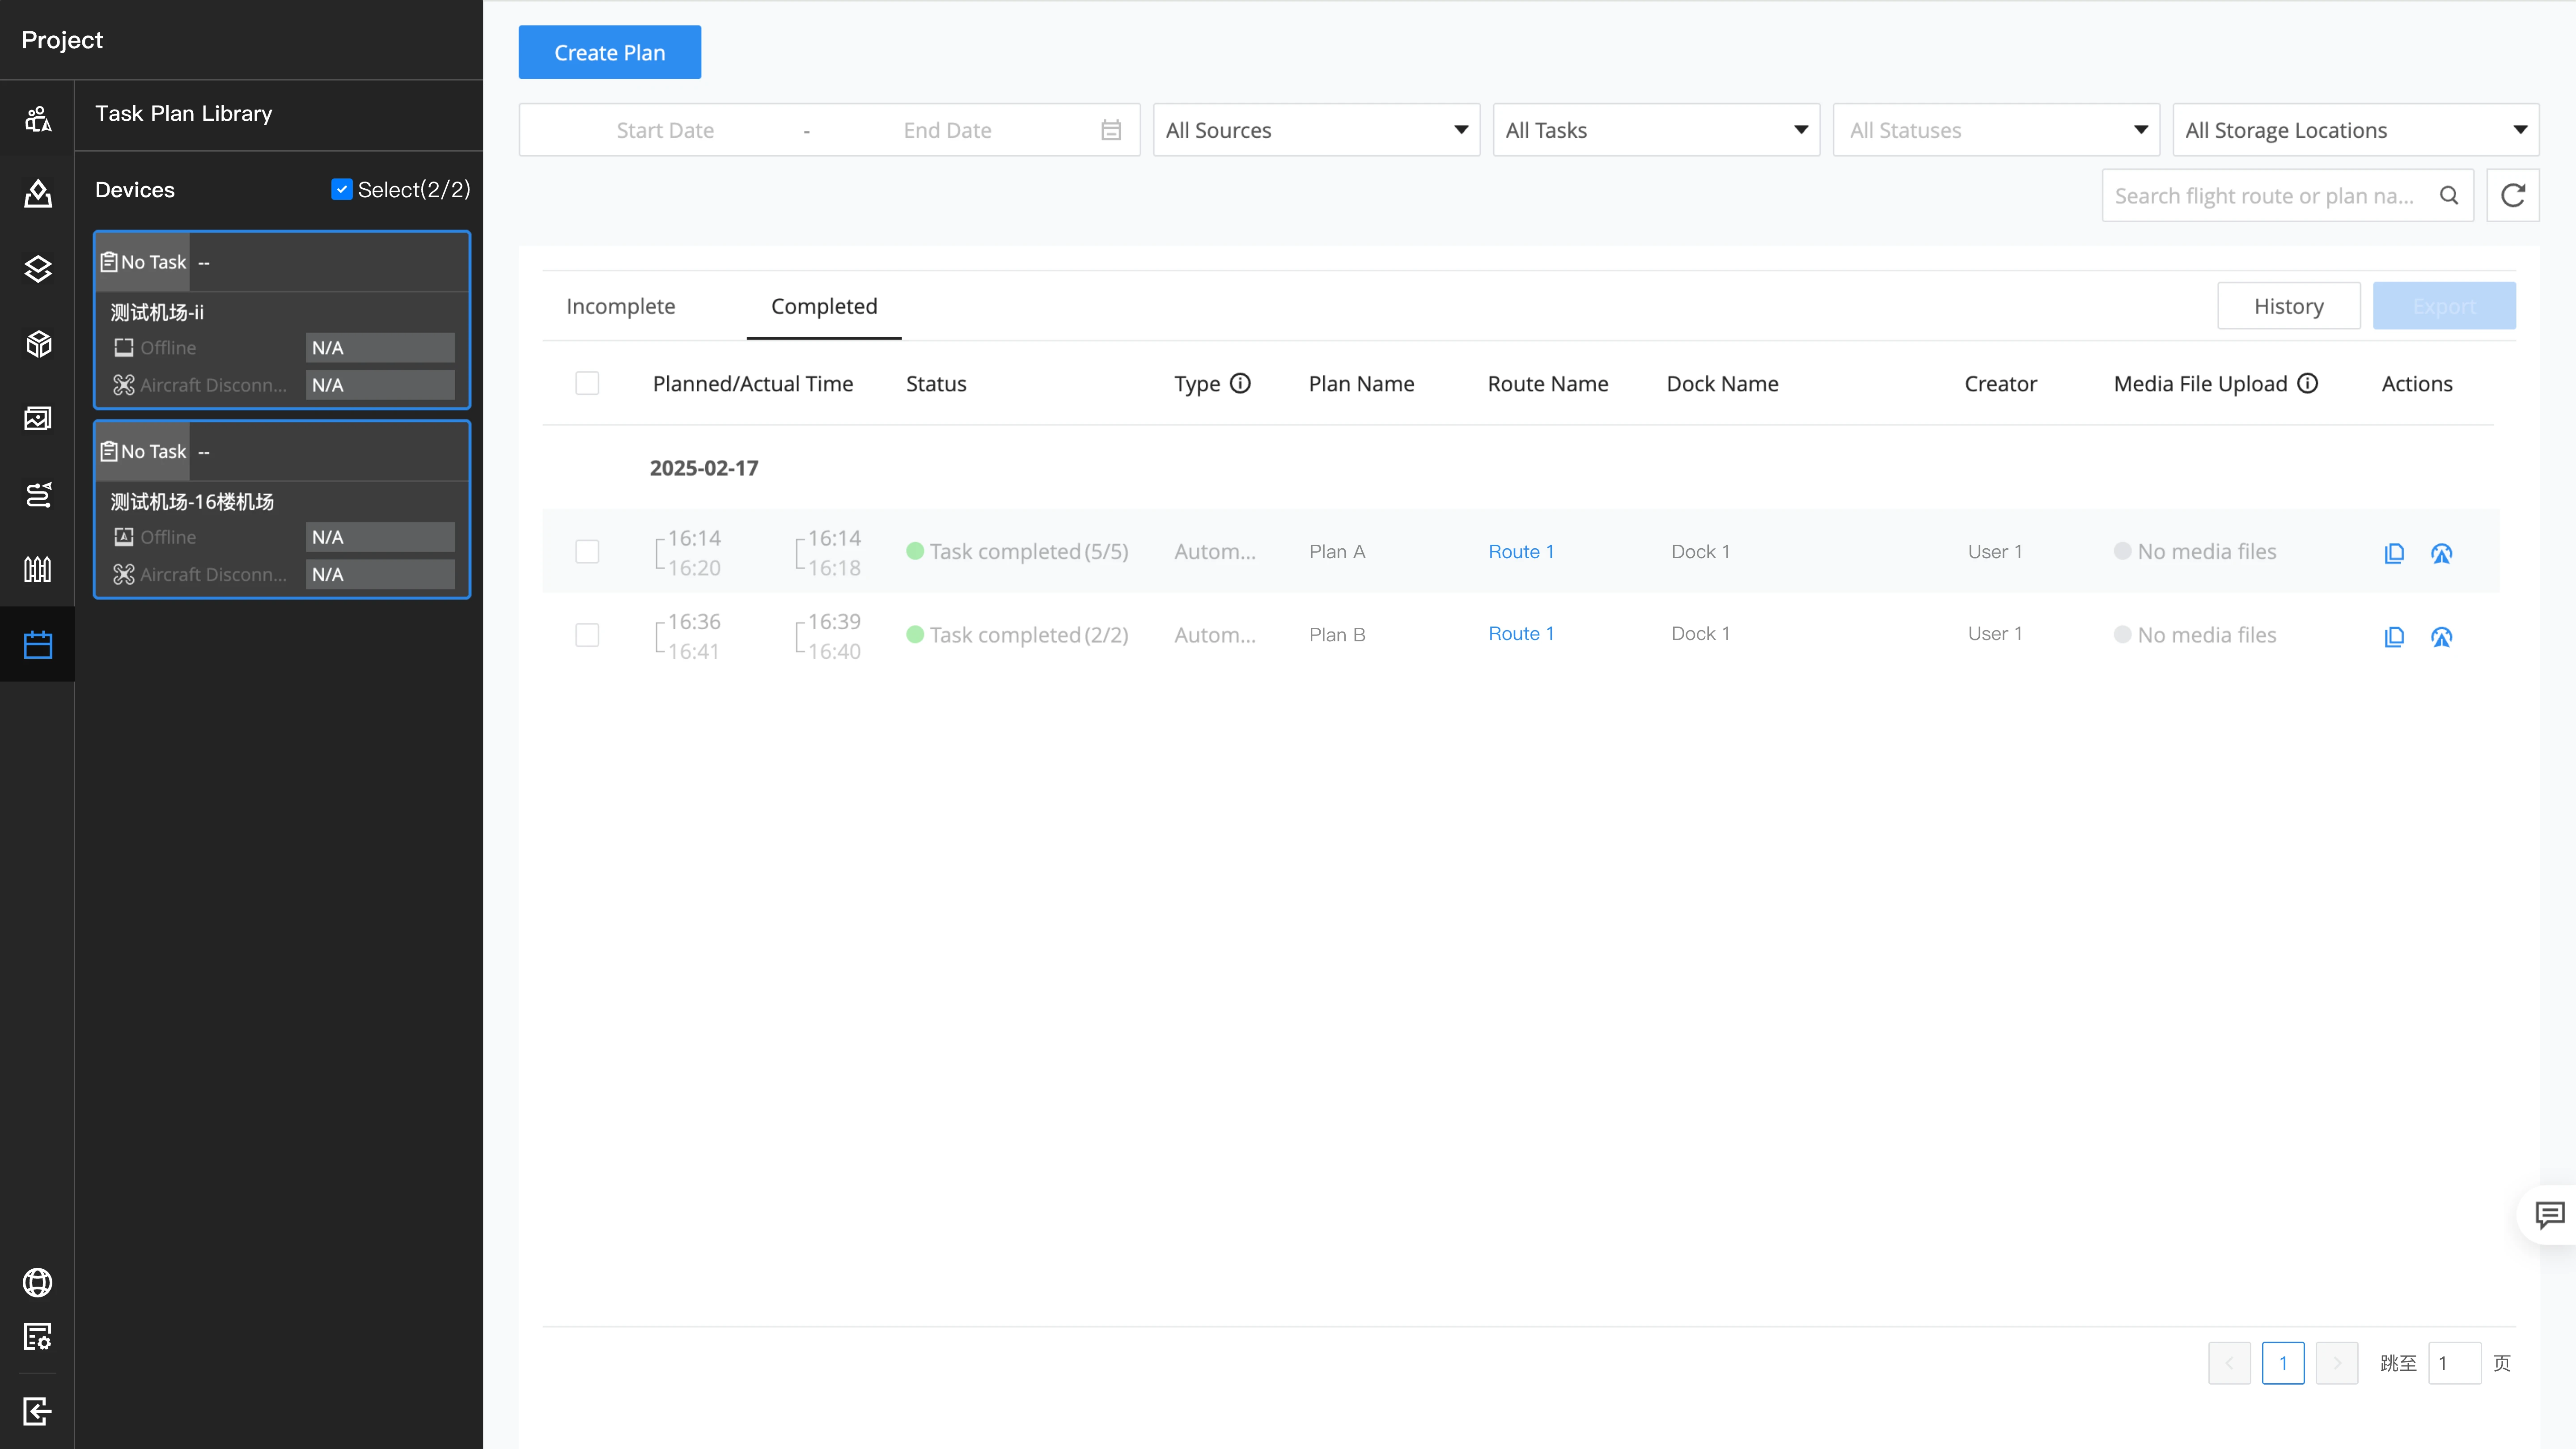
Note: Only Dock 3 and Dock 4 support viewing and exporting flight records. Other versions and devices only support viewing flight record summary information.
Error Codes
When the following error codes occur during continuous tasks, to prevent meaningless continuous retries and failures, the next continuous task will automatically be postponed and retried after 10 minutes.
| Error Code | Description |
|---|---|
219102 | Dock offline. Unable to perform task. Check if dock power supply and network connection are stable. |
219103 | Dock not found in project. Unable to perform task. |
316026 | Dock emergency stop button pressed down. Unable to perform task. Release button and try again. |
319001 | Unable to perform task. Dock is performing task or uploading issue logs. Wait until task is complete or logs uploaded and try again. |
319016 | Dock performing other task. Unable to perform current task. |
319018 | Unable to perform task. Dock uploading issue logs. Try again later. |
319019 | Unable to perform task. Dock obtaining issue logs. Try again later. |
321513 | Unable to perform task. Flight route altitude greater than aircraft max flight altitude. |
321514 | Failed to perform task. Flight route start or end point in buffer zone or exceeds distance limit. |
321515 | Unable to perform task. Aircraft will fly across GEO Zone. |
514120 | Dock and aircraft disconnected. Restart dock and try again or relink dock and aircraft. |
514134 | Heavy rainfall. Unable to perform task. Try again later. |
514135 | Unable to perform task. Wind speed too high. Try again later. |
514136 | Dock power supply error. Unable to perform task. Resume power supply and try again. |
514137 | Unable to perform task. Environment temperature lower than -20° C (-4° F). Try again later. |
514145 | Dock in local debugging mode. Unable to perform current operation or task. Disconnect dock from remote controller and try again. |
514146 | Dock in remote debugging mode. Unable to perform task. Exit debugging mode and try again. |
514147 | Unable to start remote debugging or perform task. Updating device firmware. Wait until update is complete. |
514148 | Task in progress. Dock unable to enter remote debugging mode or perform task again. Wait until current task is complete and try again. |
Notes on On-premises Version
The SMS and email services for AI routes rely on third-party cloud service capabilities. DJI FlightHub 2 on-premises version currently does not support SMS notifications.
Configuring the internal communication server or the alert server with a webhook URL is currently not supported either.
Rapid Mapping
The on-premises version of DJI FlightHub 2 supports enabling the rapid modeling function when issuing area-based route tasks. When enabled, the aircraft will continuously transmit thumbnails during route execution. Once the thumbnail transmission is complete, model reconstruction will be automatically triggered. This is suitable for emergency scenarios where quick access to low-precision models is required.
The Matrice 4 industry series also supports enabling this function on the Pilot 2 App, which can be activated during oblique modeling route planning or issuance.
Note: After the on-premises version of DJI FlightHub 2 is issued to the App, the plan will be executed immediately. Please ensure the safety of the surrounding environment before issuing the route task.
Distribute FlightHub Flight Route Planned Task to Pilot
The FlightHub on-premises version supports directly distributing flight tasks to DJI Matrice 4 enterprise series aircraft and starting the tasks immediately, improving end-cloud collaboration efficiency.
Note: After distributing from FlightHub on-premises version to the app, the planned task will start immediately. Make sure the surroundings are safe before distributing flight tasks.