
Triggered Workflow
Triggered Workflows are used to automatically or manually dispatch aircraft to a designated location to perform tasks after an alert is received. Suitable for incident and emergency response, routine inspection, and similar scenarios.
Note: The current version only supports issuing tasks to devices that are in a dock and idle. Supported operating devices include DJI Dock 2, DJI Dock 3, and DJI Dock 4.
Feature Entry
On the "Automated Workflow" page, click the "+ Create" button in the top-right corner of the task list and select "Auto-Dispatch Workflow".
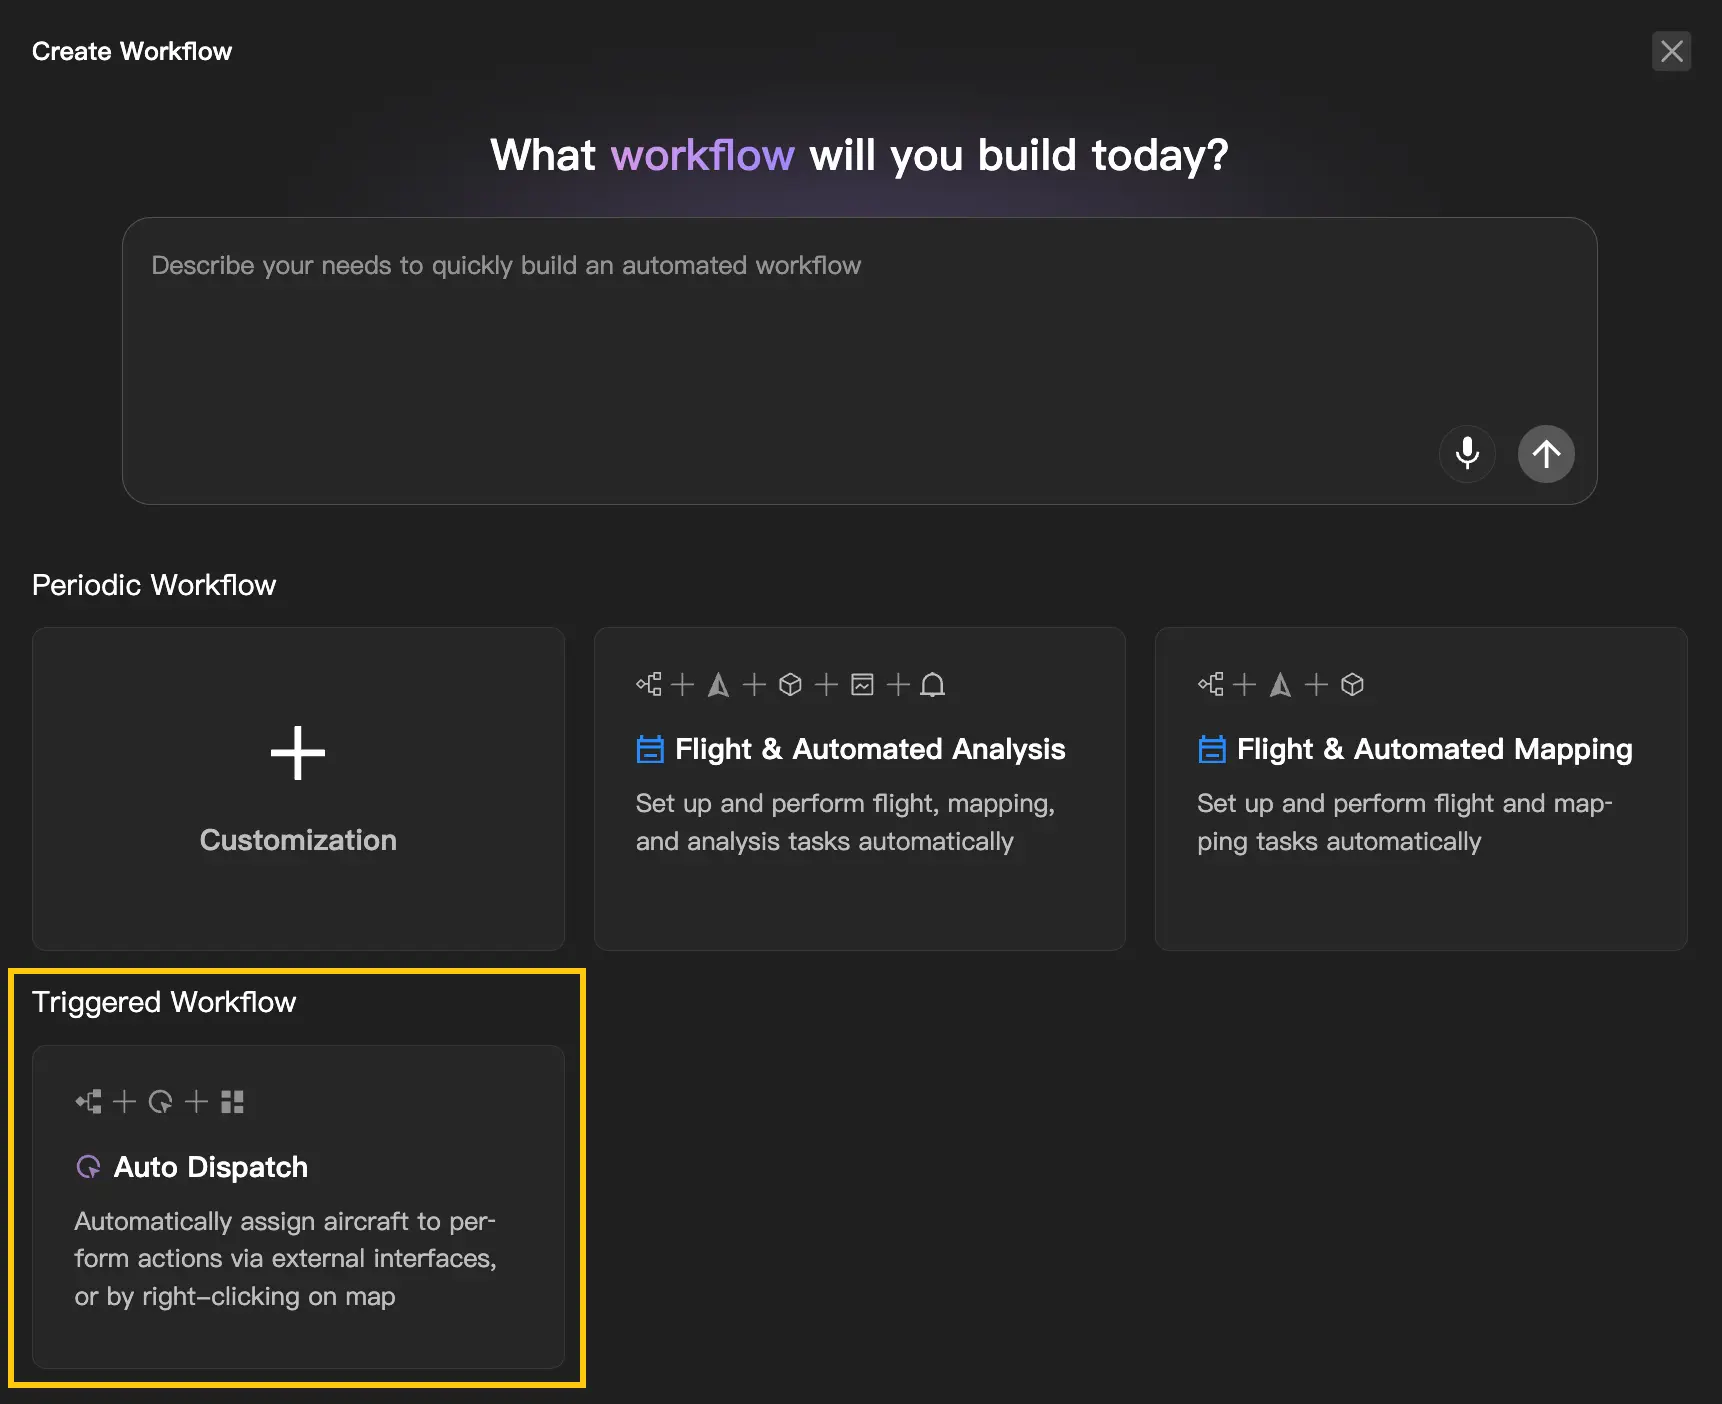
Note: Only "Project Administrators" or project members with the "Automated Workflow" permission can create this type of workflow.
A Triggered Workflow contains three nodes: "Task Trigger → FlyTo Task → Aircraft Action", connected in series by default. Note that the aircraft must remain connected to the dock throughout the entire task.

Task Trigger Configuration
The Task Trigger is used to automatically or manually trigger flight tasks. Click the "Task Trigger" card in the workflow to set the trigger conditions.
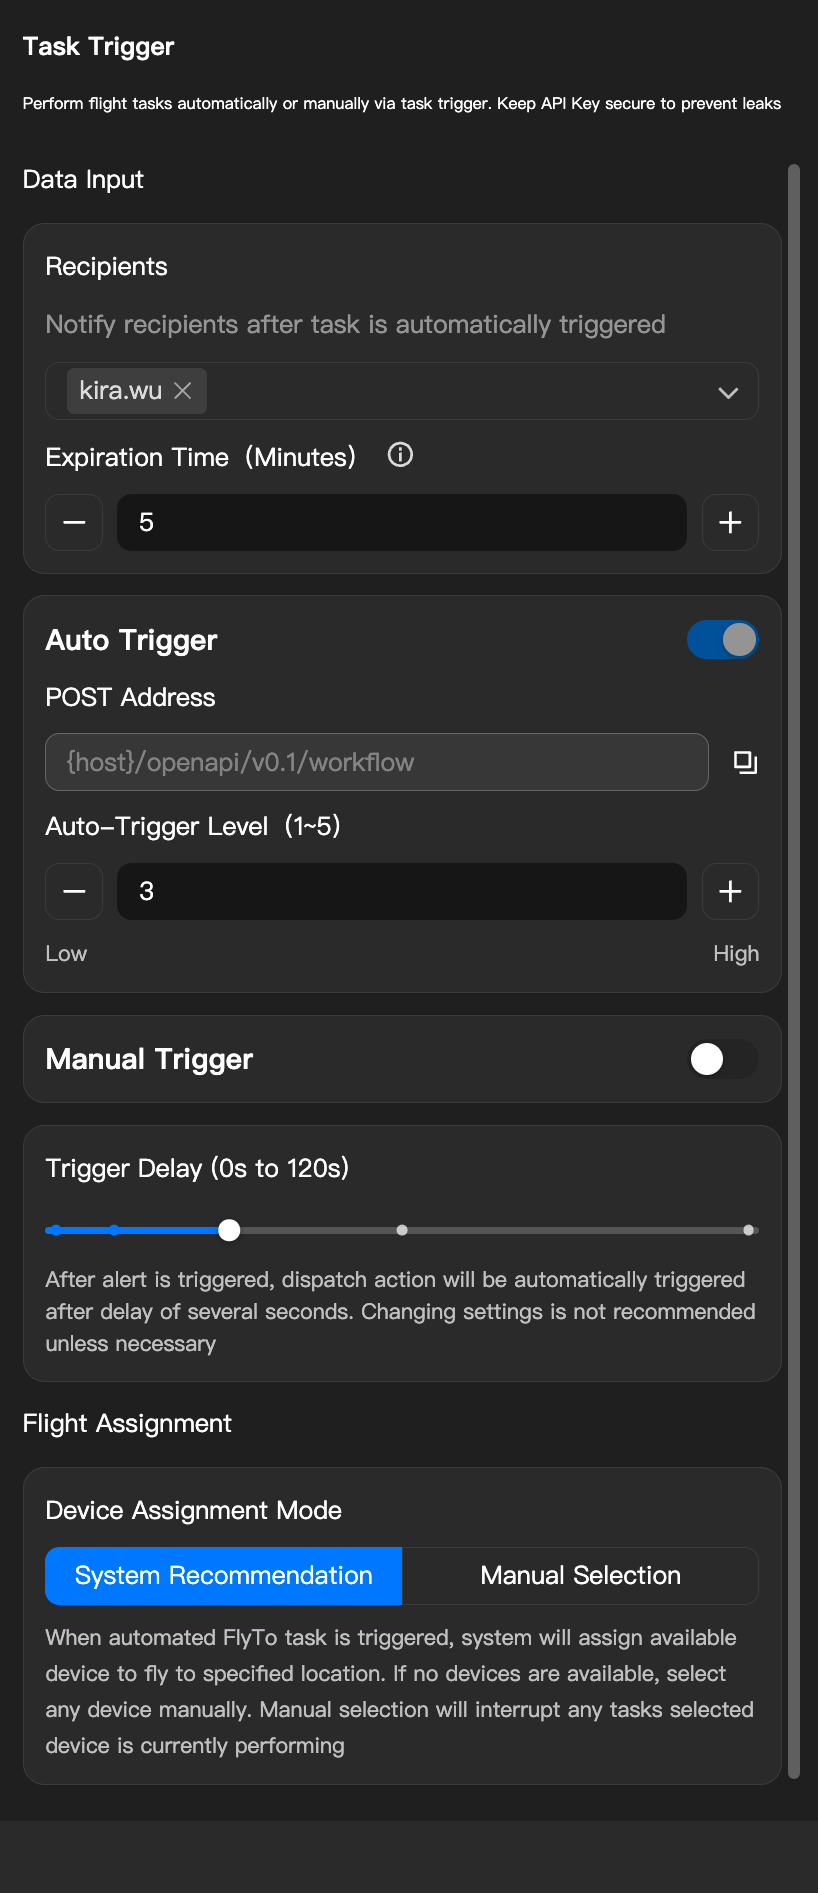
Note: Select at least one of auto trigger or manual trigger.
Recipients & Expiration Time
- Task Trigger Notification Recipients: Only project administrators can be selected.
- Event Expiration Time: 1–30 minutes. If no one responds before timeout, the event enters the Unresponded state and the execution of subsequent nodes is canceled.
Auto Trigger
When enabled, you can configure the auto-trigger settings.
- POST Address: The POST address used to receive information pushed from external systems.
- Public cloud users: The default addresses are — International Server:
https://es-flight-api-us.djigate.com; European Server:https://es-flight-api-eu.djigate.com - On-premise users: Enter the custom domain:
https://{host}:30812/openapi/v0.1/workflow.
- Public cloud users: The default addresses are — International Server:
- Auto Trigger Level: Set a response threshold from 1 to 5 (default level 3). Below the threshold, only a reminder is sent without auto-dispatch; above the threshold, auto-dispatch is triggered.
Instructions for Third-Party System Integration
Provide the following information to your system developers so they can send requests to the FlightHub system to automatically trigger the workflow:
// ========================= HTTP Request Headers =========================
//
// Content-Type: application/json
//
// [Authentication Key] Used to verify the validity of the request.
// Go to Organization Settings > FlightHub Sync to obtain and replace YOUR_SECRET_TOKEN.
// X-User-Token: YOUR_SECRET_TOKEN
//
// [Project ID] The unique identifier of the project for the current configuration. Use it directly.
// x-project-uuid: {界面中获取的值}
//
// ========================== HTTP Request Body ===========================
{
  // [System Parameter] The unique workflow identifier. This is a system-generated value. Use it directly. (String)
  "workflow_uuid": "{界面中获取的值}",

  // [Fixed Value] The trigger type. Always enter 0. (Integer)
  "trigger_type": 0,

  // [Service Parameter] The name of the alert task. (String)
  "name": "高压线塔异物-20231113180000",

  // [Core Parameter] The object containing the core business parameters of the alert. (Object)
  "params": {
    // [System Parameter] The task creator ID. This is a system-generated value. Use it directly. (String)
    "creator": "1988423428261173248",

    // [Service Parameter] The alert latitude. Coordinate system standard is WGS84. (Number)
    "latitude": 22.793234156,

    // [Service Parameter] The alert longitude. Coordinate system standard is WGS84. (Number)
    "longitude": 114.258620618,

    // [Core Business Parameter] The alert level, used to trigger auto-dispatch. (Integer, range 1-5)
    // When level >= the "Auto Trigger Level" you set, the aircraft will be dispatched automatically.
    "level": 5,

    // [Service Parameter] A detailed text description of the alert. (String)
    "desc": "35号高压线塔A相绝缘子串发现不明漂浮物,请立即核实。"
  }
}
Response Description
| Response Type | Status Code / Business Error Code | Meaning and Cause | Recommended Action |
|---|---|---|---|
| Successful | 200 OK | FlightHub has successfully received the alert information and started processing the subsequent flow based on the level value. | — |
| Failed | Other status codes | Indicates an issue with the request. See the rows below for common cases. | Troubleshoot using the status code and the business error code in the response body. |
| Request format or parameter error | 400 Bad Request | The request body (Body) JSON format is incorrect, required fields are missing, or field types do not match. | — |
| Workflow does not match project | code: 245008 in the response body | Workflow is not in project: The workflow_uuid in the request body does not match the project specified by the request header x-project-uuid. | Confirm that both workflow_uuid and x-project-uuid are obtained from the current configuration page, without mixing in configurations from other projects. |
| Authentication failed | 401 Unauthorized / 403 Forbidden | The X-User-Token in the request headers (Headers) is incorrect, missing, or expired, or x-project-uuid does not match. | Check the header configuration and confirm that X-User-Token was obtained correctly from Organization Settings > FlightHub Sync. |
| Server internal error | 500 Internal Server Error | The FlightHub system encountered an unexpected problem while processing the request. | Try again later. If the problem persists, contact technical support. |
Manual Trigger
When enabled, the trigger entry is shown in the map right-click menu. You can customize the menu name.
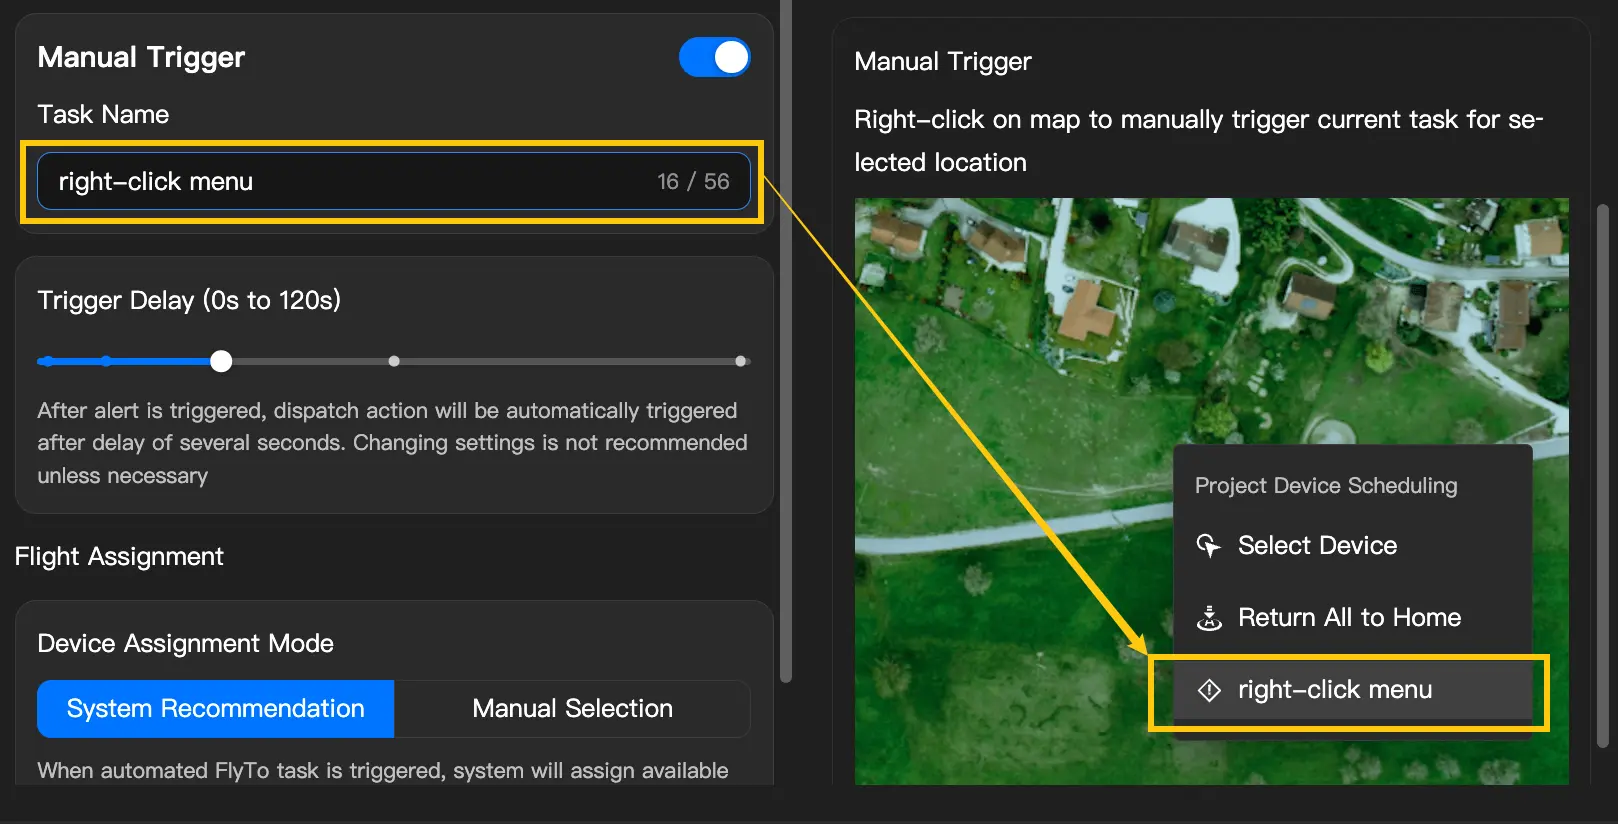
- Trigger Delay: Set the delay before issuing the dispatch command after the alert is triggered. Selectable values: 0s / 10s / 30s / 60s / 120s (upper limit 120s, lower limit 0s), used to configure 0-second immediate dispatch or to reserve time for manual confirmation. Do not change unless necessary. Once an alert is triggered, the auto-dispatch will be issued after a few seconds of delay.
Device Assignment Mode
- System Recommendation: When an automatic FlyTo Task is triggered, the system automatically dispatches the currently idle device to fly to the designated location. If no idle device is available, you can manually assign any device; manual assignment interrupts the task the device is currently performing.
- Manual Selection: Assign a fixed device to perform all triggered tasks, or set it so that the operating device must be manually selected each time.
FlyTo Task Configuration
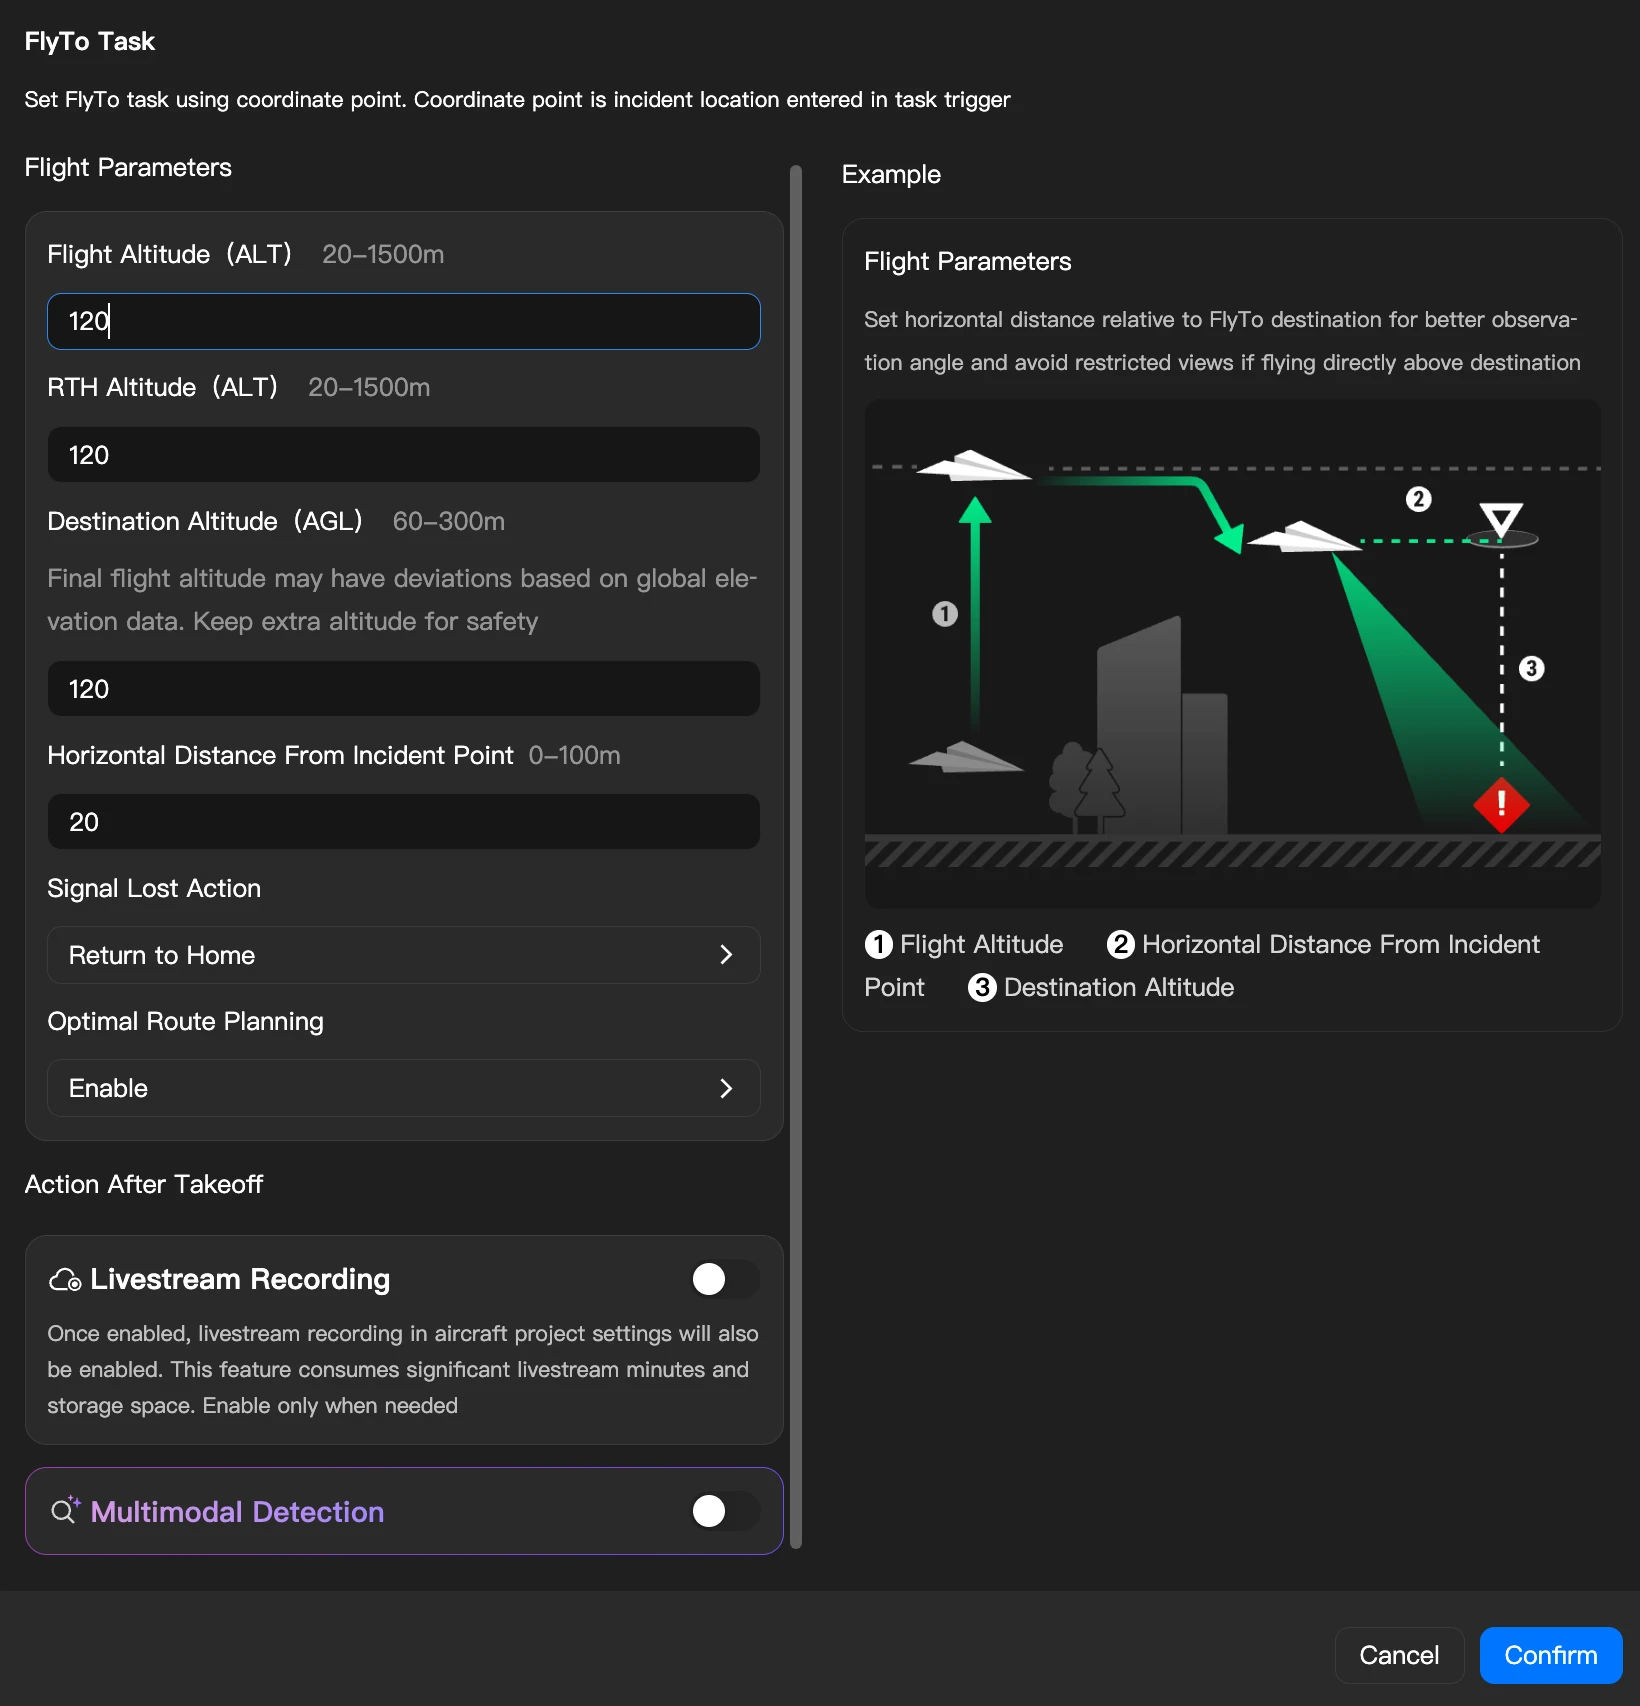
Used to set how the aircraft flies toward the destination. Click the "FlyTo Task" card in the workflow to set the FlyTo Task parameters.
Common Parameters
The FlyTo Task parameters are consistent with the cockpit settings:
| Parameter | Description |
|---|---|
| Flight Altitude | The altitude at which the aircraft flies to the destination. |
| RTH Altitude | The altitude at which the aircraft returns to home. |
| Destination Altitude | The altitude of the aircraft's destination. By default, it will be directly above the alert point. Note: The destination altitude is the ALT altitude relative to the dock; set it appropriately to avoid the aircraft's final altitude being too high or too low. |
| Horizontal Distance From Alert Point | If you need to orbit the alert point, or retreat a certain distance for easier observation, you can set the horizontal distance from the alert point. |
| Signal Lost Action | The action taken when the aircraft loses connection during flight. RTH is recommended. |
| Optimal Route Planning | Whether to plan the optimal flight route in real time based on terrain and other information during flight. Enabling by default is recommended. |
Live-Stream Recording
When live-stream recording is enabled, the corresponding live-stream recording function in the aircraft's project settings will be enabled simultaneously, ensuring data retention throughout the task. This function consumes significant live-stream duration and storage space. Enable it as needed. After the task ends, if live-stream recording was already enabled before the flight, the system will not turn it off automatically; if the live-stream recording was enabled by this incident-response task, the system will automatically disable live-stream recording for the corresponding project once the task ends.
Multimodal Recognition
When enabled, the multimodal recognition function can be activated while FlyTo flies toward the destination. After turning on the switch, you can enter a specific multimodal recognition prompt; the interaction follows the existing multimodal recognition input field.
Aircraft Action Configuration
Actions performed automatically after arriving at the destination. Click the "Aircraft Action" card in the workflow to set aircraft actions. Actions can be dragged to reorder, and the aircraft returns to home after execution (no new actions are issued during return).
Note: Issuing aircraft actions requires the drone to remain connected to the dock throughout. If the video transmission signal is lost, the drone will hover and wait.
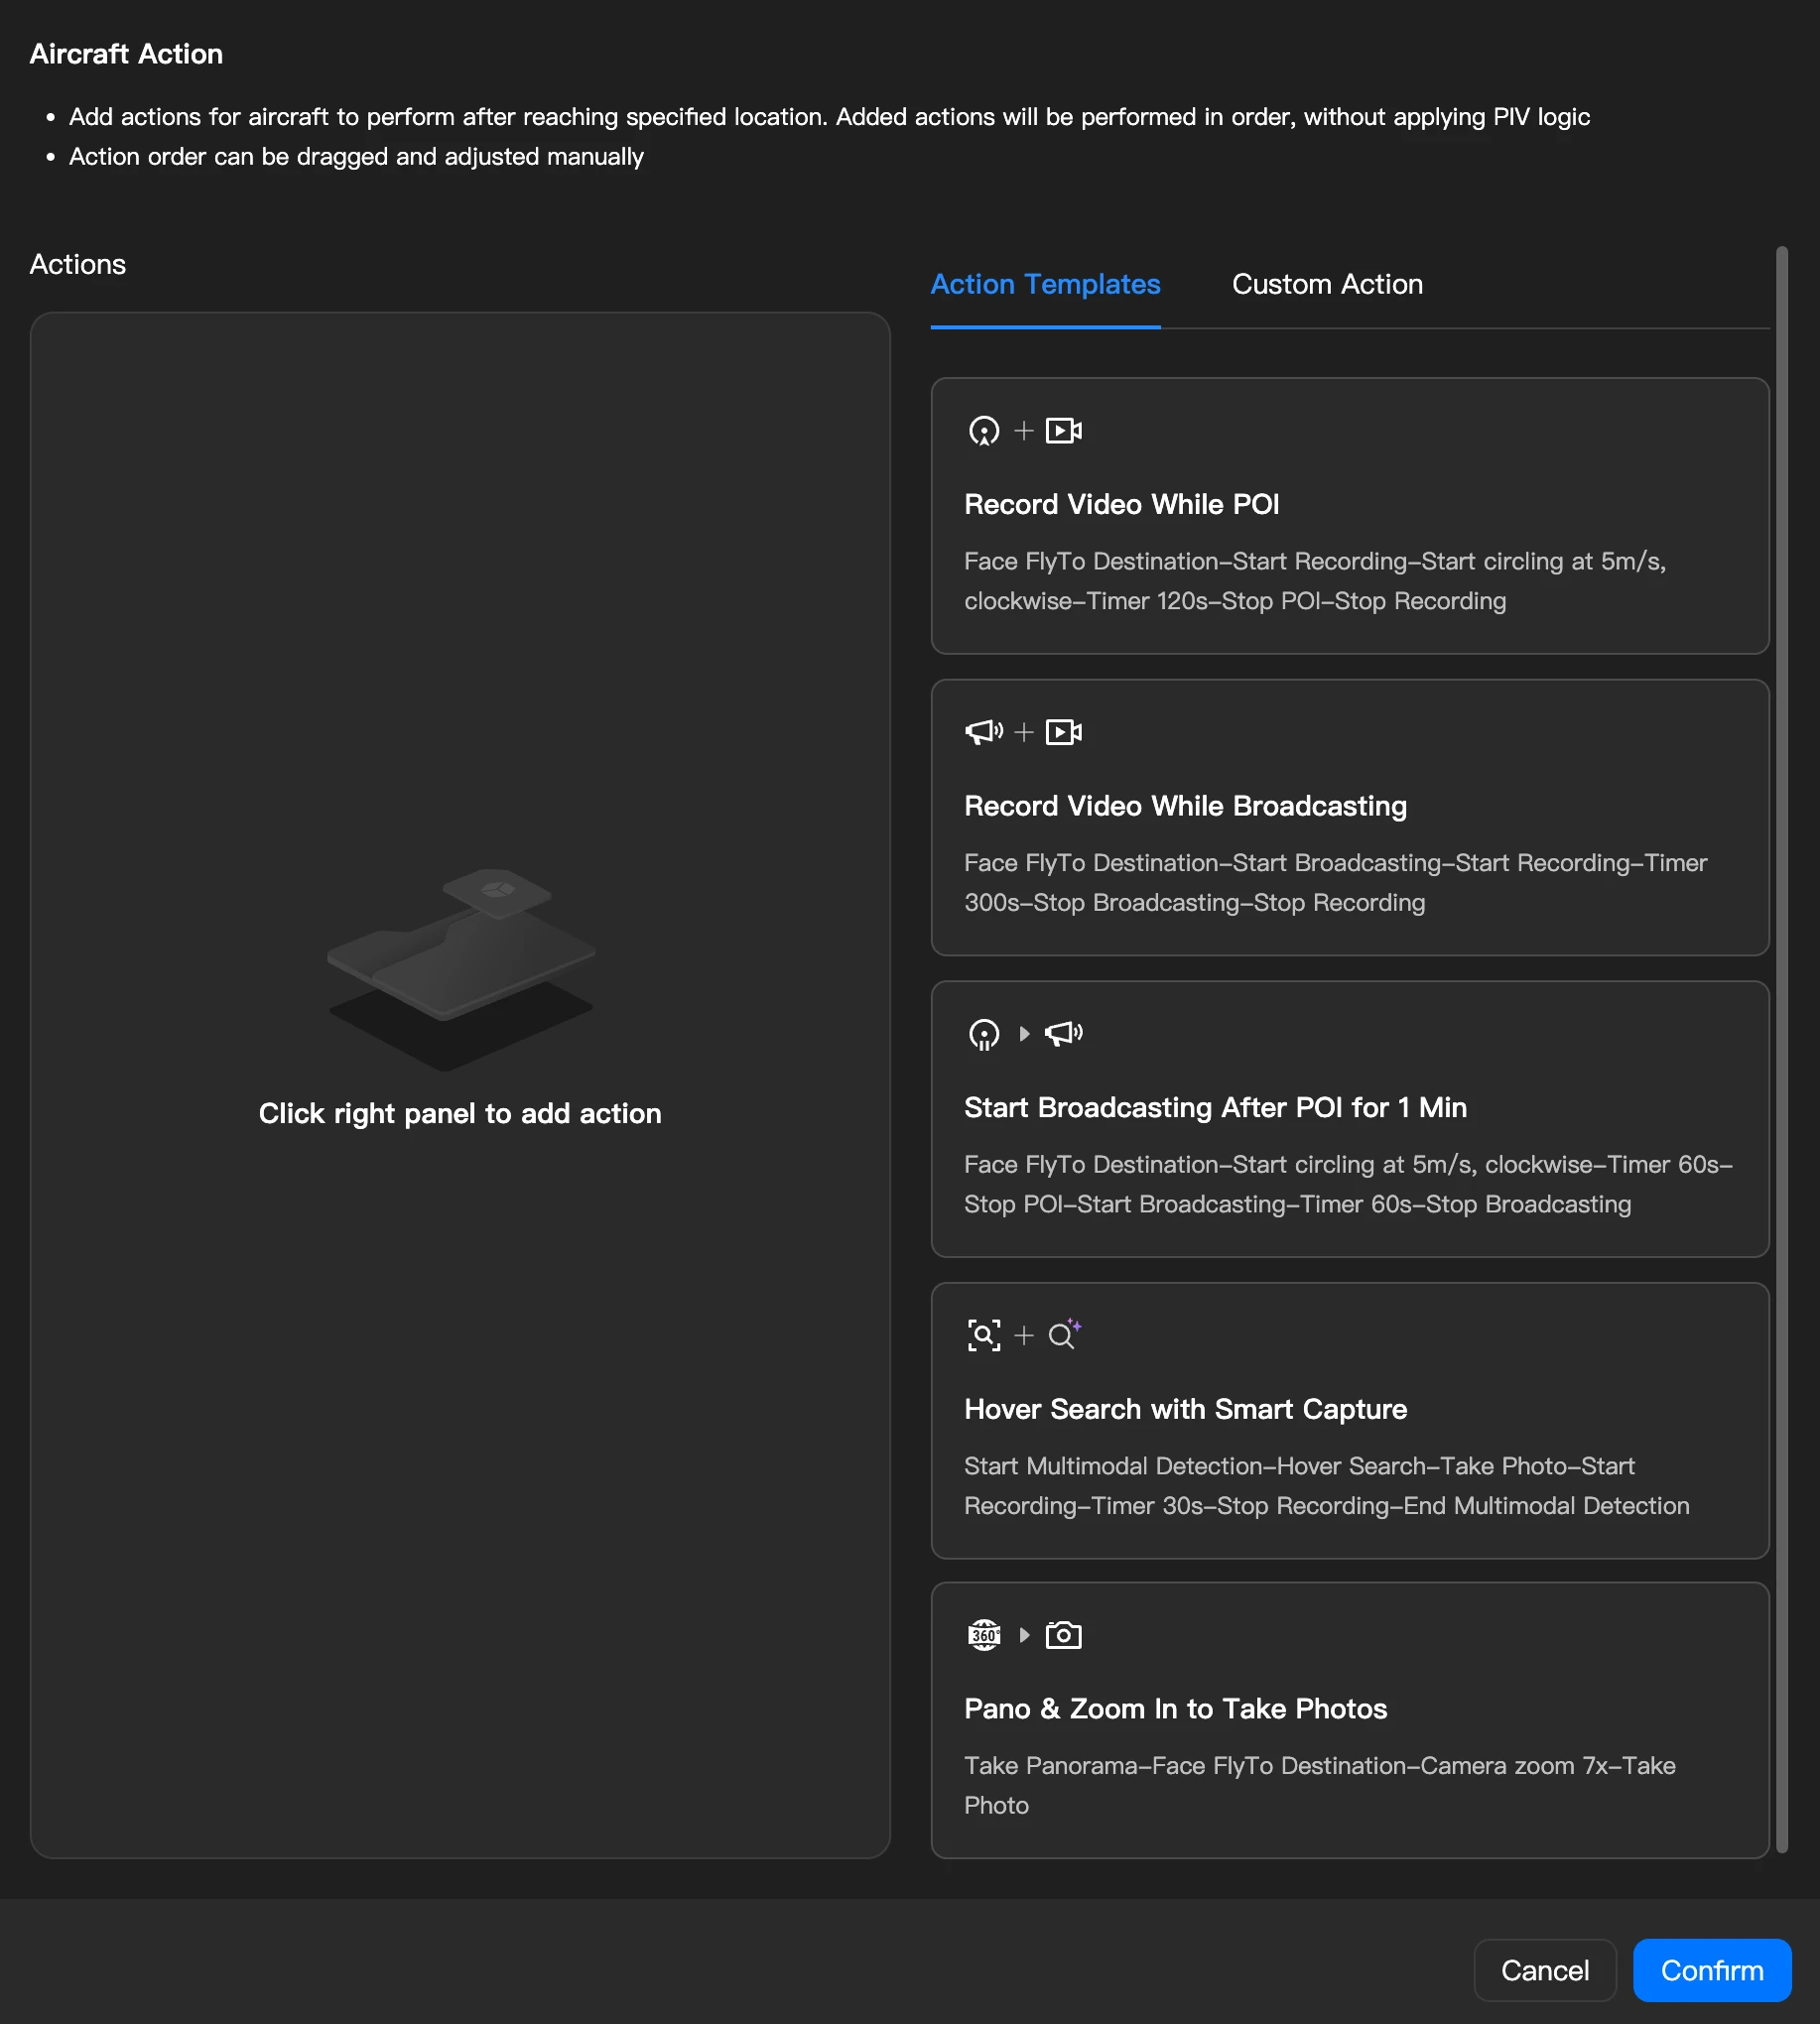
Action Templates
| Default Action Template (Example) | Description |
|---|---|
| Record while orbiting | Face destination → start recording → start orbit (clockwise, 5 m/s) → timer 300 s → stop orbit → stop recording |
| Record while broadcasting | Face destination → start broadcasting → start recording → timer 300 s → stop broadcasting → stop recording |
| Start broadcasting after orbiting for one minute | Face destination → start orbit (clockwise, 5 m/s) → timer 60 s → stop orbit → start broadcasting → timer 60 s → stop broadcasting |
| Search in place with simultaneous intelligent recognition | Start multimodal recognition → search in place → take photo → start recording → timer 30 s → stop recording → stop multimodal recognition |
| Take panorama and zoom-in photo | Take panorama → face destination → 7x zoom → take photo |
Supported Actions and Parameters
| Supported Action | Parameter Description |
|---|---|
| Face Destination | No parameter |
| Gimbal Tilt Angle | -90° ~ 35°, default -90° |
| Zoom | 1x ~ 112x, default 1x |
| Take Photo | No parameter |
| Start/Stop Recording | No parameter |
| Hover | Combined with the timer for duration control, 1 ~ 1800 s |
| Start/Stop Broadcasting | The specific broadcast file content can be set |
| Panorama | No parameter |
| Start/Stop Orbit | Direction, speed 0.1 ~ 14.0 m/s |
| Timer | 1 ~ 1800 s. The device continues performing the previous action during the timer and does not proceed to the next action until the timer ends. For example, "start orbit → timer 120 s → stop orbit" means the aircraft will keep orbiting for 120 s before stopping. |
| Camera Switching | Switch between wide-angle / zoom / infrared lenses during the task flow. For aircraft that do not support infrared, the action to switch to the infrared lens will be skipped after being issued. |
| Multimodal Recognition | Perform a specific multimodal recognition task after arriving at the location |
| Search in Place | The aircraft spins in place three times while the gimbal swings at low, medium, and high angles respectively. It is recommended to use it together with the multimodal recognition action for coverage-style target search; after finding a target, the gimbal automatically aims at the first detected target. |
| RTH | No parameter |
- Device compatibility note: When DJI Dock 2 is selected as the operating device, if unsupported actions (such as Start POI / Stop POI) are configured, a prompt "This action is only supported by DJI Dock 3. Issuing it to other models will cause abnormal action execution" will appear after adding the action; if the workflow contains actions not supported by DJI Dock 2, they will be skipped during execution.
Auto-Dispatch Log
After the first auto-dispatch task is triggered, you can enter by clicking "View Details" of "Triggered Workflow" in the data statistics section on the automated workflow home page.
The dispatch log supports filtering by "Alert Level", "Trigger Method", and "Task Status".

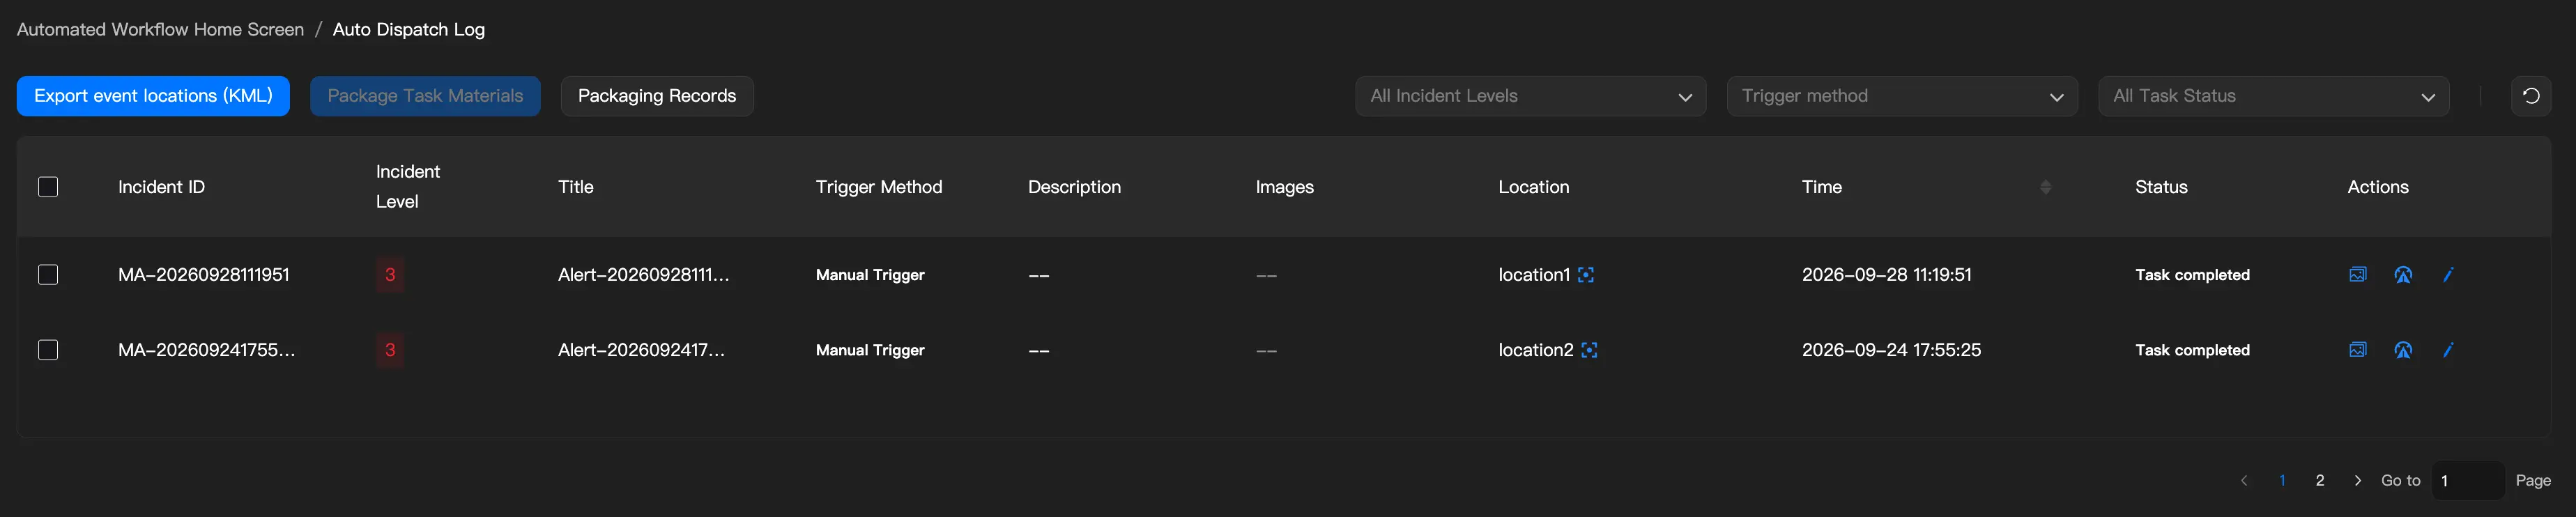
List Fields
- Incident ID
- Alert Level: filterable
- Title
- Trigger Method: filterable
- Description
- Image
- Location
- Time
- Status: filterable
- Dispatch Successful: all three nodes completed, and the aircraft action at least partially performed
- Dispatch Interrupted: trigger succeeded but the FlyTo Task failed
- Dispatch Failed: trigger execution failed
- False Alarm Indicator: an icon is displayed in the status column for events manually marked as false alarms; hovering shows "Manually confirmed as false alarm"
- Operation
- Related Records: supports jumping to view the flight records and media files of this FlyTo Task
One-Click KML Export
Supports exporting the alert points of all triggered events within the project as a KML file to the "Auto-Dispatch Locations" folder on the project annotation page.
Task Materials Packaging
In the Auto-Dispatch Log list, you can select multiple completed dispatch records and generate a task materials package (ZIP format) with one click. The task materials package contains basic information, media files, and flight records for the incident response. It can be downloaded locally or shared with third parties via a link / QR code.
Start Packaging

- In the Auto-Dispatch Log list, use the checkbox at the beginning of each row to select dispatch records to package. The checkbox in the header selects / deselects all records. You can first filter by alert level, trigger method, task status, and other criteria, then select multiple records.
- After selecting records, click the "Task Materials Packaging" button in the top-right corner of the list.
- The system displays a confirmation dialog showing the total number of selected records, the number that can be packaged, and records that cannot currently be packaged, along with the reasons (these records will be skipped without affecting the packaging of other records).
- After confirmation, the system starts asynchronous packaging and automatically opens the Packaging Records panel so you can view progress.
Reasons records cannot be packaged include:
| Reason | Description |
|---|---|
| Task in Progress | The flight task for this dispatch record has not yet ended |
| Media Files Uploading | Media files captured by the aircraft are still being uploaded |
| Flight Records Not Ready | Flight record data has not yet been fully generated |
Note: A maximum of 5 dispatch records can be packaged at a time.
Packaging Records
Click the "Packaging Records" button in the top-right corner of the list to open the Packaging Records panel and view the status and available operations for all packaging tasks.
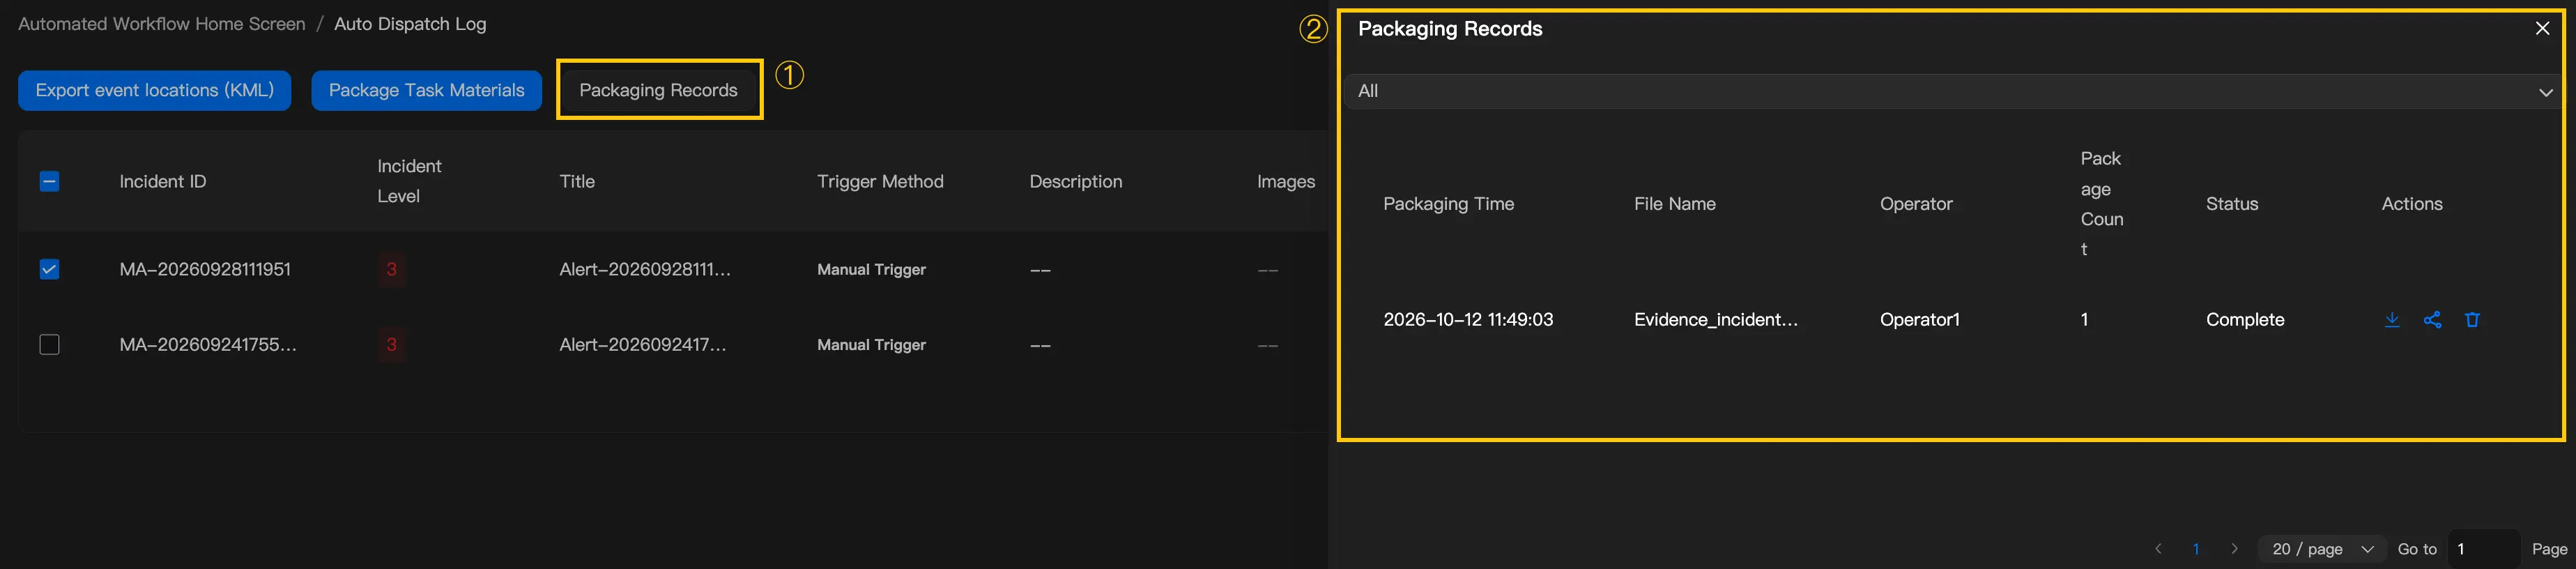
Record Fields
| Field | Description |
|---|---|
| Packaging Time | The time packaging was initiated |
| File Name | The ZIP file name of the task materials package |
| Operator | The user who initiated packaging |
| Number of Packaged Records | The number of dispatch records included in this packaging task |
| Status | Queued / Packaging (with a progress bar) / Completed / Failed / Expired |
Status Descriptions
| Status | Description | Available Operations |
|---|---|---|
| Queued | Waiting in the queue for processing | Delete |
| Packaging | The task materials package is being generated, with progress shown as a percentage | — |
| Completed | The task materials package is ready | Download, Share, Delete |
| Failed | An error occurred during packaging | Repackage, Delete |
| Expired | The task materials package has expired and its files have been removed | Repackage, Delete |
Note: A task materials package is valid for 7 days and must be repackaged after it expires.
Supported Operations
- Download: Click the download button and select a local save path to download the task materials package.
- Share: Click the share button to display a sharing card containing a QR code and download link. Anyone who receives the link or scans the QR code can download directly without logging in. After repackaging, the previous sharing link becomes invalid.
- Repackage: For failed or expired records, click Repackage to have the system regenerate the task materials package.
- Delete: Delete the packaging record and its download link. Deletion cannot be undone.
Task Materials Package Contents
The generated task materials package is a ZIP archive with the following internal structure:
| Folder | Contents |
|---|---|
| Basic_Info/ | basic_info.json: Structured basic information for the incident response, including the alert title, alert level, trigger method, alert time, alert location, operating device information, task execution results, media file statistics, and more |
| Media/ | Media files generated during this flight task, including photos, videos, panoramic photos, AI alert screenshots, and more |
| Flight_Log/ | Flight record CSV files |
Note: If individual media files or flight records cannot be retrieved, the system skips those files and continues packaging, and records their retrieval status in the basic information.
Packaging Notifications
- When packaging is Completed, the system notifies the operator who initiated packaging via in-app message and email.
- When packaging has Failed, the system notifies the operator via in-app message. The operator can repackage from Packaging Records.
- Clicking "View Details" in the in-app message automatically opens the Packaging Records panel.
Message Center
Global Prompt for Auto-Dispatch
When a user manually triggers, or automatically triggers via API, the auto-dispatch workflow, dispatch notifications can be configured.
- Display: alert title/description/level, coordinates (recenterable), estimated flight distance and duration, operating device (changeable).
- Available operations:
- Cancel Dispatch: terminate the task.
- Immediate Dispatch: the aircraft is automatically dispatched after the countdown ends; clicking manually dispatches immediately and opens the cockpit to view.
Cockpit Status Sync and Mission Stop
- Status Sync: If the user is already on the cockpit page of the corresponding alert aircraft, no redirection is needed when an incident is triggered—the incident task status is displayed synchronously in the current view. If the user is not in the corresponding aircraft's cockpit (whether in another aircraft's cockpit or a non-cockpit page), a new page will continue to be opened.
- Direct Trigger from Map: The cockpit map supports right-clicking to directly trigger the auto-dispatch workflow. If the currently selected aircraft is the one being used, no new tab is opened.
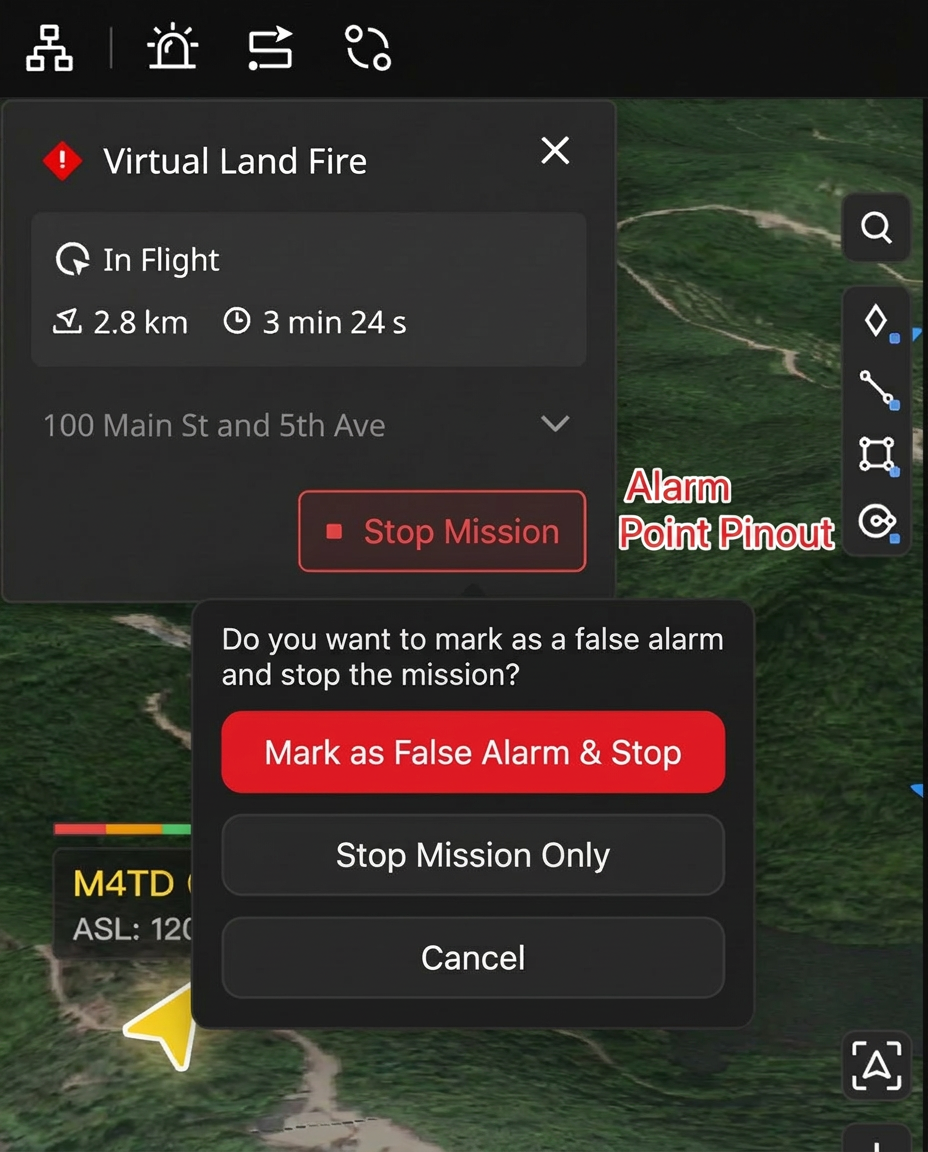
- Mission Stop and False Alarm Marking: In the cockpit mission panel, after clicking the red "Stop Mission" button, the system displays a confirmation dialog asking "Mark as false alarm and stop the mission?", providing the following options:
- Mark as False Alarm & Stop: interrupts the current mission and makes the aircraft hover, while marking the task as a "False Alarm" (viewable in the dispatch log). This action synchronizes information containing the false alarm flag via EventAPI.
- Stop Mission Only: only interrupts the mission and makes the aircraft hover, without marking a false alarm. This action synchronizes only task status information via EventAPI.
- Cancel: closes the dialog, and the task continues execution.
One-Tap Snapshot
During an auto-dispatch task, you can capture the current cockpit view with one tap and push it to third-party systems. Upon receiving it, third-party systems can directly create an incident work order without manual screenshots or descriptions.
- Entry: The "Capture Snapshot" button appears in the cockpit alert window only while an auto-dispatch task is in progress.
- Operation: Click "Capture Snapshot" without switching pages or manually entering a description.
- Prompt: After capture succeeds, "Capture successful. Snapshot pushed as an EventAPI event" is displayed.
- Snapshot Image Style: The same as existing AI alert snapshots.
- Notification Content: The snapshot image, target coordinates, target type, capture time, and the alert's incident ID, workflow UUID, operating device SN, and operator.
- Subscription: Subscribe to "Automatic Dispatch Workflow Stage Event Notification" under "FlightHub Sync - EventAPI Event Notifications". Snapshots are pushed as
snapshotevents. For details, see EventAPI.
EventAPI Message Subscription
During the execution of the auto-dispatch workflow, you can subscribe to event messages via EventAPI to achieve status synchronization with third-party systems.
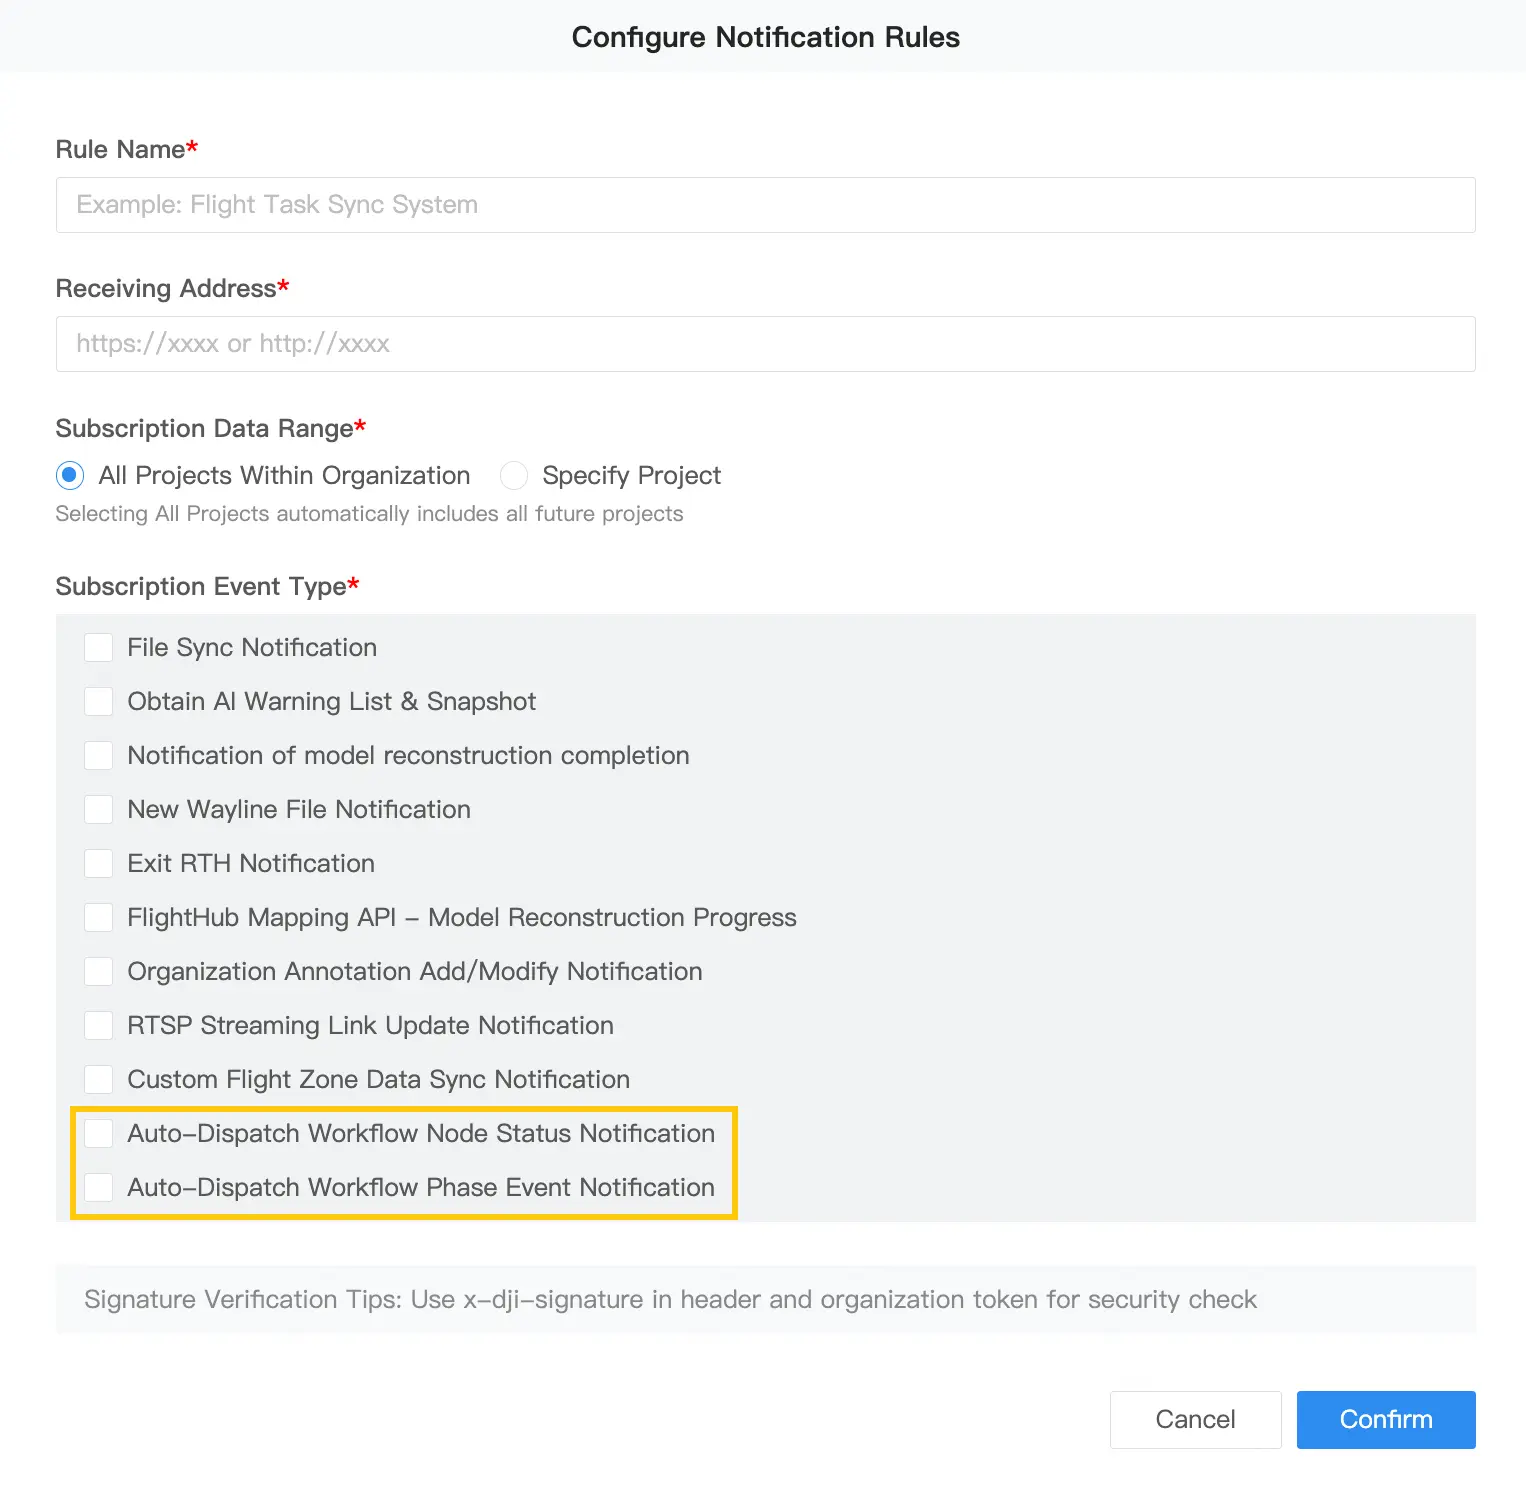
When creating or editing a notification rule under "FlightHub Sync - EventAPI Event Notifications", you can subscribe to the following two types of auto-dispatch workflow events. The two types are independent and can be subscribed to simultaneously:
| Subscription | Use Case | Description |
|---|---|---|
| Automatic Dispatch Workflow Node Status Notification | Synchronize the execution status of each workflow node. | Previously "Automatic Dispatch Workflow Notification". Only the name has changed; the notification payload is unchanged, and existing subscriptions are unaffected. |
| Automatic Dispatch Workflow Stage Event Notification | Synchronize stage progress and on-site snapshots throughout the incident-response lifecycle. | — |
Node Status Notification
The returned fields include:
- Alert ID.
- Workflow UUID.
- Operating Device SN.
- Camera SN and Index.
- Overall execution progress enumeration.
- Media file path (returned only after the overall workflow status reaches a terminal state; recommended to use together with FlightHub Sync).
- False Alarm Flag (returned when the user clicks the "Stop Mission" button in the cockpit mission panel and confirms marking as a false alarm).
Stage Event Notification
Events are pushed stage by stage throughout the incident-response process. Each event includes the event time, task ID, operating device SN, and operator. Third-party systems (such as CAD, VMS, and middleware) can consume events directly by stage without parsing node statuses themselves.
| Event Type | Description |
|---|---|
stage_change | Lifecycle stage change. |
snapshot | One-Tap Snapshot report from the cockpit; does not affect the stage status. |
Lifecycle Stages
| Stage | Description | Terminal State |
|---|---|---|
dispatch_clicked | Dispatch clicked | No |
dispatch_cancelled | Dispatch canceled | Yes |
taking_off | Taking off | No |
flying_to_scene | Flying to the scene | No |
on_scene | Arrived at the scene | No |
returning | Returning to home | No |
mission_ended | Mission ended | Yes |
media_uploaded | Media file upload completed | No |
For more event types, field definitions, status enumerations, and full integration instructions, please refer to EventAPI for details.