
Virtual Cockpit
Feature Overview
The Virtual Cockpit is an all-in-one operation interface in FlightHub 2 for remotely controlling drones. It integrates maps, live video feeds, flight dashboards, and control panels on a single page, and supports multimodal large model capabilities, allowing you to complete the full workflow of takeoff, flight control, shooting, and return-to-home without switching between different interfaces.
How to Enter
Once inside, you can remotely control the aircraft, issue commands, or execute tasks. When the aircraft is powered on, entering the Virtual Cockpit will by default activate the flight and gimbal camera live feed, and obtain flight control authority.
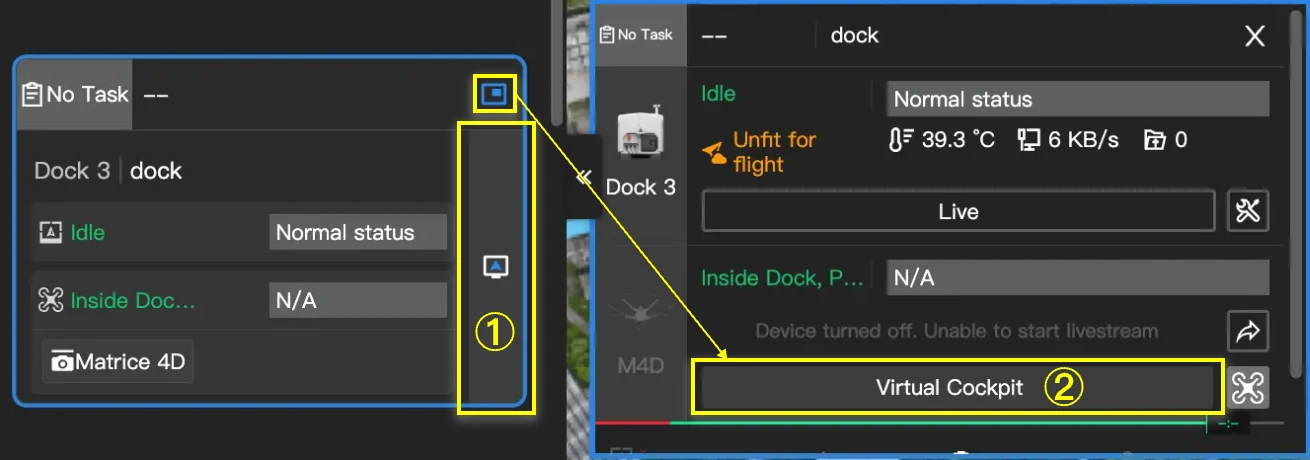
- ① From the "Team Page → Dock/Ground Station" page, click the "Enter Virtual Cockpit" button to enter the Virtual Cockpit.
- ② From the "Device Mini-Window" page, click the "Virtual Cockpit" button to enter the Virtual Cockpit.
Supported Devices
Devices supported by the Virtual Cockpit include "DJI Dock", "DJI Dock 2", "DJI Dock 3", "DJI Dock 4", and accessories "DJI AS1 Speaker", "DJI AS2D Speaker", "DJI AL1 Spotlight", and "DJI AL2D SpotLight"; DJI Mavic 3 Enterprise Series, DJI Matrice 4 Enterprise Series, and Matrice 400 drones.
- When using "DJI Dock", dock firmware v01.03.0902 or above and aircraft firmware v06.02.0803 or above are required.
- When using the DJI Mavic 3 Enterprise Series, aircraft firmware v10.01.00.14 or above is required to remotely control the gimbal camera feed.
- When using the DJI Matrice 4 Enterprise Series (including Matrice 4D Series drones connected via remote controller), aircraft firmware v12.0.0 or above is required to remotely control commanded flight and gimbal camera feed.
- When using the Matrice 400 drone, aircraft firmware v14.1.0 or above is required to remotely control commanded flight, gimbal camera feed, and PSDK accessories.
Window Layout and Modules
The Virtual Cockpit interface opens in a new browser window. Before using it for the first time, make sure you are logged in to your FlightHub 2 account and have completed device binding.
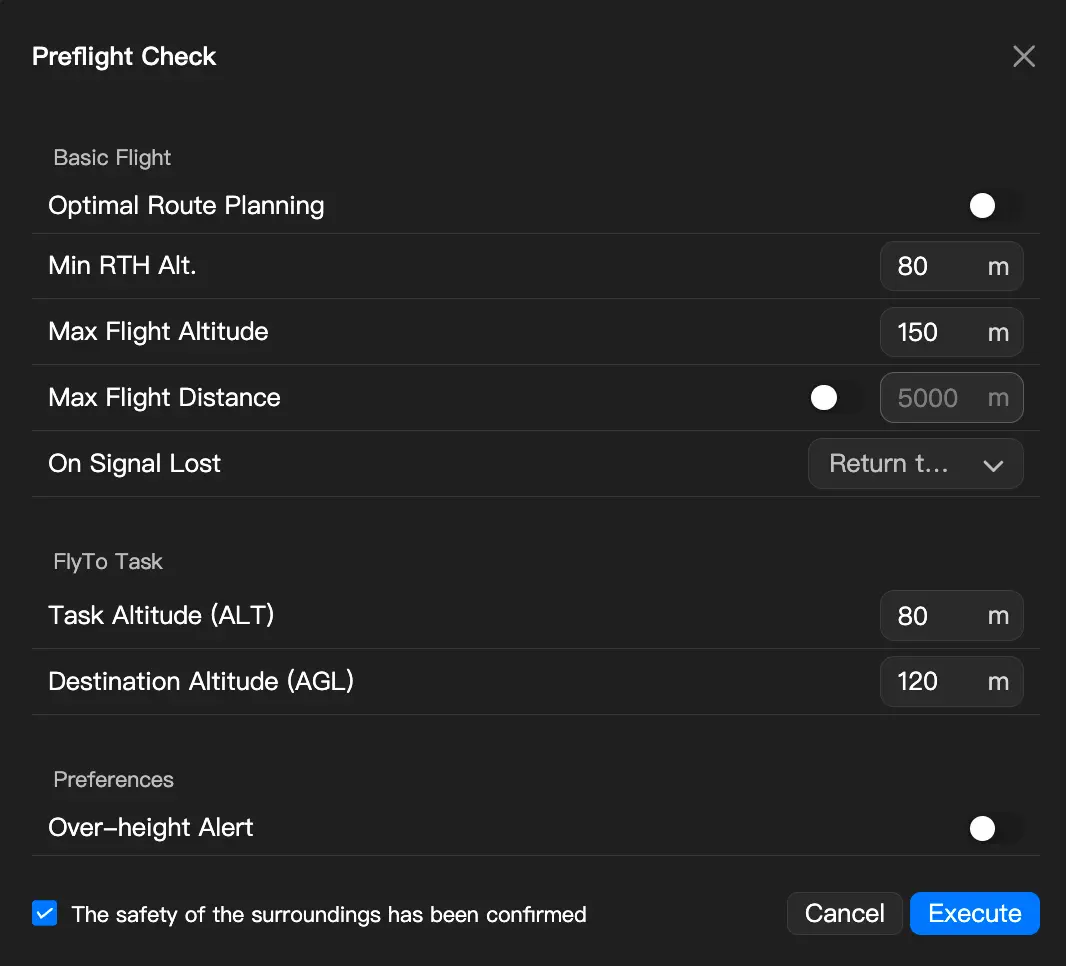
After obtaining flight control authority, you can click the "One-Tap Takeoff" button  in the lower-right corner of the page. In the "Pre-flight Check" pop-up window, configure the flight parameters, confirm that the flight environment is safe, and then click the "Execute Now" button to take off the aircraft.
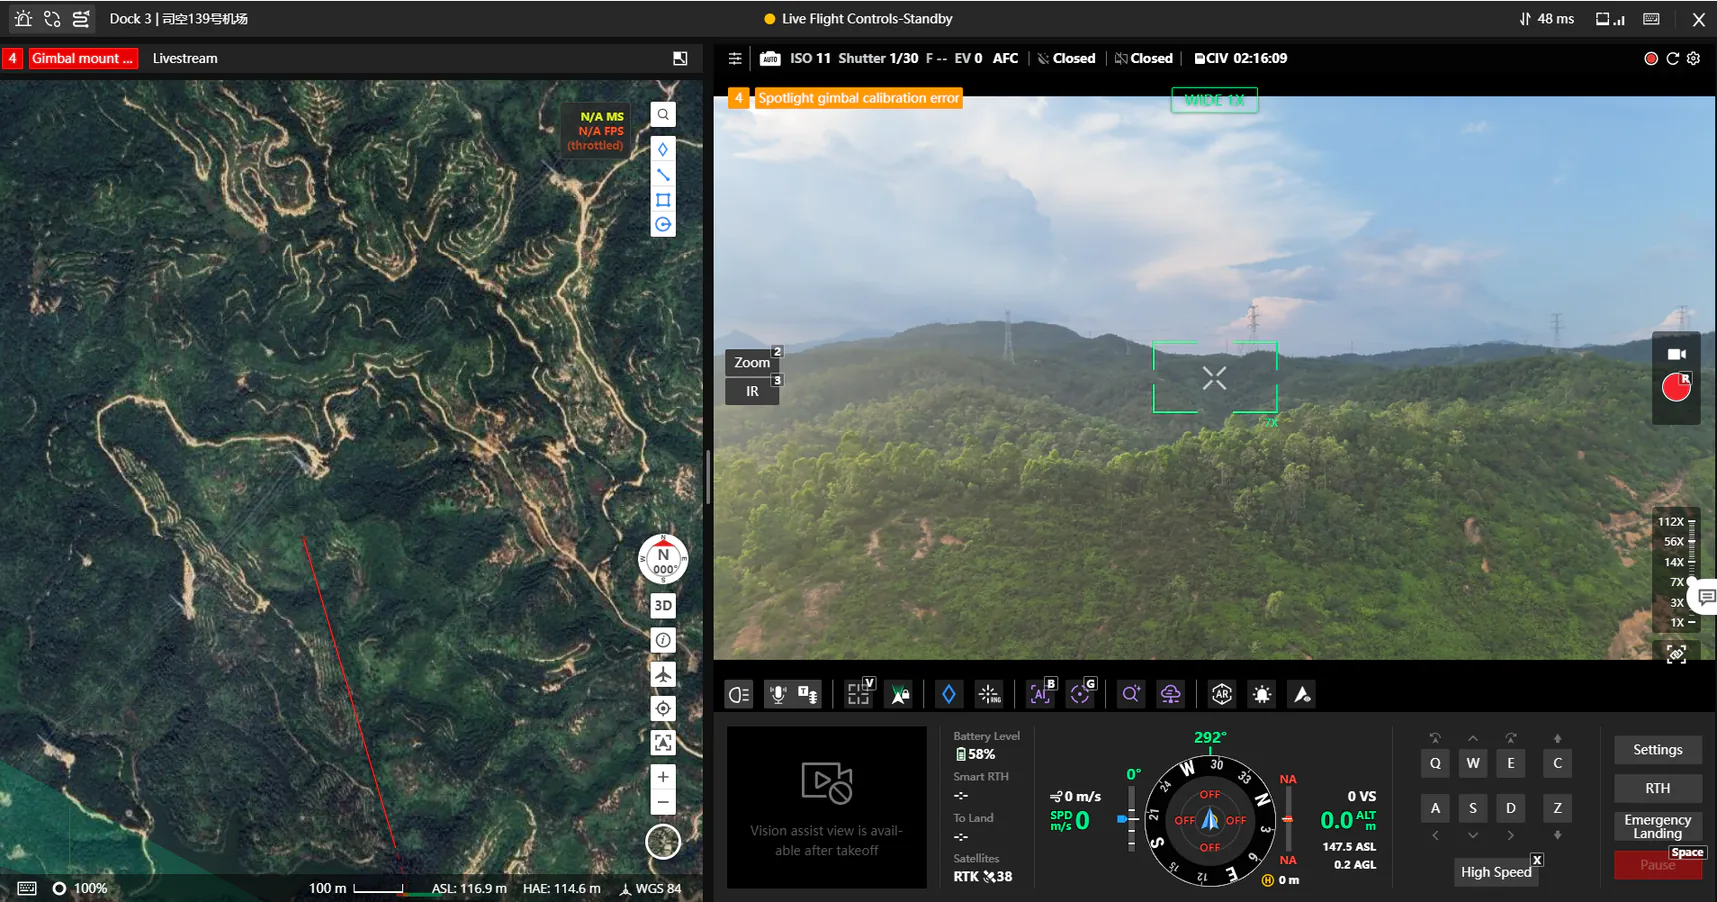
After the aircraft takes off, the sub-view window will automatically switch to "Vision Assist". The overall page overview is as follows:
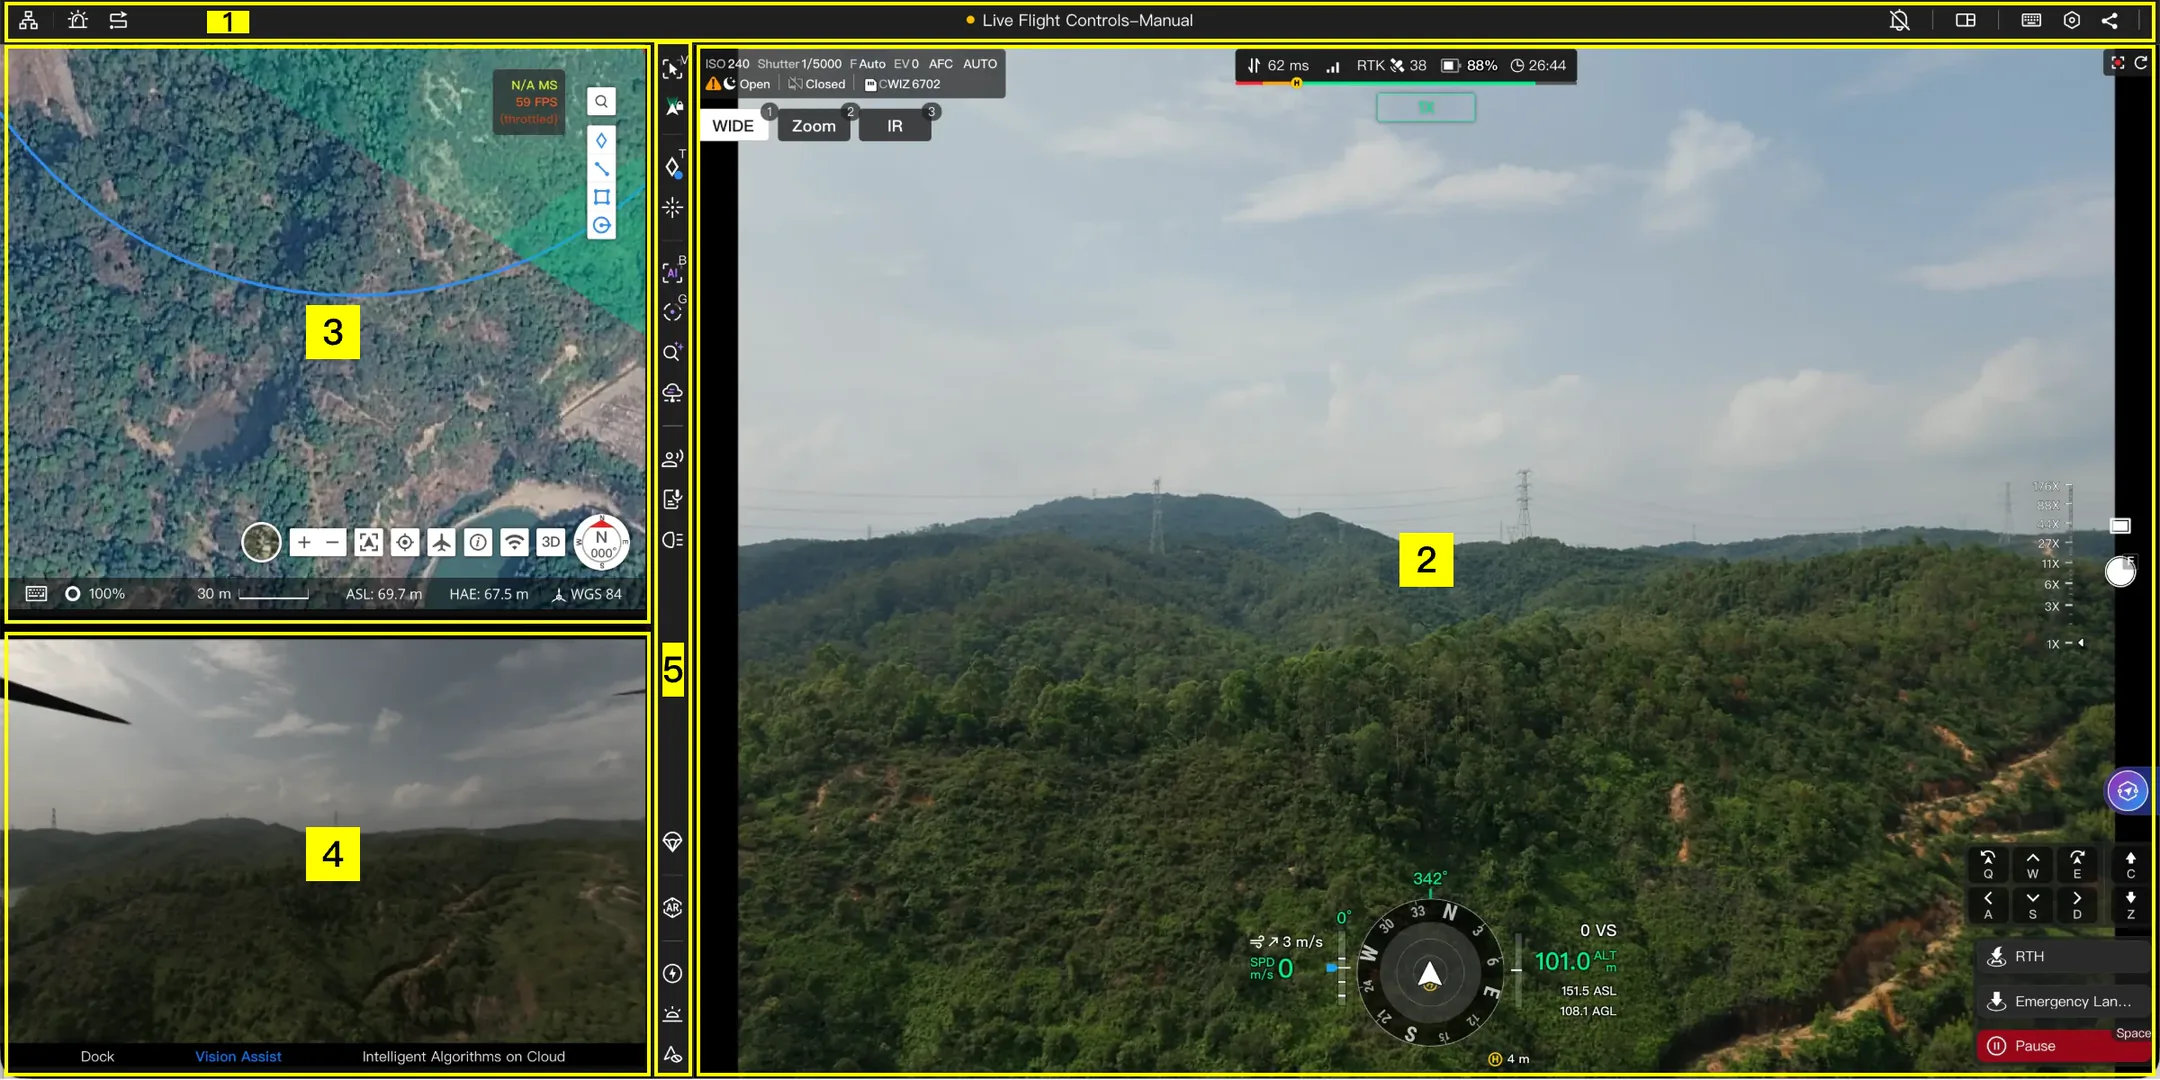
As shown above, the page modules are divided into:
- Page Menu Bar: Contains device management, alert records, route library, message notifications, page layout settings, shortcuts, settings, live stream sharing, and aircraft status.
- Main View Module: Displays the gimbal camera feed by default, integrating the aircraft navigation information module, camera information, gimbal control, and photo capture.
- Map Module: Allows observation of all annotations and device information within the current project.
- Auxiliary View Module: Contains dock live stream, Vision Assist (viewable after takeoff), and cloud AI algorithm.
- Function Operation Area: Includes various function operations such as view follow, laser ranging, AI algorithm, multimodal target detection, speaker, lighting, AR, and more.
The following sections introduce detailed information about each module on the Virtual Cockpit page.
Page Menu Bar

| Icon | Description |
|---|---|
 | Device Management: Add/remove fleet devices here. |
 | Alert Records: View target alert records here, with filtering by date and alert category supported. |
 | Route Library: View routes here, with filtering by aircraft model and route type supported; supports importing and navigating to the route library to create routes. |
 | Message Notifications: Central hub for platform messages, supports setting "Do Not Disturb" to focus on operations. |
 | Page Layout Settings: Set the layout of the main view and sub-view here, supports creating new tabs and opening multiple windows to view the Virtual Cockpit page. |
 | Shortcuts: Set whether to display control keys in the flight interface here. |
 | Settings: Configure parameters for flight, camera, live stream, spotlight, and speaker here. |
 | Live Stream Sharing: Set live stream sharing parameters and generate a sharing link here, supporting configuration of link validity period, sharing password, and specified devices. |
 | Aircraft Status: Displays the current status information of the aircraft during remote control. |
Multi-Aircraft Control
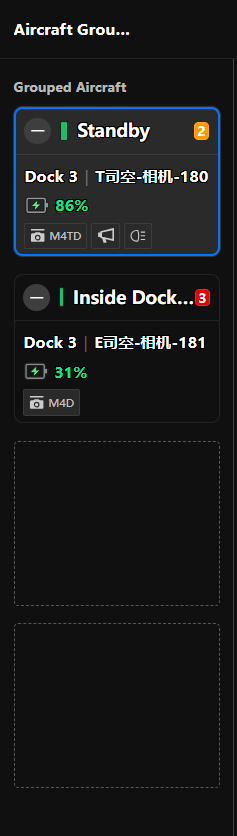
To manage multiple aircraft, expand the multi-aircraft control panel and add available aircraft to the Grouped Aircraft list. You can then configure what happens when you switch between aircraft, including:
- Automatically taking control of the selected aircraft.
- Automatically starting the livestream from the selected aircraft.
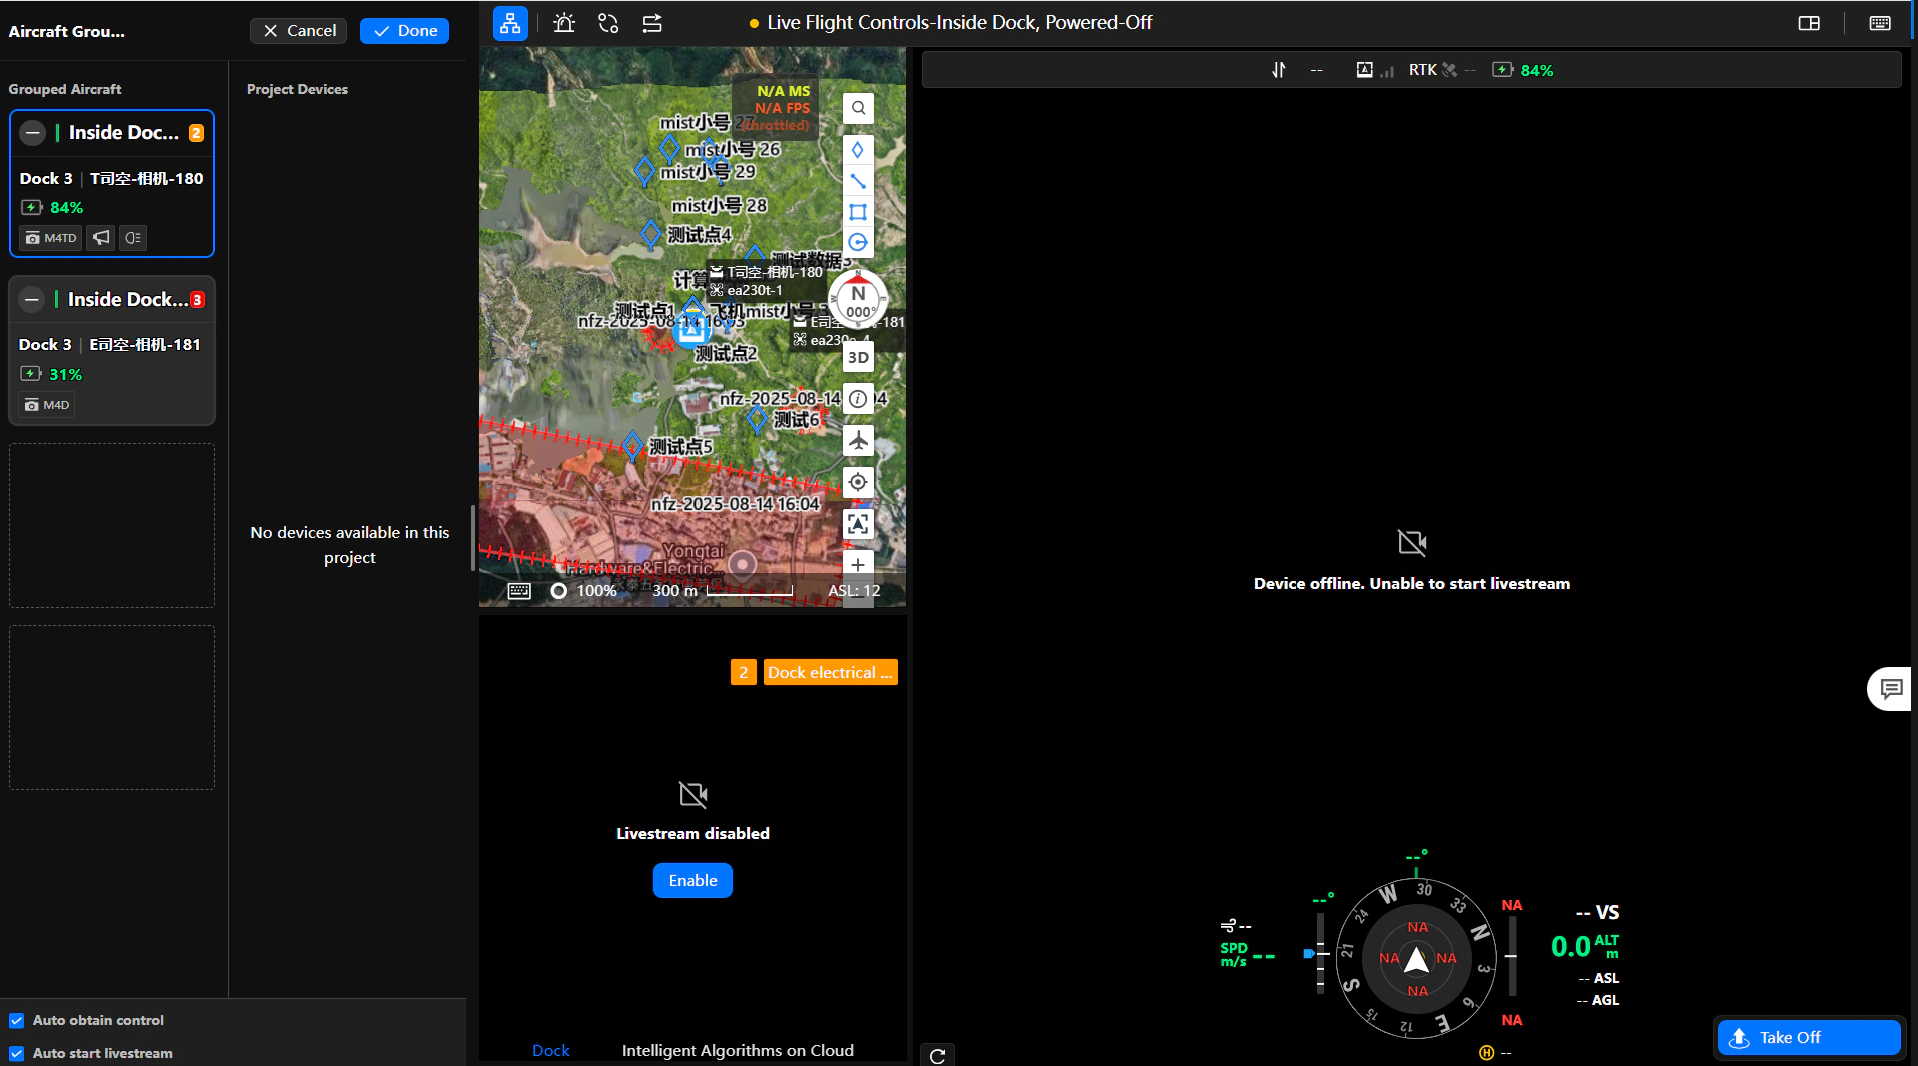
Click on a device card to quickly switch aircraft control authority, and support one-tap return-to-home and emergency stop commands.
Recommended Configuration Requirements
| Recommended Configuration | Simultaneously Controlling 1–2 Devices | Simultaneously Controlling 3–4 Devices |
|---|---|---|
| Processor | Intel Core i5-1135G7 or higher. | Intel Core i7-12700K or higher. |
| Memory | 16 GB or above. | 32 GB or above. |
| Network Bandwidth | 50 Mbps or above. | 150 Mbps or above. |
Note: Please note that low-power processors (such as the i5-7200U) are not recommended for simultaneous control. Additionally, to ensure a better user experience, make sure the device is connected to a power source and the signal is stable throughout the operation.
AI Warning Records
Real-time AI Warnings
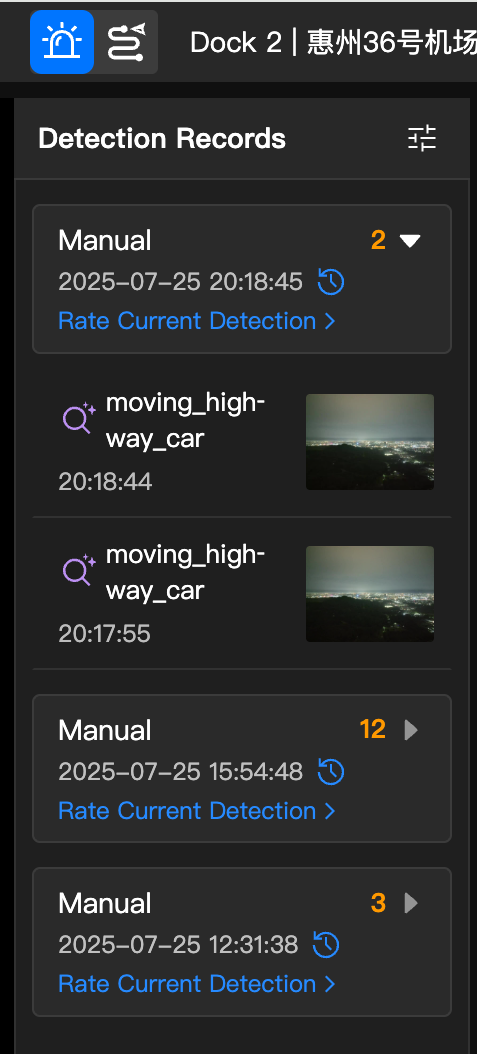
When AI functions are enabled in the virtual cockpit and an alert is triggered, relevant information and snapshots are displayed in the AI warning record list. You can filter records by date, warning category, and object type. Completed flights can be reviewed via a shortcut in the flight records.
Automated Flight Route AI Warnings
When a Smart Capture waypoint route triggers a warning and in-web notifications are enabled, you can use the notification link to jump directly to the virtual cockpit, where you can manually take over the aircraft for task intervention.
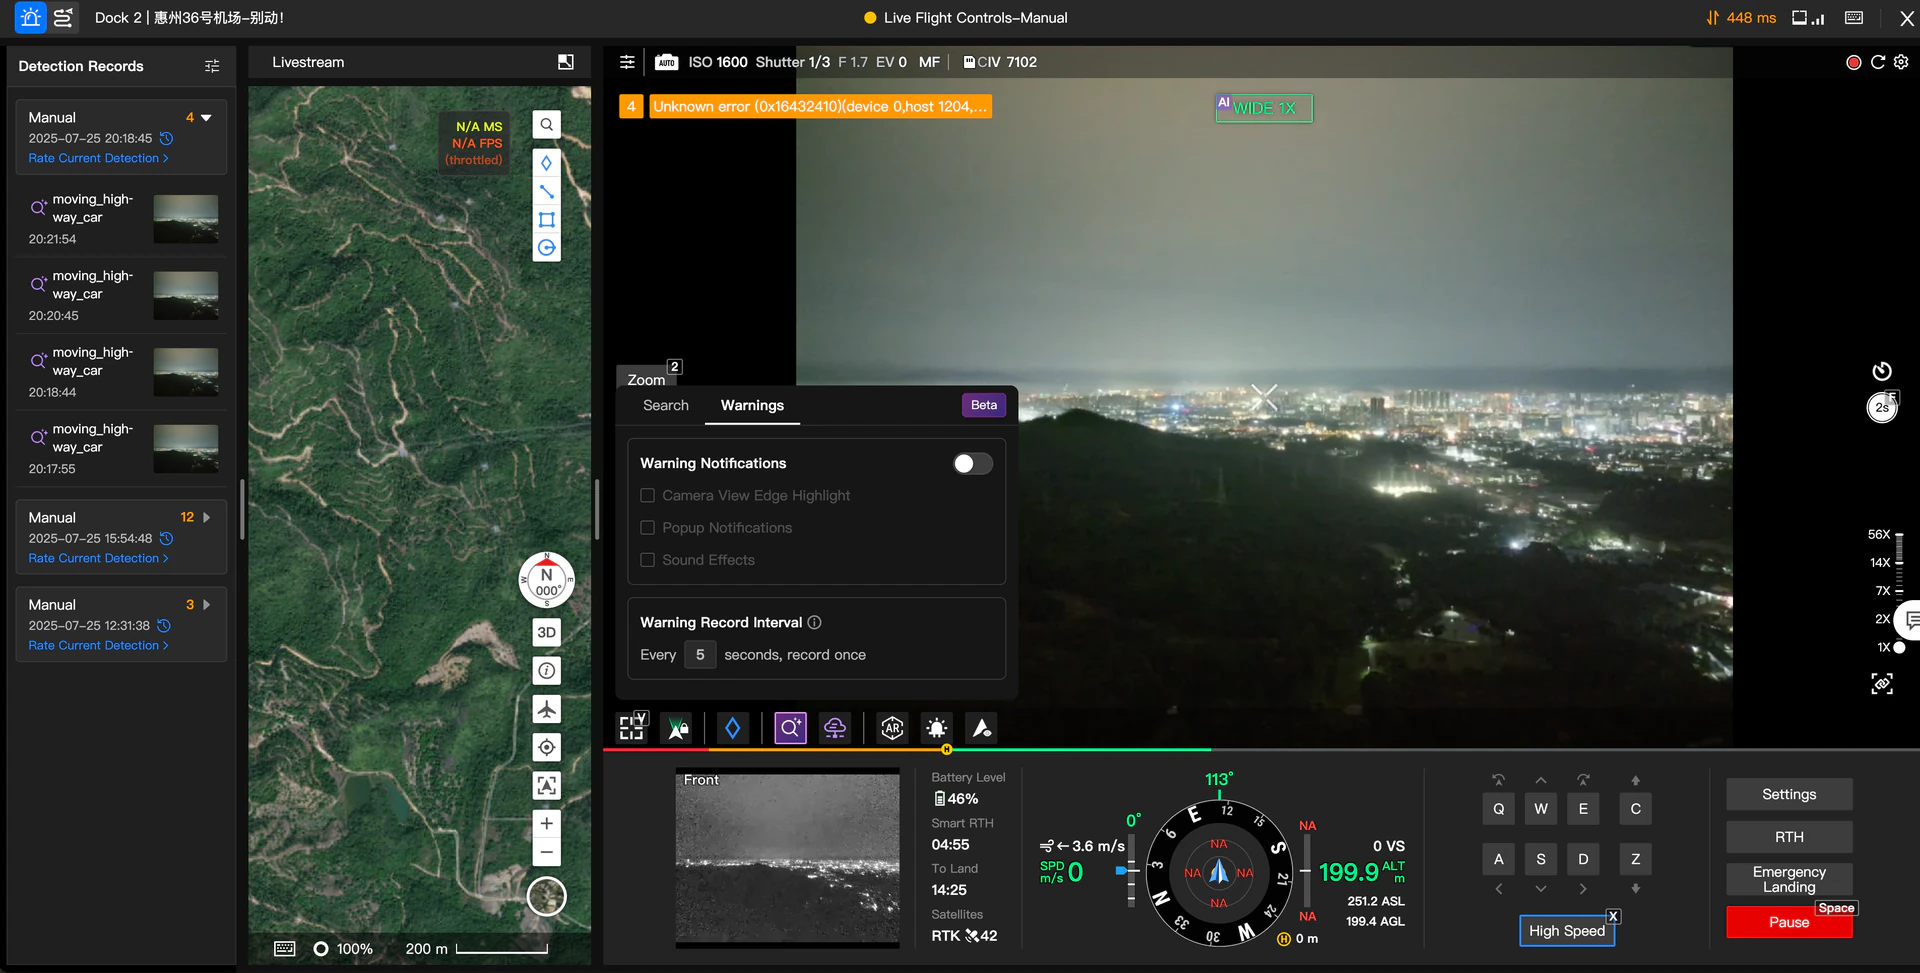
The virtual cockpit displays AI automated flight route warning records, providing quick access to alert trigger times, conditions, object locations, and snapshots.
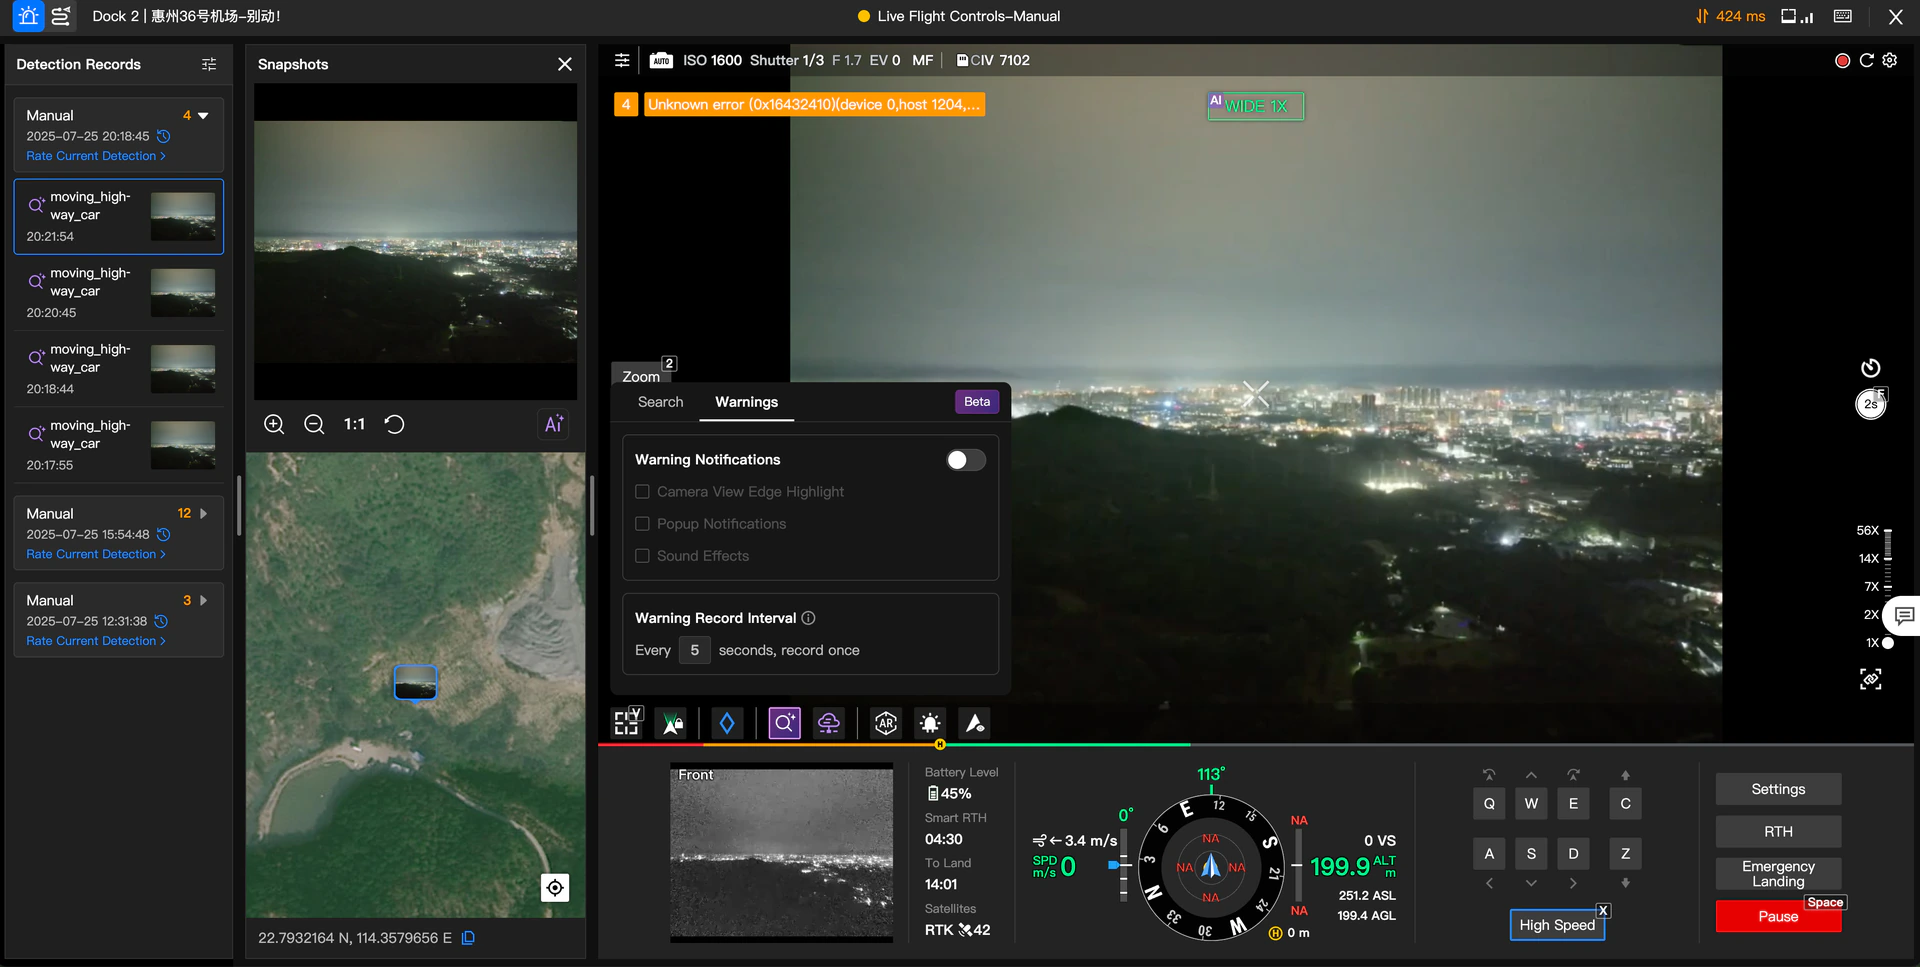
Distribute Flight Route via Virtual Cockpit
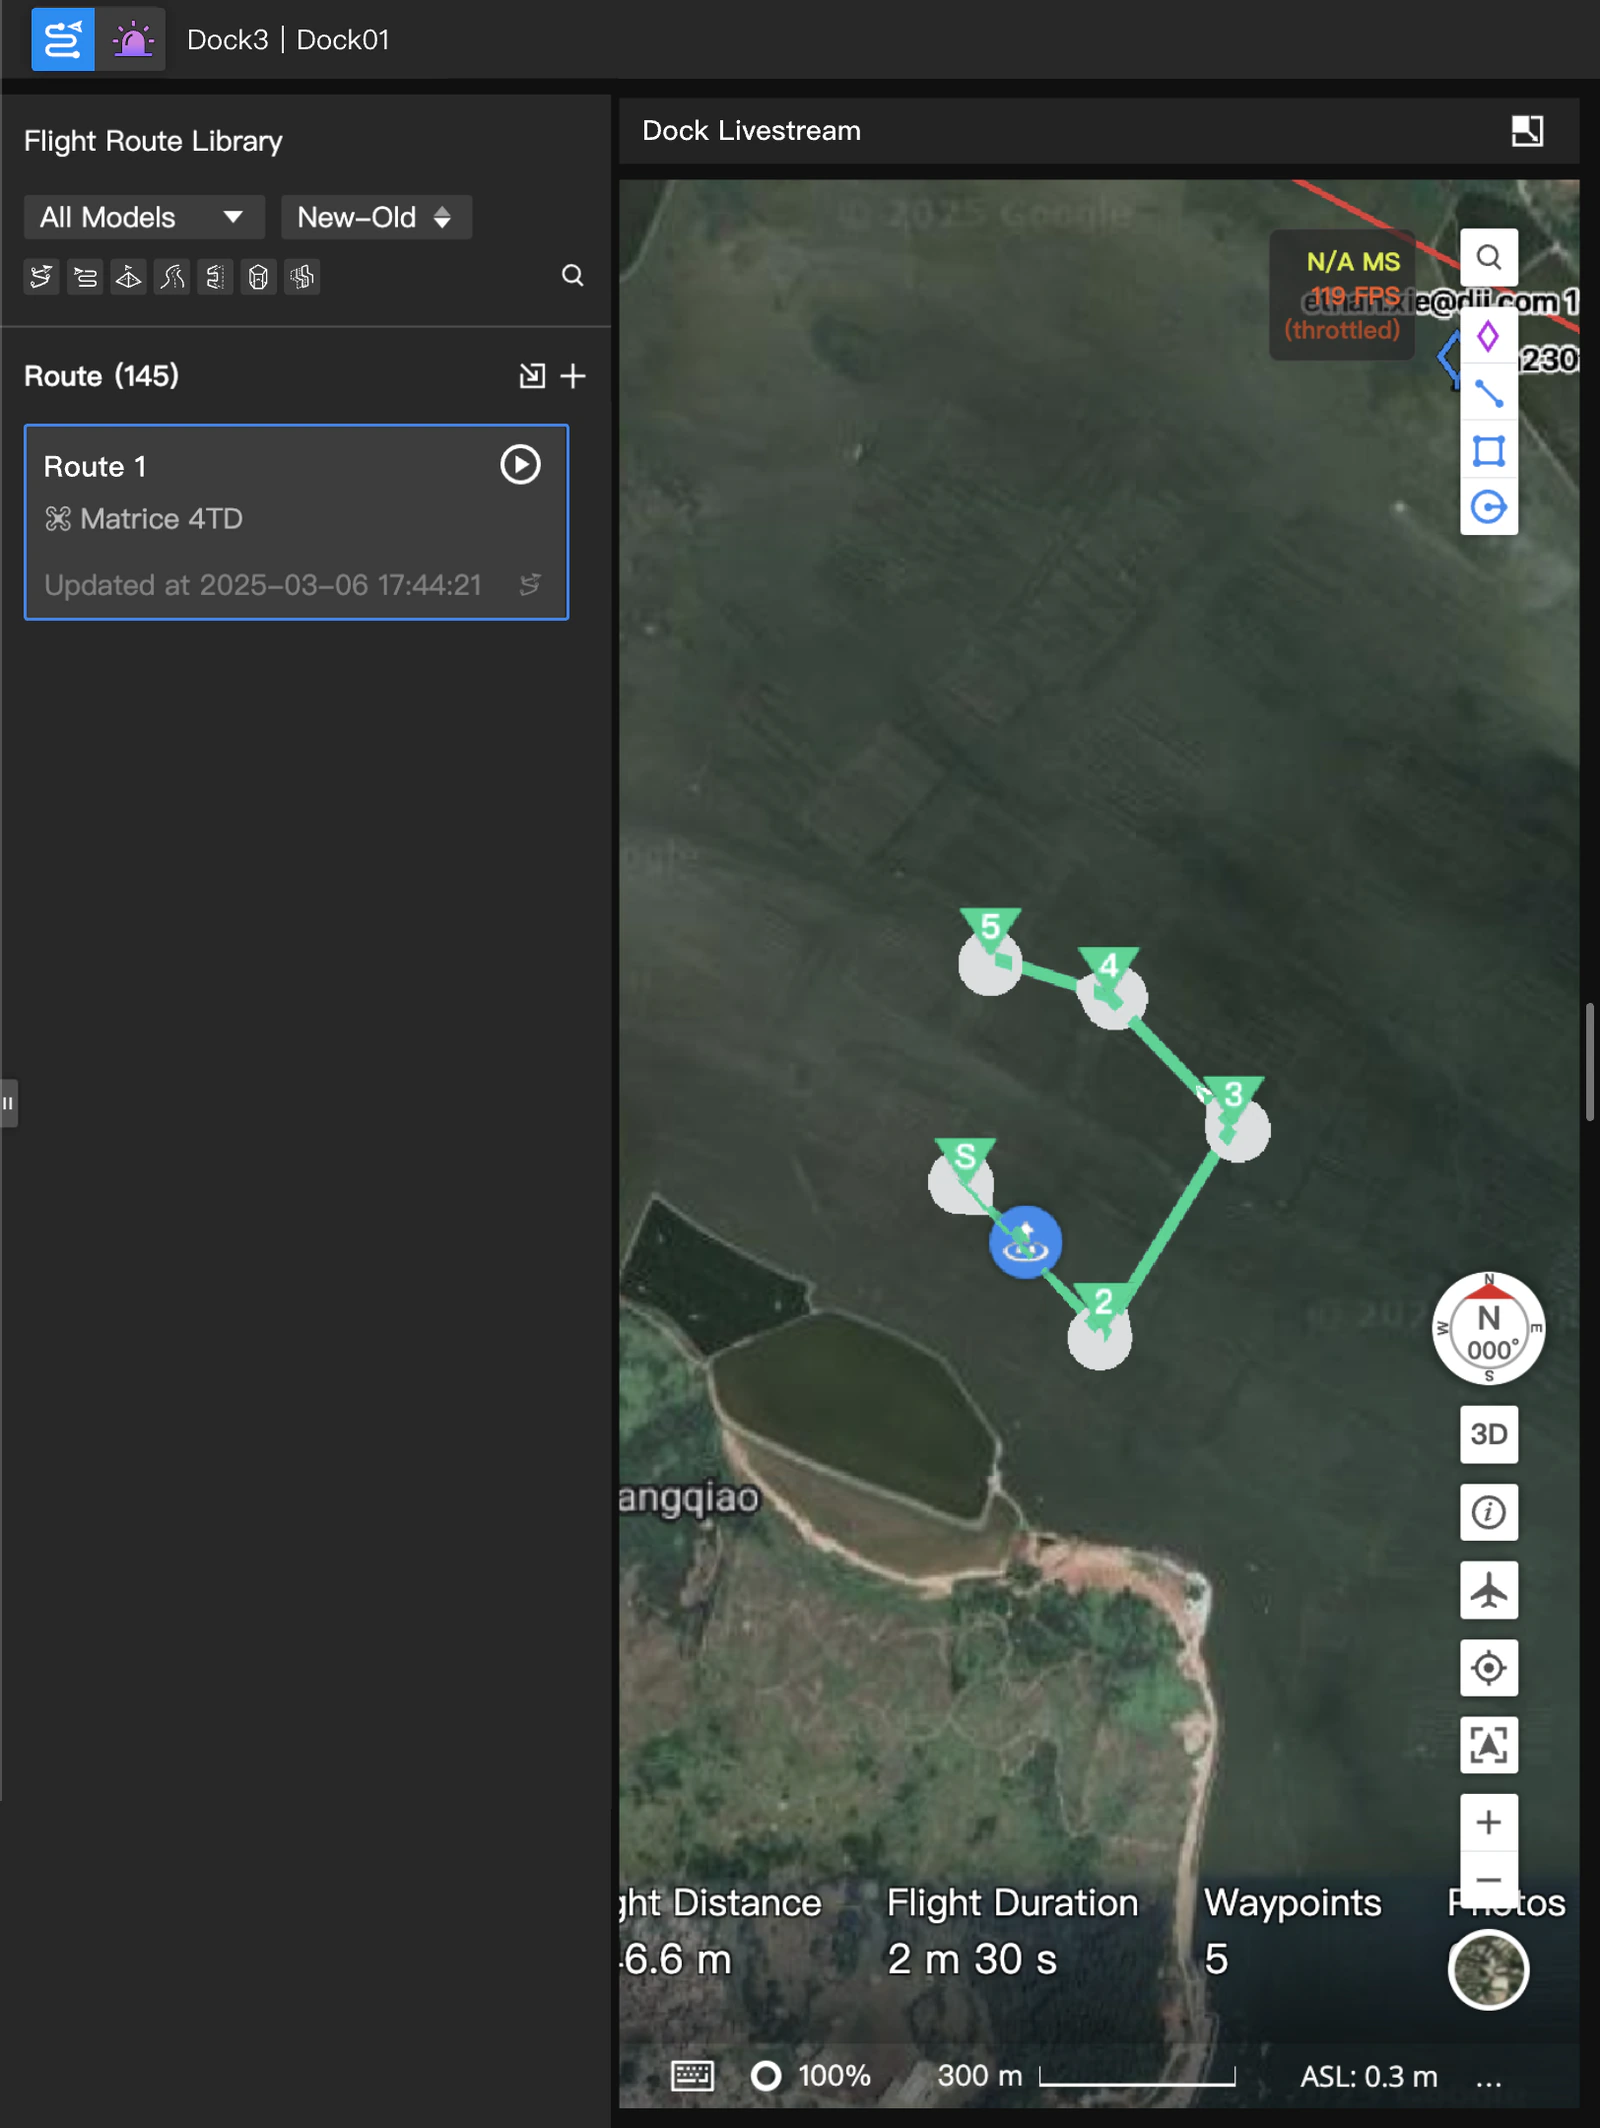
Users can expand the flight route list in the virtual cockpit interface, select, and distribute the required flight route task in real time.
Settings
| Flight Settings | Camera Settings | Live Stream Settings | Spotlight Settings | Speaker Settings |
|---|---|---|---|---|
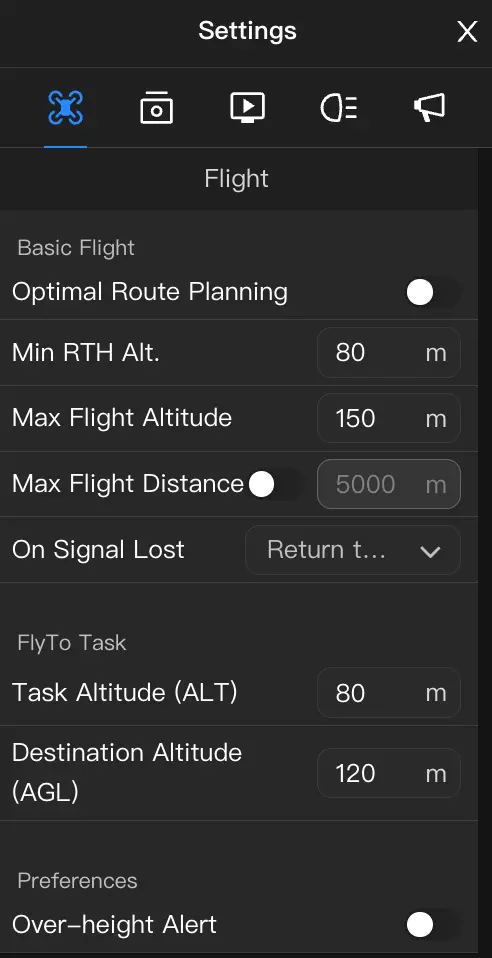 | 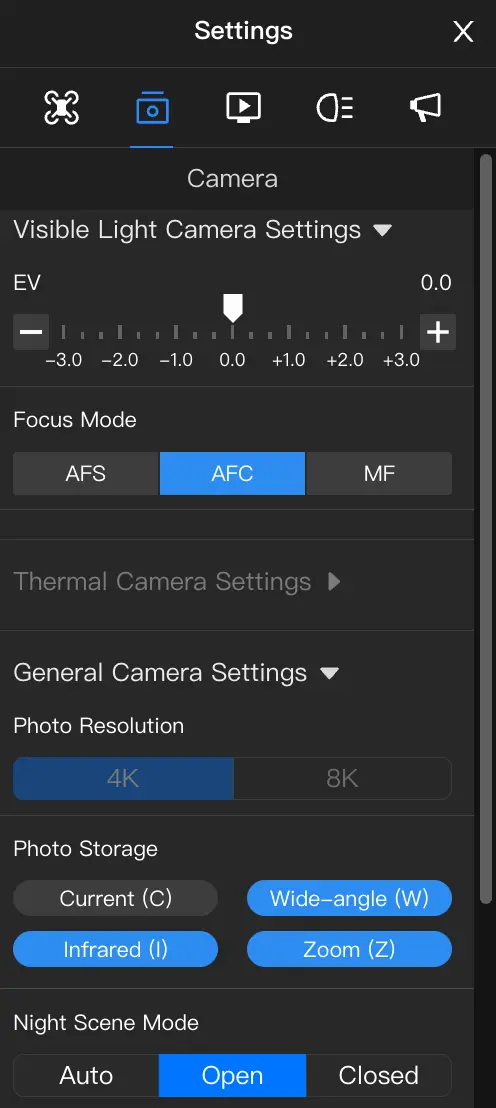 | 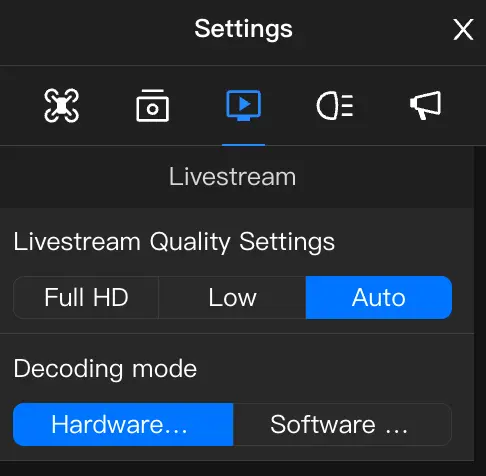 | 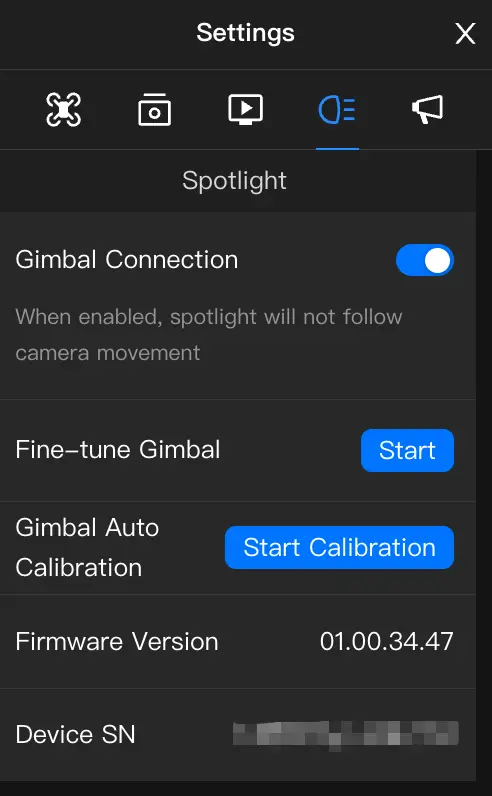 | 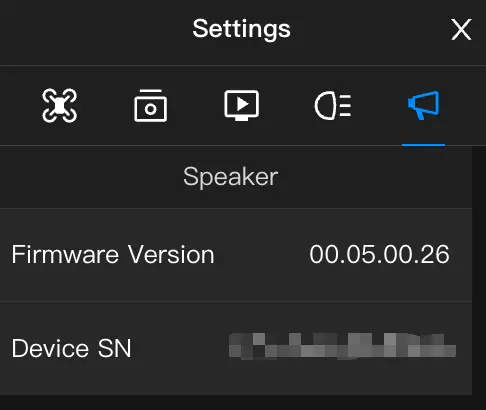 |
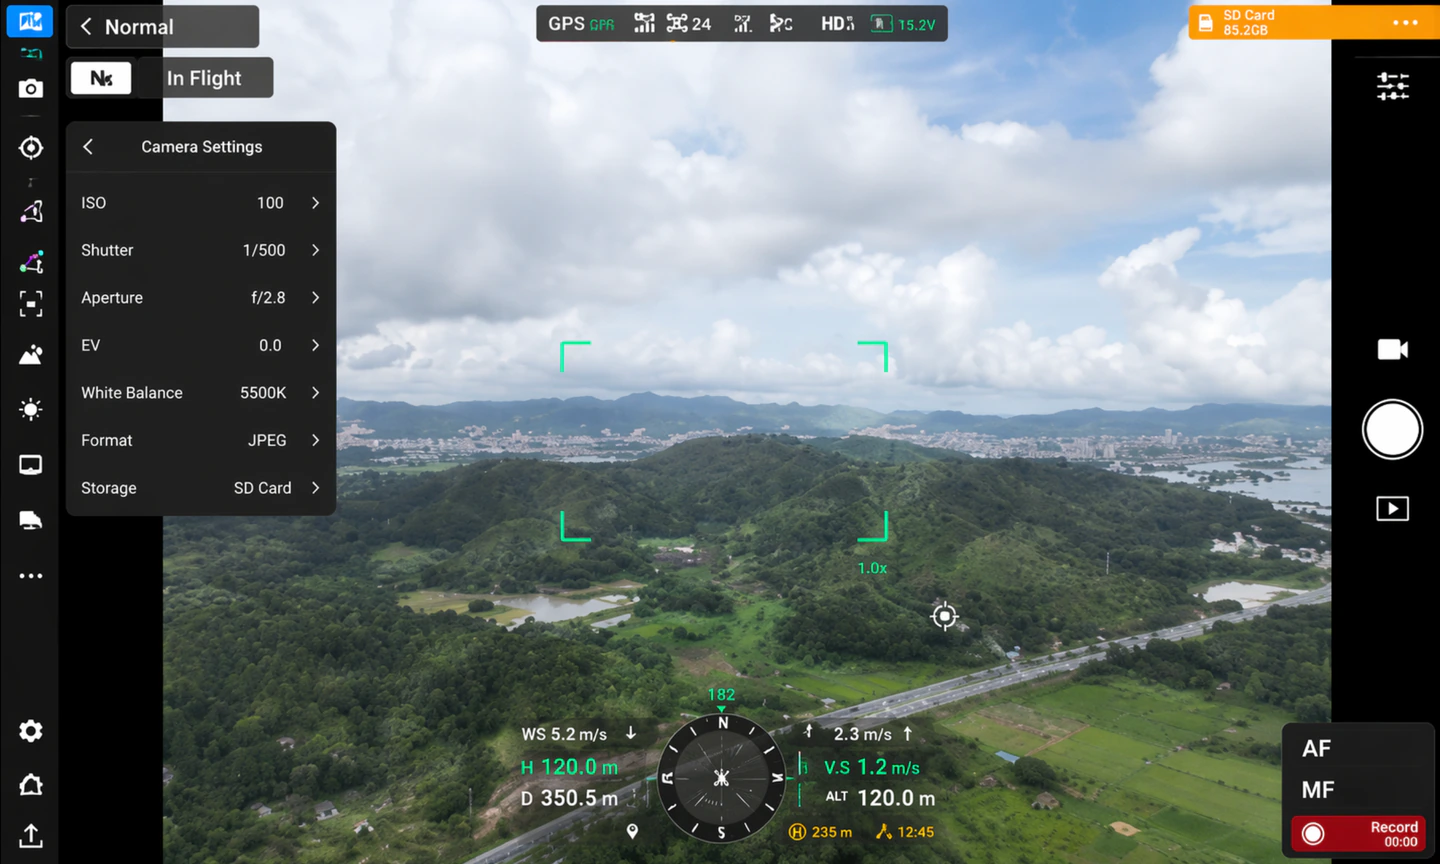
| In addition to setting basic flight and specified flight parameters, supports enabling intelligent optimal route planning and setting "Altitude Warning". | Supports setting camera visible light, focus, and general camera settings such as resolution, photo storage, night scene mode, etc. | Supports setting live stream quality and decoding method. | Supports "Gimbal Linkage" between spotlight and camera; after enabling, the gimbal can be adjusted. | Speaker information can be viewed here. |
Operation Guide (Shortcuts) and Gimbal Control
Operation Guide
Click or press the [?] key to display the keyboard shortcut operation guide within the Virtual Cockpit.
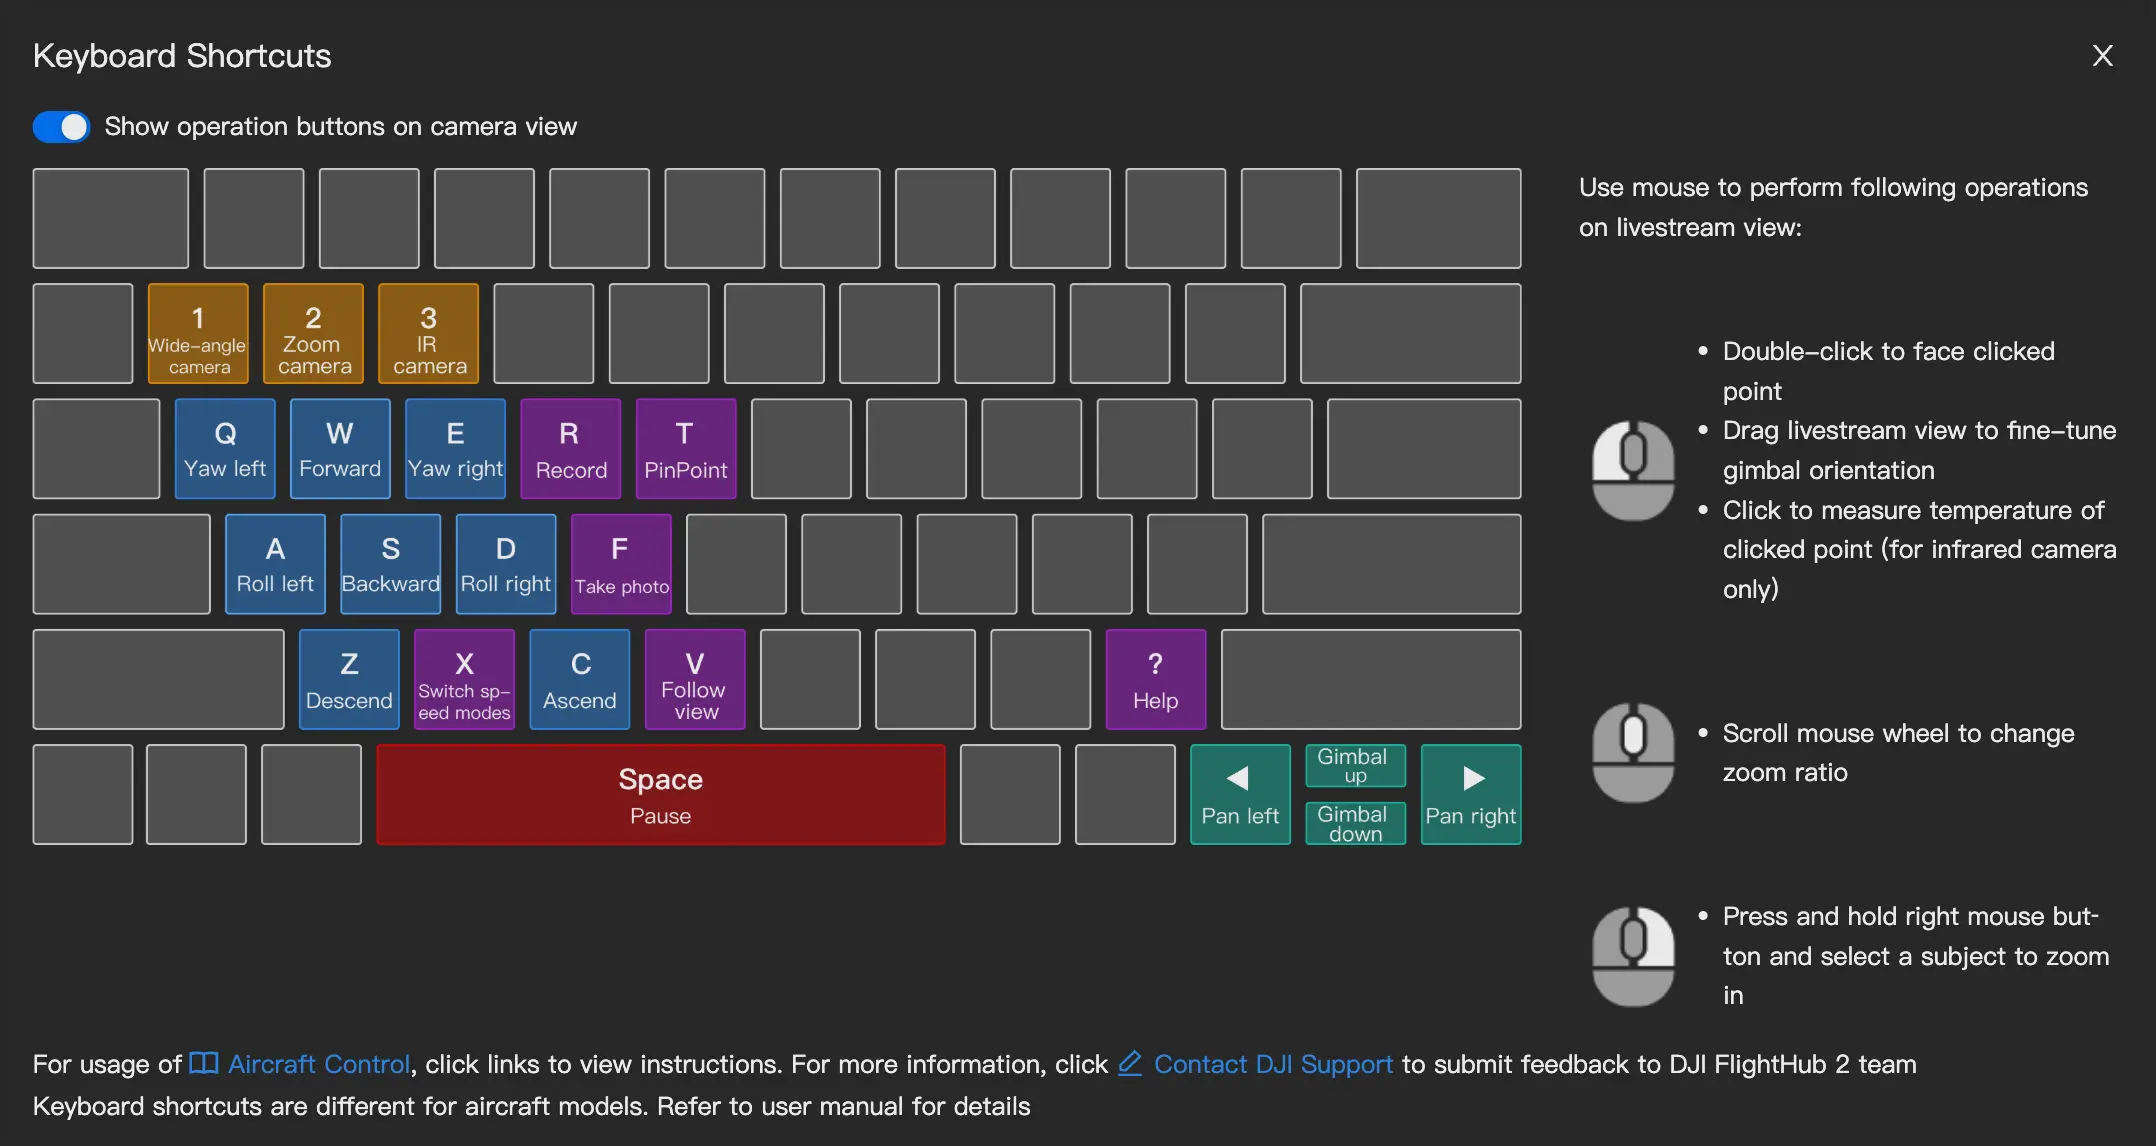
| Shortcut | Action | Function Shortcut | Action |
|---|---|---|---|
| [1] | Switch to wide-angle lens. | [F] | Take photo. |
| [2] | Switch to zoom lens. | [X] | Switch speed mode. |
| [3] | Switch to infrared lens. | [R] | Start/stop recording. |
| [W] | Aircraft forward. | [T] | Drop a pin. |
| [S] | Aircraft backward. | [V] | View locked to follow mouse movement; press [V] or [ESC] to exit. |
| [A] | Aircraft move left. | [B] | AI recognition. |
| [D] | Aircraft move right. | [G] | Smart Tracking. |
| [Q] | Aircraft rotate left. | [?] | Keyboard shortcut operation guide. |
| [E] | Aircraft rotate right. | [SPACE] | Emergency stop. |
| [Z] | Aircraft descend. | [Left Mouse Button - Double Click] | Look at target. |
| [C] | Aircraft ascend. | [Left Mouse Button - Long Press] | Drag to fine-tune gimbal direction. |
| [◀︎] | Gimbal left. | [Left Mouse Button - Single Click] | Temperature measurement (infrared lens). |
| [▶] | Gimbal right. | [Mouse Scroll Wheel] | Scroll to zoom. |
| [▲] | Gimbal up. | [Right Mouse Button] | Box-select target for auto zoom. |
| [▼] | Gimbal down. |
Note: Keyboard layouts may differ between countries or regions; users should follow the actual interface guidance. To change the keyboard layout, go to "Personal Center > Preferences > Keyboard Layout".
Gimbal Control
- Supports switching between gimbal free mode and gimbal body-lock mode:
- Gimbal Free Mode: The gimbal orientation is not locked to the aircraft body orientation. Users can freely control the gimbal; when the gimbal rotates, the aircraft does not rotate synchronously.
- Gimbal Body-Lock Mode: The gimbal orientation is locked to the aircraft body orientation. When the user double-clicks the screen to look at a target in the cloud, or uses long-press drag or keyboard gimbal fine-tuning, the aircraft rotates synchronously, maintaining a constant relative angle between the gimbal pan angle and the aircraft heading angle. This mode makes cloud operations safer and more efficient.
Note: "DJI Dock 2" defaults to Gimbal Body-Lock Mode; adjusting the gimbal yaw angle will synchronously adjust the aircraft heading angle by default. When the aircraft heading angle cannot be adjusted, some gimbal control functions will be restricted. For example, during tap-to-fly, "DJI Dock 2" does not support gimbal control.
Users can use the FlightHub 2 gimbal buttons for quick switching:
- Gimbal Center
- Gimbal Down
- Gimbal Yaw Center
- Gimbal Pitch Down
Gimbal control also supports the following quick operations with keyboard and mouse:
- Double-click to center: Double-click anywhere on the live feed, and the gimbal will look toward that position.
- Gimbal fine-tuning: Long-press the left mouse button and drag the screen, or press [←] [→] [↑] [↓] to fine-tune the gimbal direction.
- Box-select zoom: Right-click and drag to box-select, and the target will be automatically zoomed in. Under the wide-angle lens, box-selecting a target will automatically switch to the zoom lens for magnification.

Main View Module
When the aircraft is powered on, entering the Virtual Cockpit will default to activating the gimbal camera live feed.
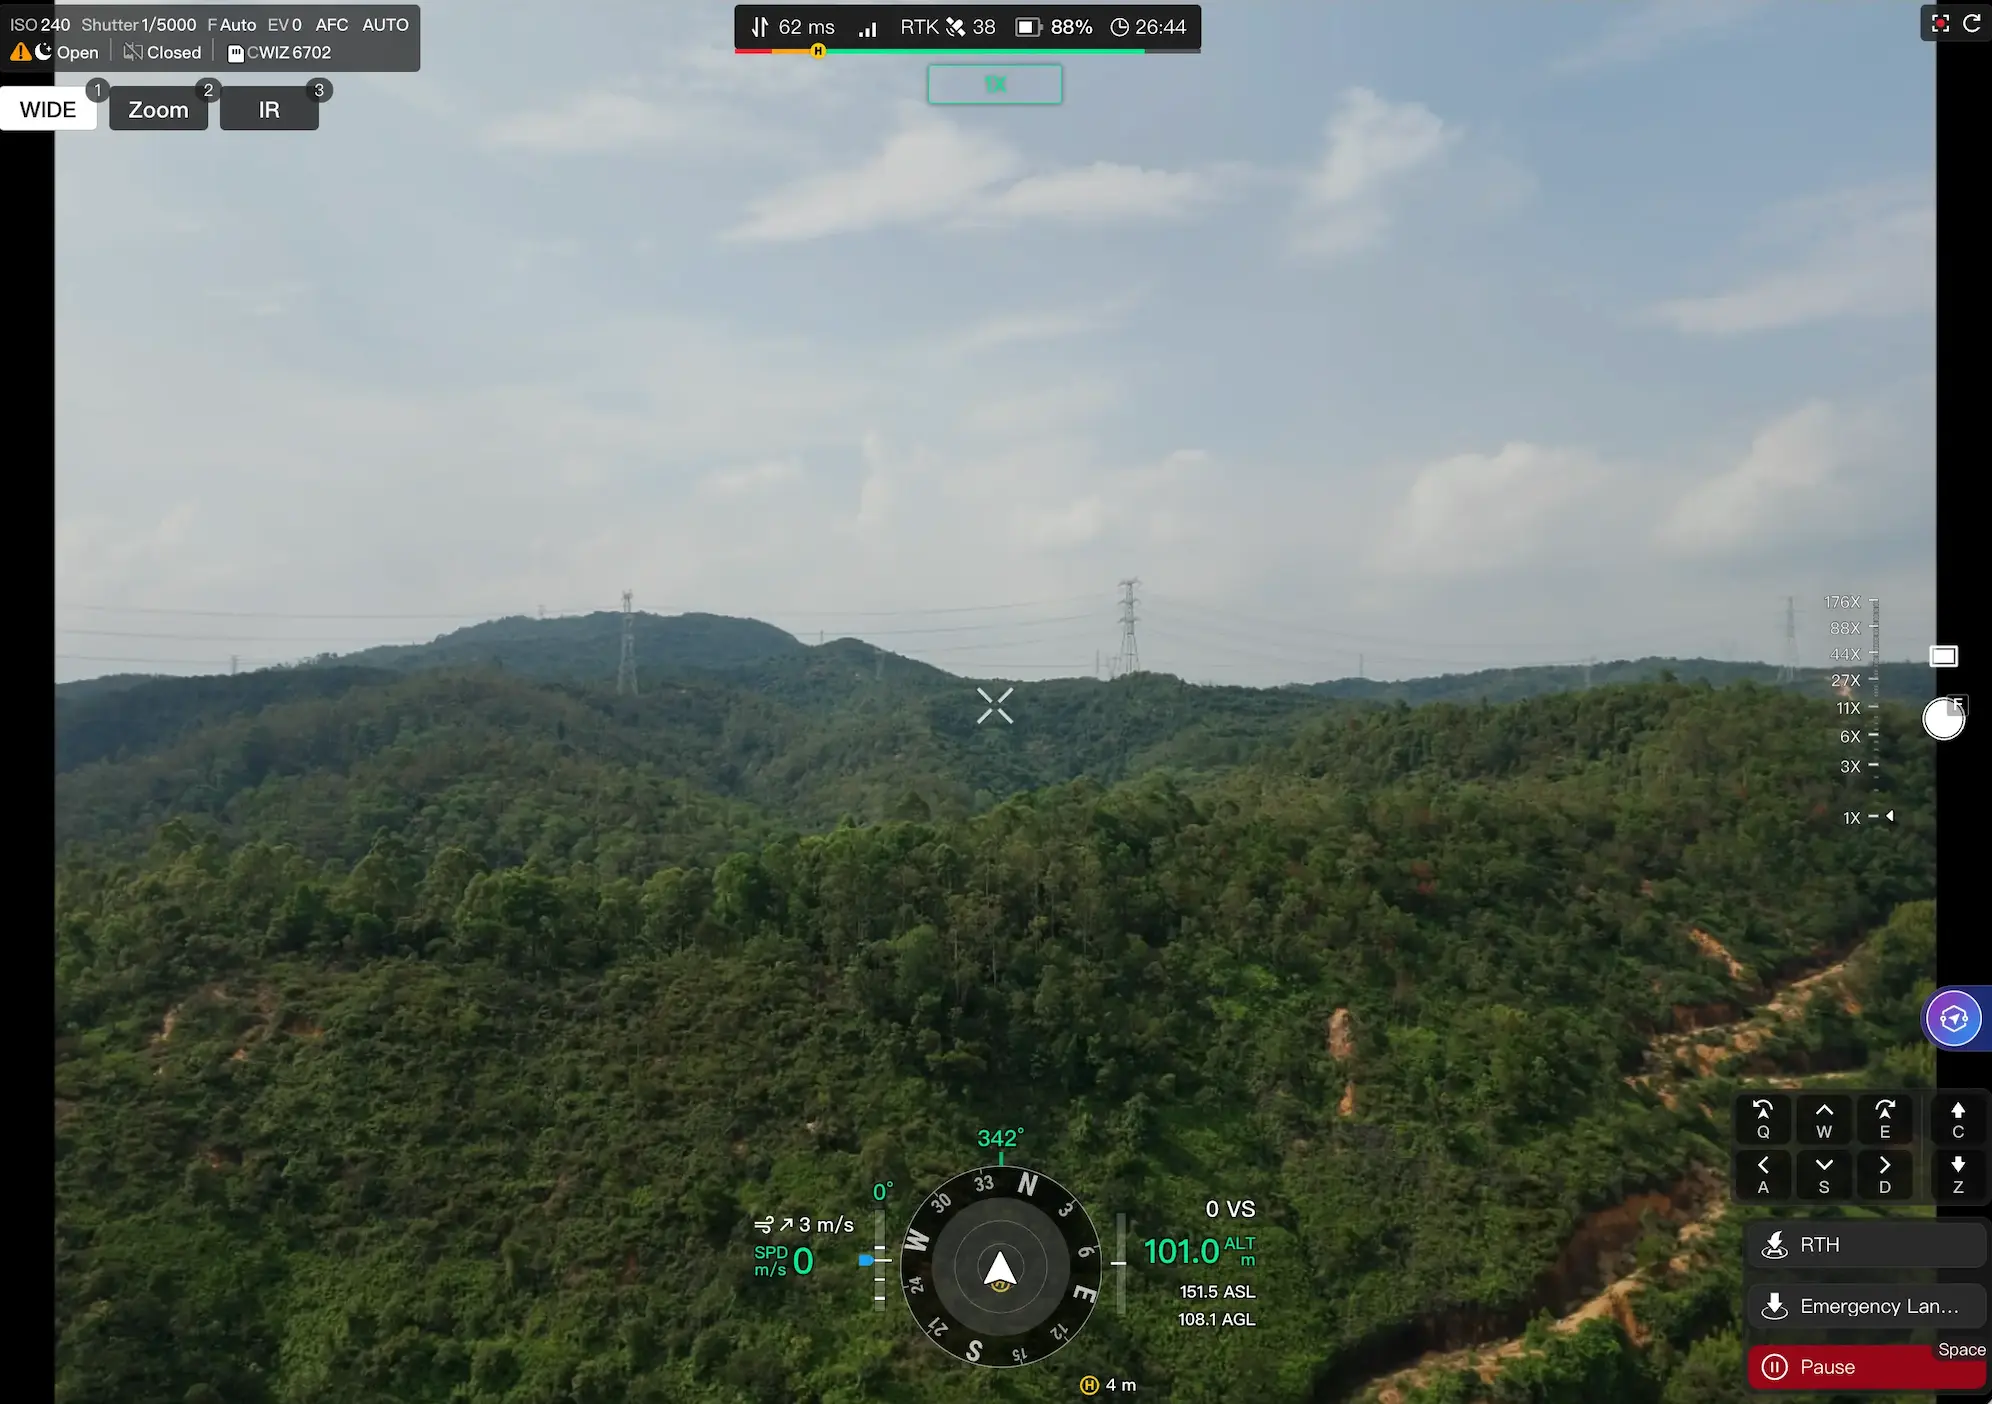
Camera Information and Related Settings

The camera information bar displays basic information about the gimbal camera, such as ISO sensitivity, shutter speed (Shutter), aperture (F), exposure compensation (EV), focus mode, photo mode, night scene mode status, etc.
Camera-Related Settings and Notes
- Camera Parameters: Displays ISO sensitivity, shutter, and exposure data; supports Auto and M modes:
- Auto mode supports setting camera exposure parameters (EV).
- M mode supports setting ISO sensitivity, shutter, aperture, and other parameters.
- Focus Mode: Click to adjust the focus mode of the zoom camera; supports AFS (Auto Focus Single), AFC (Auto Focus Continuous), and MF (Manual Focus).
- Resolution Settings: Supports users setting the video resolution of the visible light camera.
- Mechanical Shutter: Users can disable the mechanical shutter to extend device service life.
- Distortion Correction: Users can enable distortion correction to ensure the camera image is displayed normally.
- Lens Defog: Users can actively trigger the lens defog function.
- Storage Settings: Displays the remaining storage space under the current shooting mode. Supports users setting the storage type for photos and videos. Options include current lens (C), visible light (V), and infrared (I). In infrared lens split-screen mode, the lens captures image transmission screenshots.
- Watermark: Users can enable the watermark function to display watermark information on the live feed and media files captured by the camera.
- Decoding Method: Users can switch the decoding mode of the video stream.
- Hardware Decoding (Recommended): Uses the GPU for decoding, with low latency and low performance consumption. Suitable for devices with a discrete graphics card or high performance.
- Software Decoding: Uses the CPU for decoding. Suitable for devices with integrated graphics to try switching when playback is laggy.
- Night Scene Mode: In low-light environments, enabling Night Scene Mode can improve the image quality, presenting clearer and more accurate image information, ensuring efficiency and accuracy for nighttime operations.
Note: Only supported by aircraft from "DJI Dock 3"、"DJI Dock 4".
- Aerial Download: After obtaining flight control authority via remote control, photos captured by the aircraft will be transmitted to the cloud in real time during flight. This setting can be modified in the operation panel.
Photo Aerial Download Feature Notes:
- Requires "DJI Dock" firmware v01.06.17.02 or above and aircraft firmware v09.01.00.05 or above.
- Requires "DJI Dock 2" firmware v09.02.01.08 or above and aircraft firmware v09.02.01.08 or above. If the aircraft is recording video or using PSDK functions, real-time file transmission will be interrupted.
Captured File Naming Rules:
- During task execution dispatched from the plan library, only files captured or recorded after obtaining flight control authority will be stored in a subfolder within the corresponding flight session folder in the media library. The subfolder is named "Remote Control".
- During one-tap takeoff task execution, only files captured or recorded after obtaining flight control authority will be stored in the media library, with the folder naming format "Dock Name-FLY-TO-Operation Time".
Infrared and Zoom Lens Switching

After obtaining camera control authority, users can switch between wide-angle, zoom, and infrared cameras depending on the device model.
Differences Between Infrared Camera and Zoom Camera
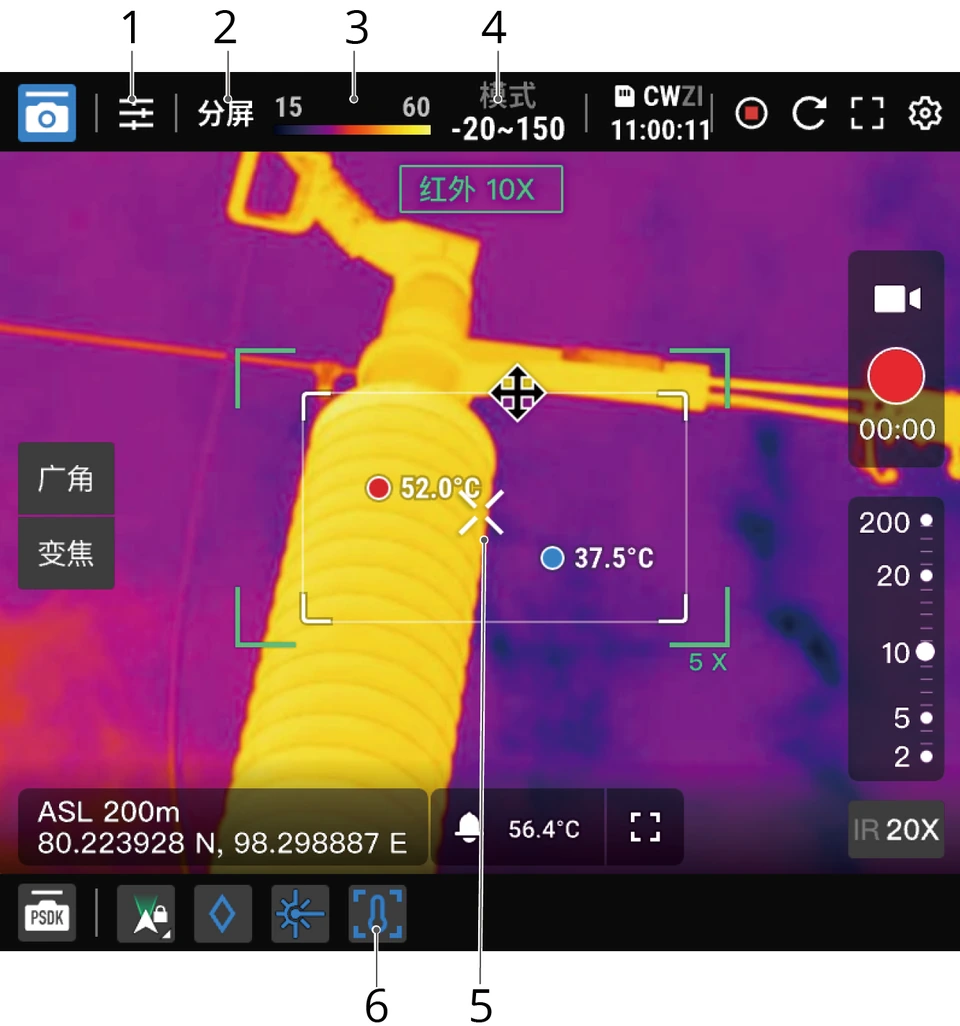
- Camera Parameters:
- Color palette switching: Switch the infrared camera color palette.
- High-temperature alert: Supports customizable temperature alert thresholds.
- Split Screen: Click "Split Screen" to view the zoom and infrared camera feeds simultaneously.
- Temperature Bar: Displays the minimum and maximum temperatures of objects in the current frame.
- Gain Mode: High gain mode provides more precise temperature measurement capability; low gain mode provides a wider temperature measurement range.
- Spot Temperature Measurement: Displays the center temperature of the infrared camera image by default; click anywhere on the infrared camera image to change the temperature measurement point location.
- Area Temperature Measurement: Click
 to enable area temperature measurement; resize or move to change the size and position of the measurement box.
Aircraft Status Information Bar
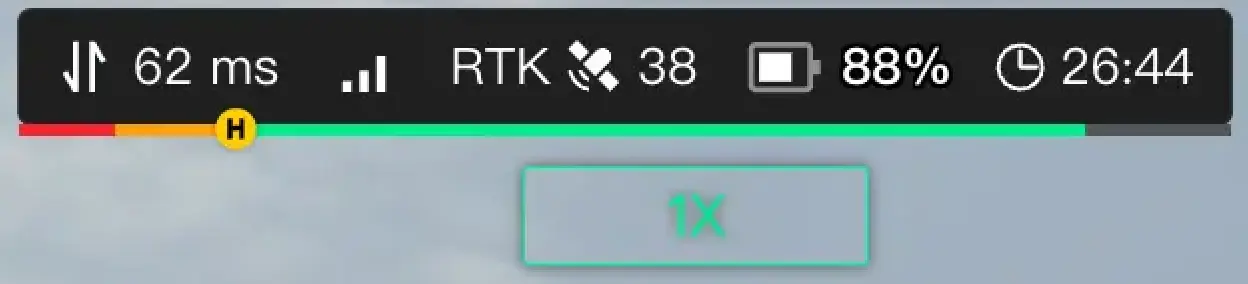
Basic status information includes: network latency, link signal, satellite lock quality, and battery information.
- Overall control latency data: Displays the latency data for the cloud-to-aircraft control loop; link data is affected by network bandwidth and video transmission signal.
- Battery Swap Status: Displays the current battery swap status of the aircraft, including "Charging", "Swapping", and "Standby". Only displayed for the DJI Dock 4.
- In-Dock Battery Information: Displays the current charge level and charging status of the batteries inside the dock. Only displayed for the DJI Dock 4.
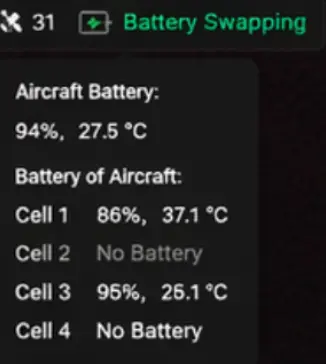
Note: During dock operations, pay attention to the remaining aircraft battery level to avoid the aircraft being unable to return normally.
Navigation Information Module
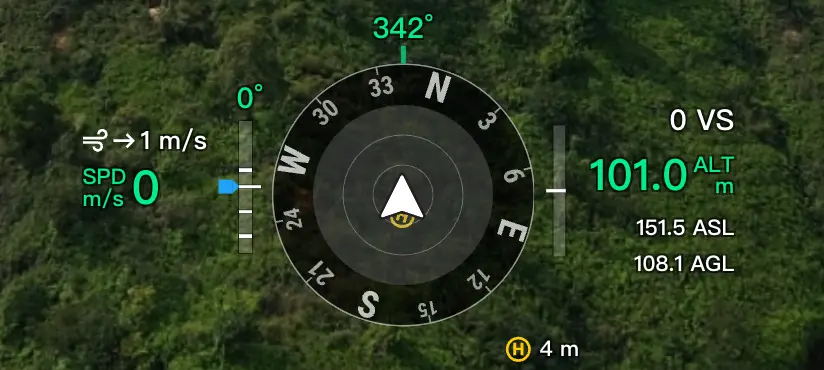
Navigation information includes aircraft and gimbal camera heading, aircraft altitude, aircraft horizontal and vertical speed, wind speed, distance to return-to-home point, and obstacle avoidance prompt information.
Image Capture Module
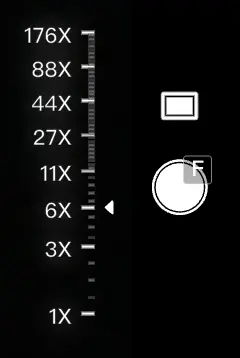
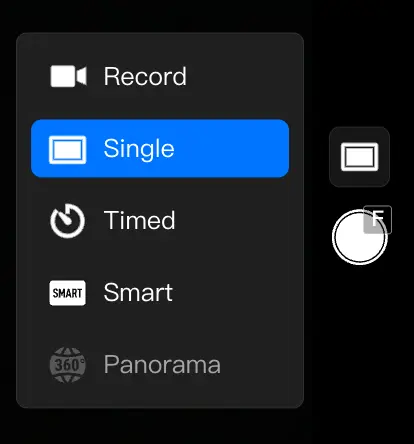
Supports adjusting camera zoom and switching photo modes.
Camera Zoom
Users can directly drag the zoom slider or scroll the mouse scroll wheel to zoom. "DJI Dock 2" supports the linked zoom function, which actively links the visible light and infrared cameras, allowing users to control the zoom of both simultaneously.
Note: The linked zoom function requires "DJI Dock 2" firmware v10.01.32.05 or above and aircraft firmware v10.01.32.05 or above.
Switch Mode
Supports adjusting camera zoom here, as well as single shot, timed shot, smart low-light, panorama and other photo modes, and video recording. Super-resolution photography is enabled by default for the DJI Dock 4 camera, providing more detailed images for closer inspection of targets when zooming in.
Panorama Photo Notes:
- Tap-to-fly, look at annotation point, box-select zoom, and double-click to center are not available in panorama photo mode.
- During the photo capture process, users cannot long-press the left mouse button to drag the screen or press [←] [→] [↑] [↓] to fine-tune the gimbal direction.
- During the photo capture process, controlling the aircraft will interrupt the panorama photo.
Operation Panel
This panel displays different operation information based on the different states of the aircraft.
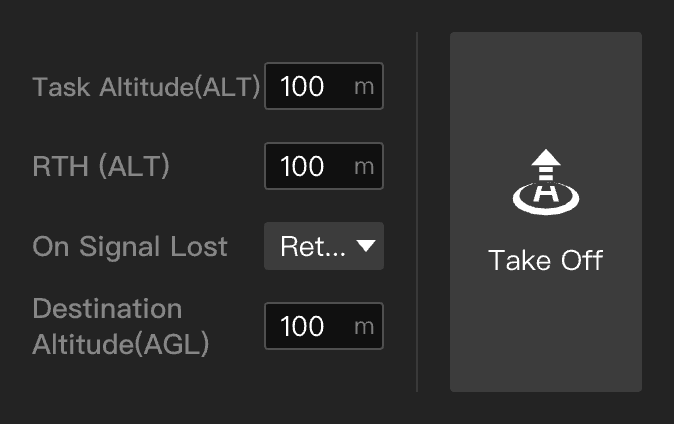
- When the aircraft is powered off or on standby on the ground, the panel will display the aircraft's basic parameter information and the One-Tap Takeoff button. One-Tap Takeoff: Users can take off the aircraft with one tap; the aircraft will take off and climb to the flight operating altitude, then hover and await subsequent commands.
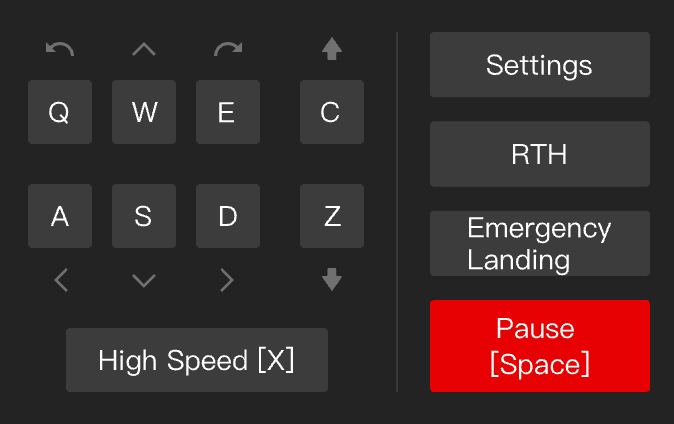
- When the aircraft has taken off into the air, the panel will display forward, backward, ascend, descend, move left, move right, rotate left, rotate right, and high-speed mode switch buttons. After the user clicks the high-speed switch button or presses the [X] key, the aircraft's horizontal flight speed will change from 5 m/s to 15 m/s.
- During tap-to-fly, the panel will display the remaining distance and duration of the flight task, as well as the flight operation mode. Users can adjust flight settings, command the aircraft to return to home, emergency stop, or resume the route.
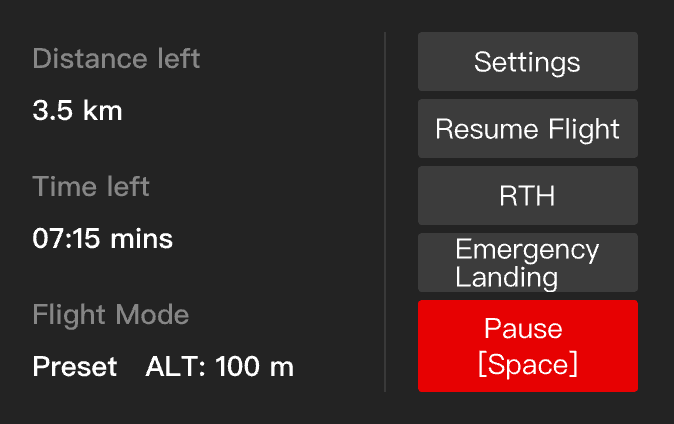 Tap-to-Fly: After selecting an aircraft, users can right-click on the map to select any position, any annotation point, or a map search result as the target point for tap-to-fly. After the target point is set, FlightHub 2 will draw the flight path, and after clicking "Start Execution" or pressing the Enter key, the aircraft will fly directly to the target point.
When the aircraft begins executing a "Tap-to-Fly" task from inside the dock:- For "DJI Dock 2":
- With "Intelligent Optimal Route Planning" enabled, the aircraft will climb 20 meters and then intelligently plan the optimal flight path to the target point.
- With "Intelligent Optimal Route Planning" disabled, the aircraft will first climb to the flight operating altitude. If the target point is higher than the flight operating altitude, the aircraft will fly obliquely to the target point. If the target point altitude is lower than the flight operating altitude, the aircraft will fly above the target point and then descend to the target point.
- For "DJI Dock":
- The aircraft will first climb to the flight operating altitude. If the target point is higher than the flight operating altitude, the aircraft will fly obliquely directly to the target point. If the target point altitude is lower than the flight operating altitude, the aircraft will fly above the target point and then descend to the target point.
- For aircraft with firmware versions below v08.00.0003, the aircraft will first climb to the flight operating altitude, then fly obliquely to the target point.
- If the target point needs to be changed during tap-to-fly, select a new target point directly and dispatch the task; the aircraft will fly directly to the new target point.
- Requires "DJI Dock" firmware v01.06.17.02 or above and aircraft firmware v09.01.00.05 or above to use the target point change feature.
- To ensure flight safety, be sure to set reasonable parameters such as flight operating altitude, return-to-home altitude, and target point altitude based on the dock's surrounding environment, operating environment, and mission objectives. Ensure that the set altitude is at least 5 meters below the altitude limit of any restricted altitude zone, and that there are no obstacles blocking the flight and return path.
- During tap-to-fly, the aircraft can navigate around restricted flight zones and terrain obstacles. If there is a restricted flight zone with a maximum width exceeding 400 meters between the current position and the target point, the aircraft may not be able to navigate around it and will hover at the edge of the restricted zone. After hovering, users can view the surrounding environment through the live feed and remotely control the aircraft to navigate around.
- When the aircraft triggers low battery return-to-home, do not cancel the return or take control during the return process; otherwise, the aircraft will exit the return process and may be unable to return to the dock.
- When the aircraft triggers critical low battery landing, the aircraft will land automatically and cannot be cancelled.
- Do not use the remote control function to command the aircraft to land; otherwise, the aircraft will not be able to stop its propellers after landing and will not be able to automatically return to the dock.
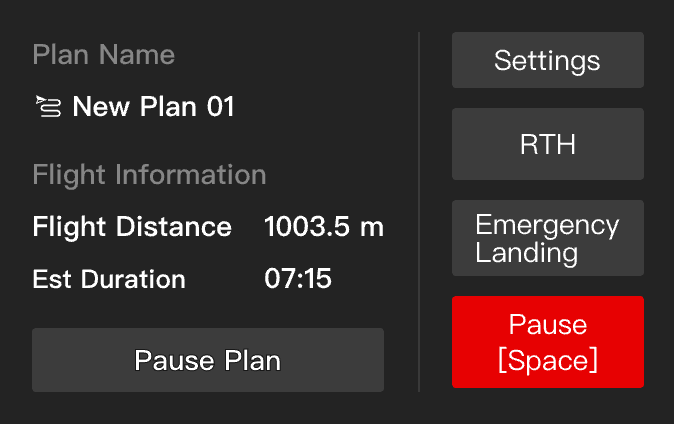
- During planned task flight, the panel will display the basic information of the route task. Users can adjust flight settings, command the aircraft to return to home, emergency stop, or resume the route.
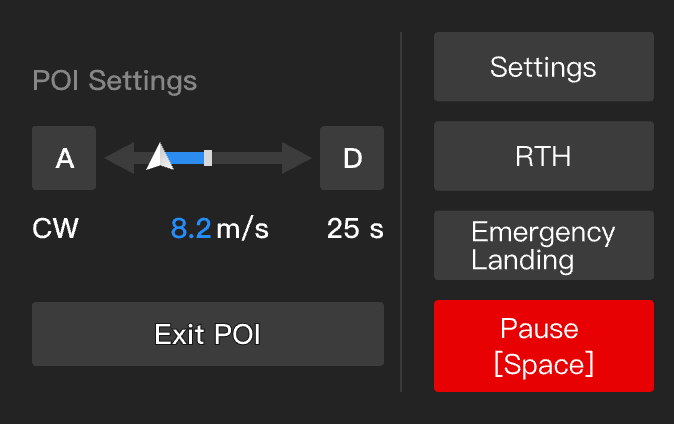
- During smart orbit, the panel will display the orbit speed. Users can adjust flight settings, command the aircraft to exit smart orbit, return to home, emergency stop, or resume the route.
 Smart Orbit:
After selecting an aircraft, users can right-click on the map to select any position or any annotation point as the target point for smart orbit. After the target point is set, the aircraft will automatically look toward the target point, and a virtual flight trajectory will be displayed on the map. Users can set the smart orbit direction and speed, and use the keyboard to fine-tune the aircraft's altitude and distance relative to the target point. The operation check panel will display the estimated time for the aircraft to complete one orbit. After clicking "Execute", the aircraft will begin smart orbit.
During smart orbit, users can set the aircraft's orbit direction and speed via the device mini-window panel or keyboard shortcuts. To exit smart orbit, users can click "Exit" or press the spacebar to interrupt the smart orbit.- To use the smart orbit function, both flight and payload control authority must be obtained simultaneously.
- To use the smart orbit function, dock firmware v01.06.17.02 or above and aircraft firmware v09.01.00.05 or above are required.
- If the aircraft touches the boundary of a restricted flight zone or detects an obstacle during smart orbit, the aircraft will hover and wait for user action. Pay close attention to the aircraft's operating status and live feed during orbit, and fly with caution.
- During smart orbit, the aircraft flies laterally. In low-light conditions such as at night, the aircraft's obstacle avoidance system will not function. Users should check the surrounding environment before starting smart orbit or review the flight trajectory in the cloud.
- The cloud will dynamically adjust the maximum speed of smart orbit based on the distance between the aircraft and the target point.
- During smart orbit, double-clicking the live feed to look at the target point, long-pressing the left mouse button to drag the screen, and using the keyboard to fine-tune the gimbal are not supported.
- Emergency/One-Tap Landing: In an emergency during airborne operations, a landing operation can be performed. During the landing process, the landing can be cancelled at any time, and the aircraft can be controlled to move forward, backward, left, and right to avoid obstacles.
- After an emergency landing of a dock aircraft, it cannot take off again; use this function with caution.
- Requires "DJI Dock 2" firmware v10.01.32.05 or above and aircraft firmware v10.01.32.05 or above.
- When lighting is sufficient or terrain obstacles are enabled, the aircraft will intelligently plan the optimal flight path for efficiency and energy savings.
- When lighting is insufficient and terrain obstacles are not enabled, the aircraft will fly according to the set "Flight Operating Altitude" and "Return-to-Home Altitude".
- With Intelligent Optimal Route Planning enabled, the aircraft will intelligently adjust flight altitude and speed during tap-to-fly or return-to-home based on environmental conditions (wind speed and direction, obstacles, etc.) to reach the target point more efficiently and with energy savings.
- It is recommended to enable the terrain obstacle function in the operation area management for the aircraft to intelligently plan the optimal path. See the Terrain Obstacles section for details.
- If during tap-to-fly or return-to-home, environmental conditions or lighting do not meet the visual operating conditions, or other abnormal situations occur, the aircraft will be unable to intelligently plan the optimal flight path based on sensor data. If the terrain obstacle function is not enabled, the aircraft can only fly at the set altitude and cannot avoid obstacles along the way. Therefore, appropriate flight operating altitude and return-to-home altitude must be set before tap-to-fly or return-to-home.
- After disabling Intelligent Optimal Route Planning, when environmental conditions or lighting meet the visual conditions, or terrain obstacle data is enabled, the aircraft can still fly horizontally or climb vertically to avoid obstacles during tap-to-fly or return-to-home.
- During operations, if the altitude limit is lower than the current aircraft altitude, the aircraft will descend directly to the altitude limit and continue operations; if the aircraft altitude reaches the altitude limit, it will stop ascending and fly at the current altitude.
- If there are obstacles such as power lines or pylons on the flight path that the visual system cannot avoid, disable "Intelligent Optimal Route Planning" and ensure that the set flight operating altitude and return-to-home altitude are higher than the obstacles on the operation flight path.

- For "DJI Dock 2":
- With "Intelligent Optimal Route Planning" enabled, the aircraft will intelligently plan the optimal flight path for return-to-home based on sensor data (only when environmental and lighting conditions meet the visual operating conditions) or terrain obstacle data.
- With "Intelligent Optimal Route Planning" disabled, when environmental conditions or lighting meet the visual conditions, or terrain obstacle data is enabled, the aircraft can still fly horizontally or climb vertically to avoid obstacles during return-to-home.
- When the horizontal distance between the aircraft and the return-to-home point is greater than 5.5 meters, the aircraft will fly to the "Return-to-Home Altitude" before returning; when the horizontal distance is 5.5 meters or less, the aircraft will fly to 15 meters (if current flight altitude is below 15 meters) or maintain the current altitude (if current flight altitude is at or above 15 meters) before returning.
- For "DJI Dock":
- When the horizontal distance between the aircraft and the return-to-home point is greater than 5.5 meters, the aircraft will fly to the "Return-to-Home Altitude" before returning; when the horizontal distance is 5.5 meters or less, the aircraft will fly to 20 meters (if current flight altitude is below 20 meters) or maintain the current altitude (if current flight altitude is at or above 20 meters) before returning. When environmental and lighting conditions meet the visual conditions, the aircraft can still fly horizontally or climb vertically to avoid obstacles during return-to-home.
- For aircraft with firmware versions below v08.00.0003, the aircraft cannot navigate around obstacles or DJI restricted flight zones; check the aircraft's operating area before return-to-home.
d. Target Point Altitude (AGL): The default altitude of the aircraft relative to the FlightHub 2 terrain surface during tap-to-fly.
Note: All of the above flight parameters can be configured when the aircraft is powered off.
Map Information Module
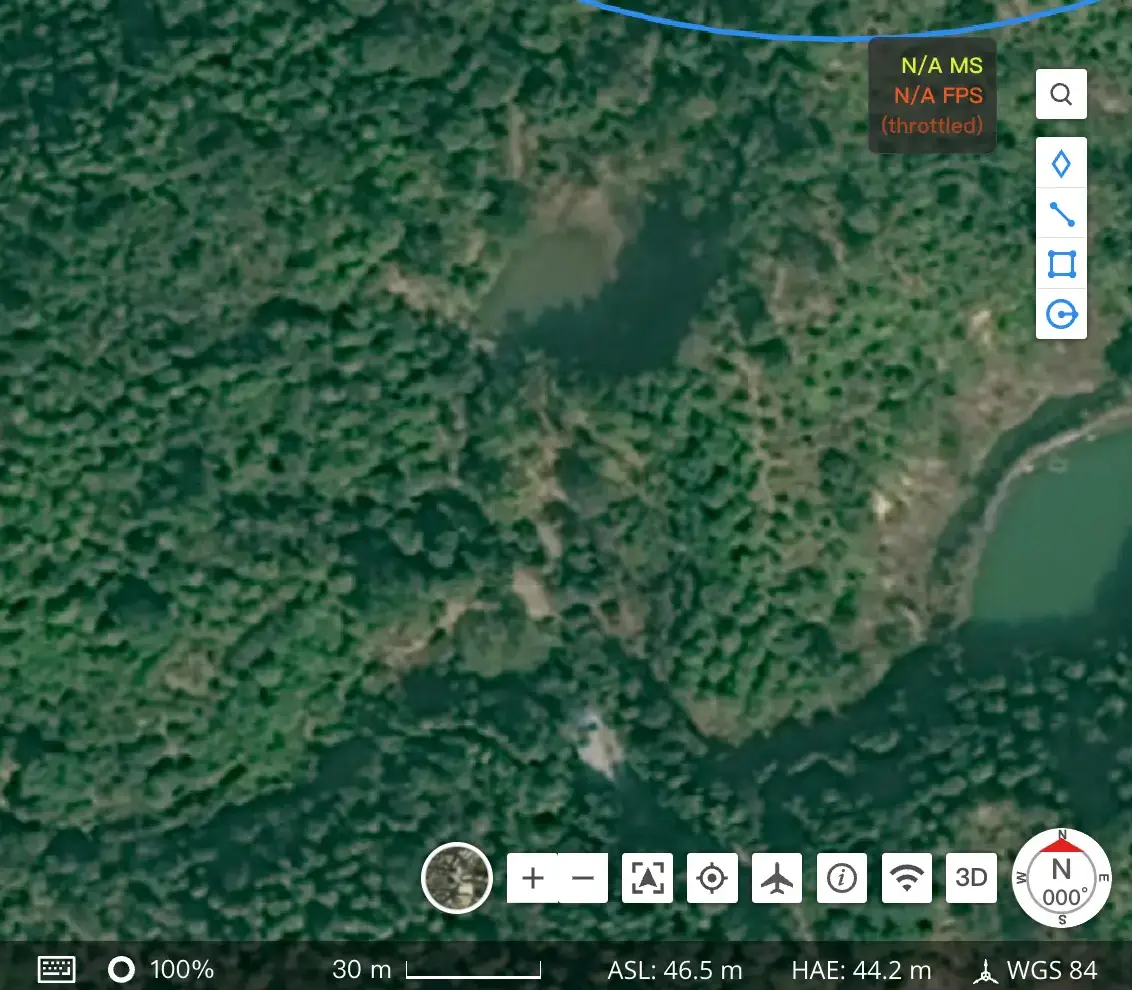
Users can observe all annotations and device information within the current project in the map module. Supports right-clicking the map interface for tap-to-fly, smart orbit, and look-at-target-point operations.
Note: For more map interface operations, see the "Map Details" section.
Auxiliary View Module
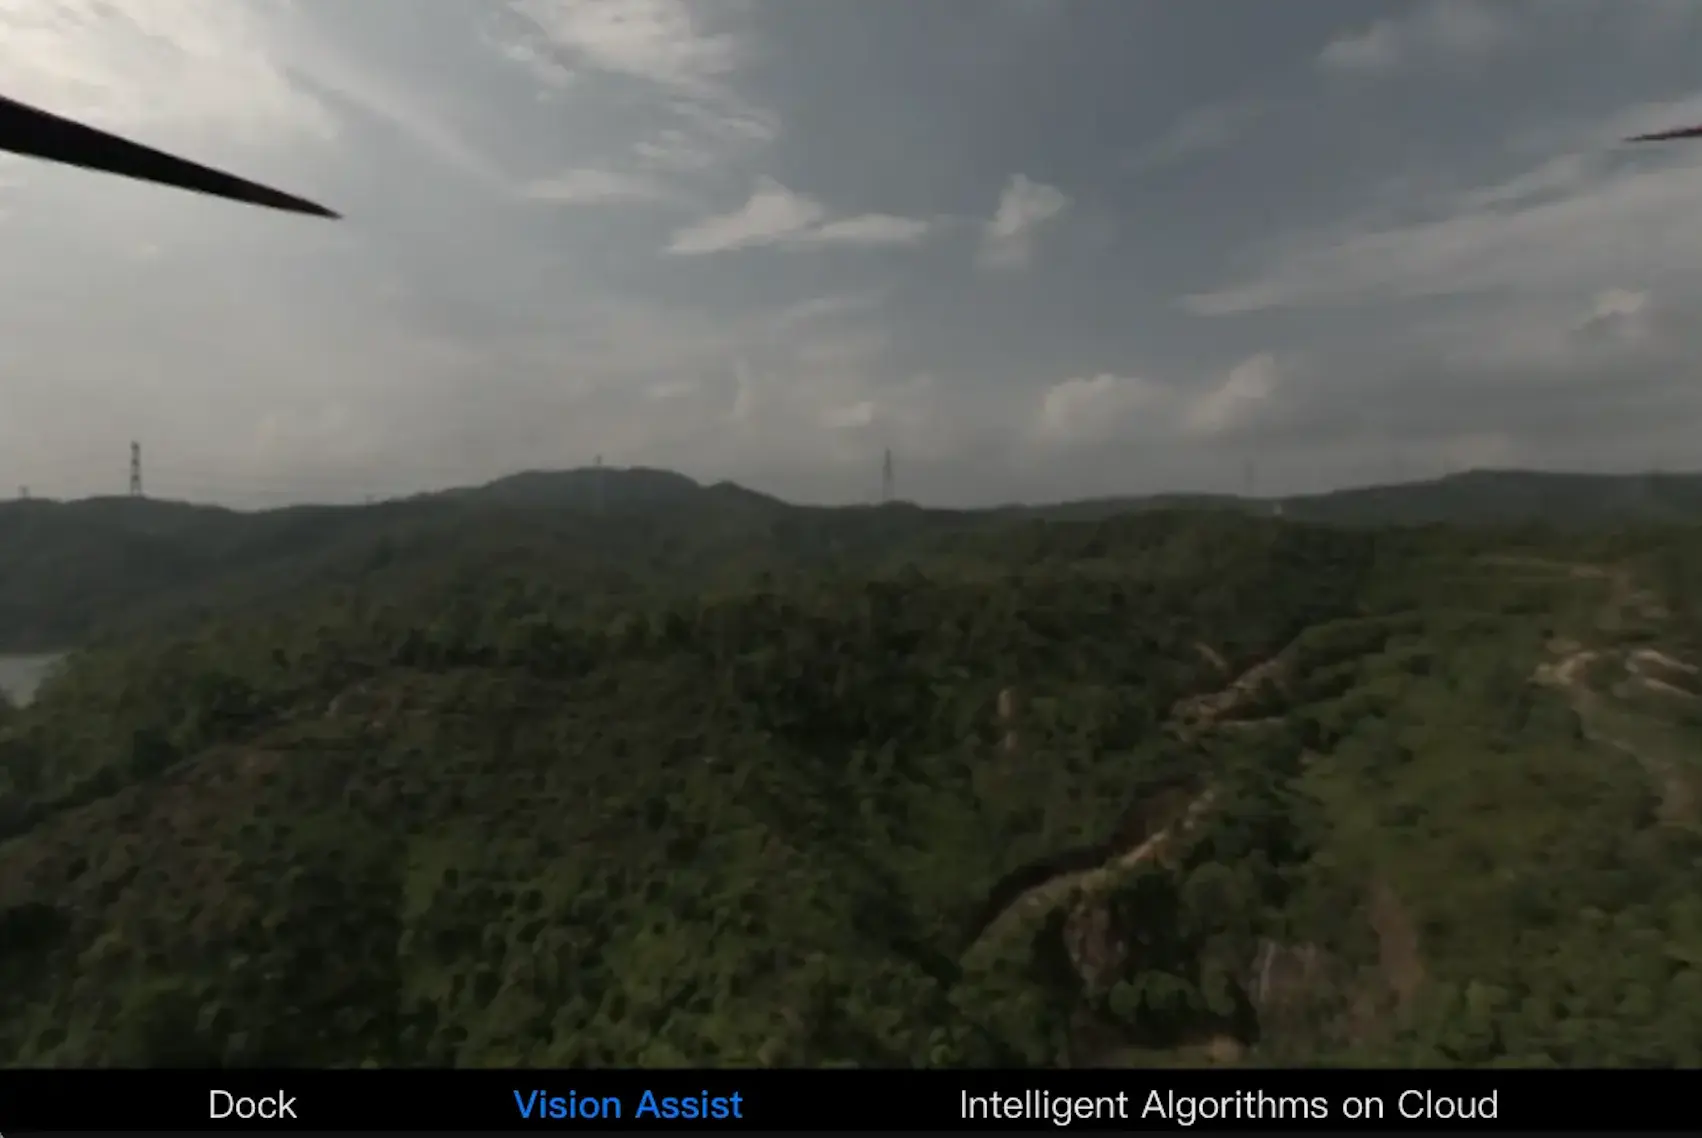
Contains dock live stream, Vision Assist (viewable after takeoff), and cloud AI algorithm.
Dock Live Stream
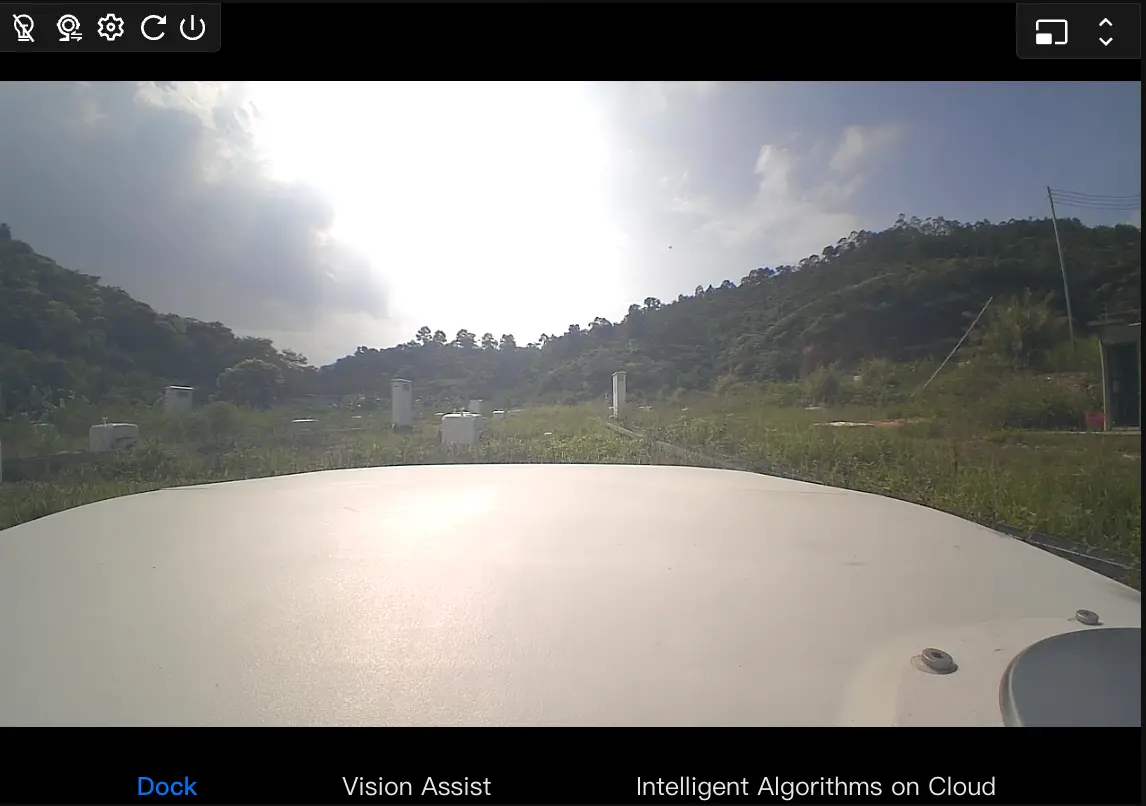
Includes dock live stream feed and alert information.
| Icon | Description |
|---|---|
 | Supplemental Light Switch: Used for dock live stream lighting. |
 | Dock Camera Settings: Switch between "indoor/outdoor" cameras here. |
 | Live Stream Quality Settings: Switch between "Ultra HD / Smooth / Auto" live stream quality. |
 | Refresh: Refresh the live stream feed. |
 | Stop Live Stream: Stop and close the live stream feed. |
 | Switch to Main View: Switch the dock live stream feed from the sub-view to the main view. |
 | Full Height Screen: Click to hide the map module and switch the dock live stream feed to full height screen. |
Dock Live Stream Feed
- By default, the dock live stream feed is disabled when a user enters the Virtual Cockpit. Click the "Enable" button to open the dock live stream.
- When the aircraft returns to home, the sub-view will switch by default to display and open the dock live stream feed. Users can click to switch to the main view to observe the dock's surrounding environment.
Dock Alert Information
Displays dock alert information; not displayed by default if there are no alerts.
Flight Feed / Vision Assist
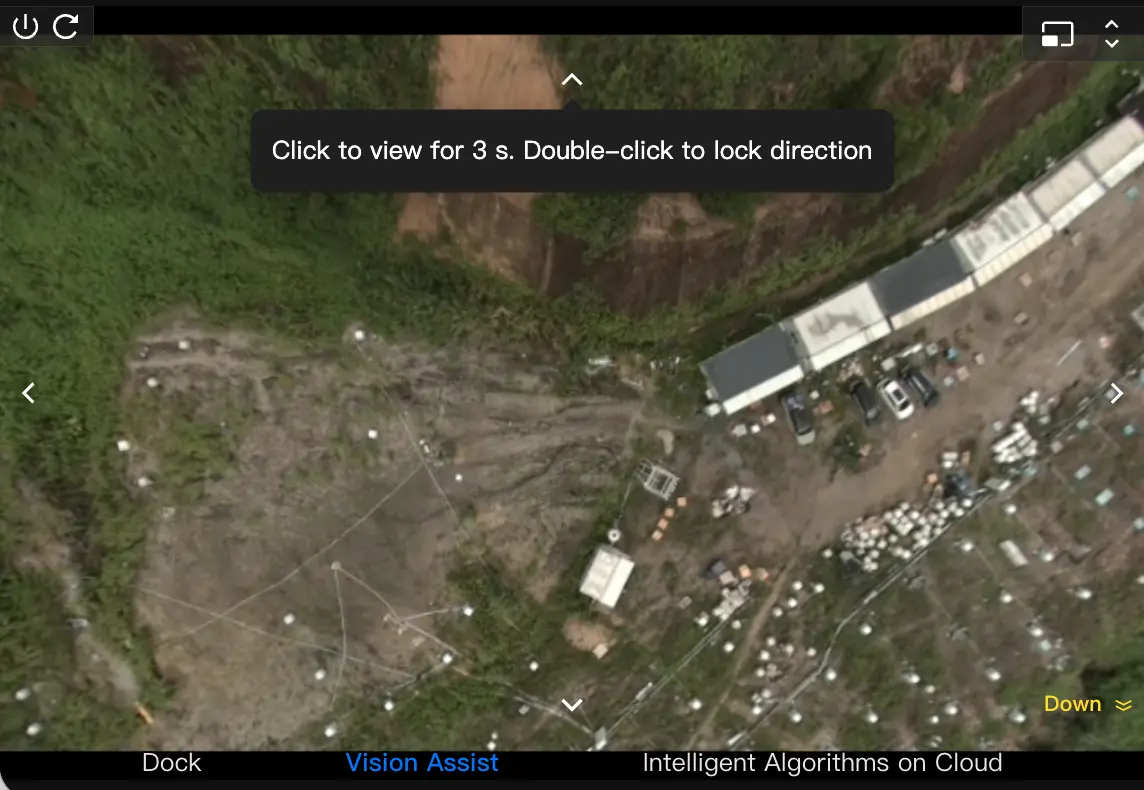
| Icon | Description |
|---|---|
| Close: Stop and close the flight feed/Vision Assist feed. |
| Refresh: Refresh the flight feed/Vision Assist feed. |
| Switch to Main View: Switch the flight feed/Vision Assist feed from the sub-view to the main view. |
| Full Height Screen: Click to hide the map module and switch the Vision Assist feed to full height screen. |
- The flight feed is only supported by "DJI Dock".
- The Vision Assist function requires "DJI Dock 2" firmware v10.01.32.05 or above and aircraft firmware v10.01.32.05 or above.
- When the aircraft has not taken off and is in low-power mode, Vision Assist is disabled by default.
Cloud AI Algorithm Live Stream
In the "Function Operation Area", click the "Cloud AI Algorithm Call Button"  , select an algorithm instance, and the live feed will display a real-time call window for the third-party cloud AI algorithm. Users can view the corresponding video live stream processed by the cloud algorithm through this window. The window supports switching views, minimizing, and closing the live stream.
Note: Due to latency in cloud algorithm calls (depending on the performance of third-party vendor services), pay attention to flight safety after switching the cloud AI algorithm live stream to the main view.
Function Operation Area
| Icon | Description |
|---|---|
 | View Follow: Click or use keyboard [V] key to enable the view follow function. |
 | Gimbal Quick Controls: Supports quick operations for "Gimbal Center" and "Gimbal Down". |
 | Laser Pin Drop: Click to set the screen center point as an annotation point. During flight, to observe an annotation point, right-click the annotation point on the map and select "Look at Annotation Point". Note: "DJI Dock 2" can simulate pin drops based on camera auxiliary heading and cloud terrain data. |
 | Laser Ranging: Get real-time latitude/longitude, altitude information, and distance to the current aircraft at the screen center point. |
 | Onboard AI Algorithm: When enabled, the live feed displays recognized targets in real time and supports target alerts. |
 | Smart Tracking: When enabled, quickly lock onto a target for continuous tracking. |
 | Multimodal Target Detection: After describing targets in natural language, enable intelligent target recognition, counting, alerts, and more. |
 | Cloud AI Algorithm: View the corresponding video live stream processed by the cloud algorithm. |
 | Live Broadcast: After enabling, click the "Start Broadcasting" button to broadcast in real time. |
 | File Broadcast: Set file broadcasting via recording, text-to-speech, or importing audio files. Supports setting "Loop Mode" and broadcast volume. |
 | Spotlight: Set spotlight parameters such as brightness and mode here. |
 | Parachute: During flight, swipe right to release the parachute and ensure aircraft safety. |
 | AR Settings: Supports enabling AR streets, annotations, return-to-home points, and alert points. |
 | Strobe Light: Use preset or create new strobe modes for the strobe light. |
 | Navigation Light: Users can toggle the aircraft's navigation lights in the Virtual Cockpit. |
 | Stealth Mode: Users can toggle the aircraft's stealth mode in the Virtual Cockpit, which disables the aircraft's navigation lights, aircraft status indicator lights, and battery level indicator lights. Note: In stealth mode, enabling the navigation light will automatically exit stealth mode. |
The following sections introduce detailed information about each function in the Function Operation Area.
View Follow
Users can click or press the keyboard [V] key to enter view follow mode for target searching. After entering this mode, the mouse cursor will change to a circle, centered by default on the screen. Users can move the mouse, and the gimbal or aircraft will look in the direction of mouse movement.
- In view follow mode, when the gimbal movement has not reached its limit, moving the mouse will only move the gimbal. When the gimbal movement reaches its limit, moving the mouse will cause the aircraft to move accordingly.
- In view follow mode, users cannot click buttons on the interface. To control the aircraft or gimbal camera, use the keyboard or mouse; to click buttons on the interface, first press [ESC] or press [V] again to exit view follow mode.
- For more gimbal camera operation details, refer to the "Remote Control - Device Mini-Window" - Gimbal Camera Control section.
- Note: To use this function normally, Chrome 92 or above is required.
Onboard AI Algorithm (AI Recognition)
Click to enable the AI recognition function. The live feed will display real-time recognized targets and supports target alerts. Default AI algorithms include "DJI Visible Light Detection" and "DJI Infrared Detection". Different AI recognition algorithms can be selected to enable based on actual application scenarios.
DJI Visible Light Detection
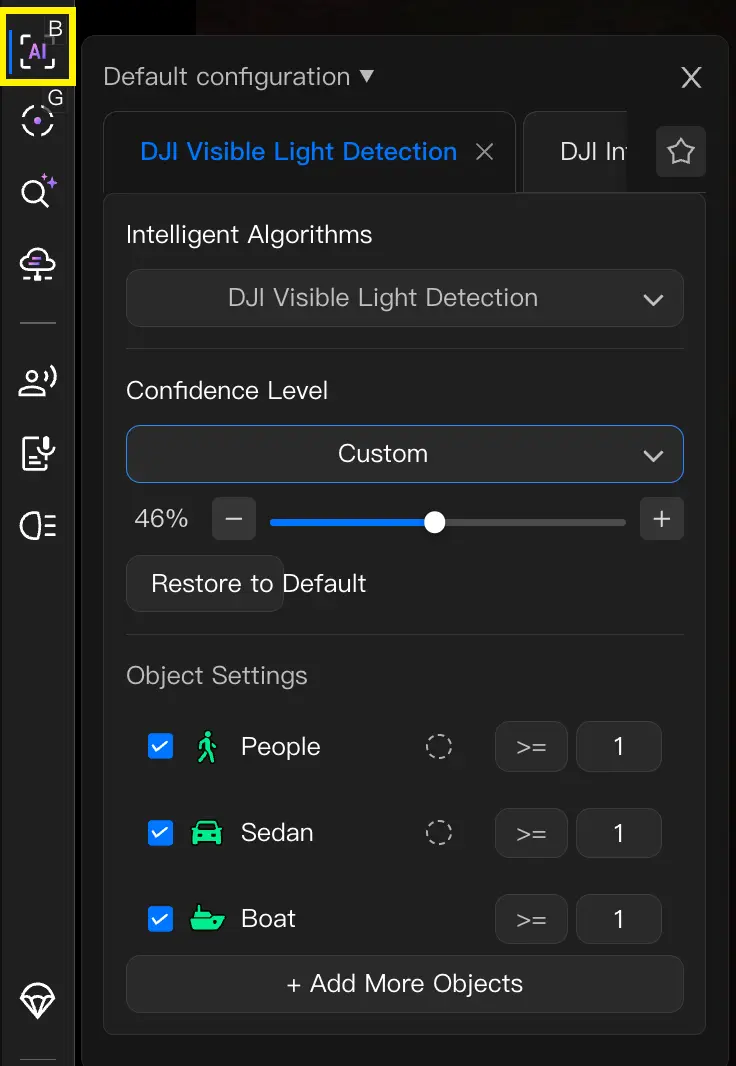
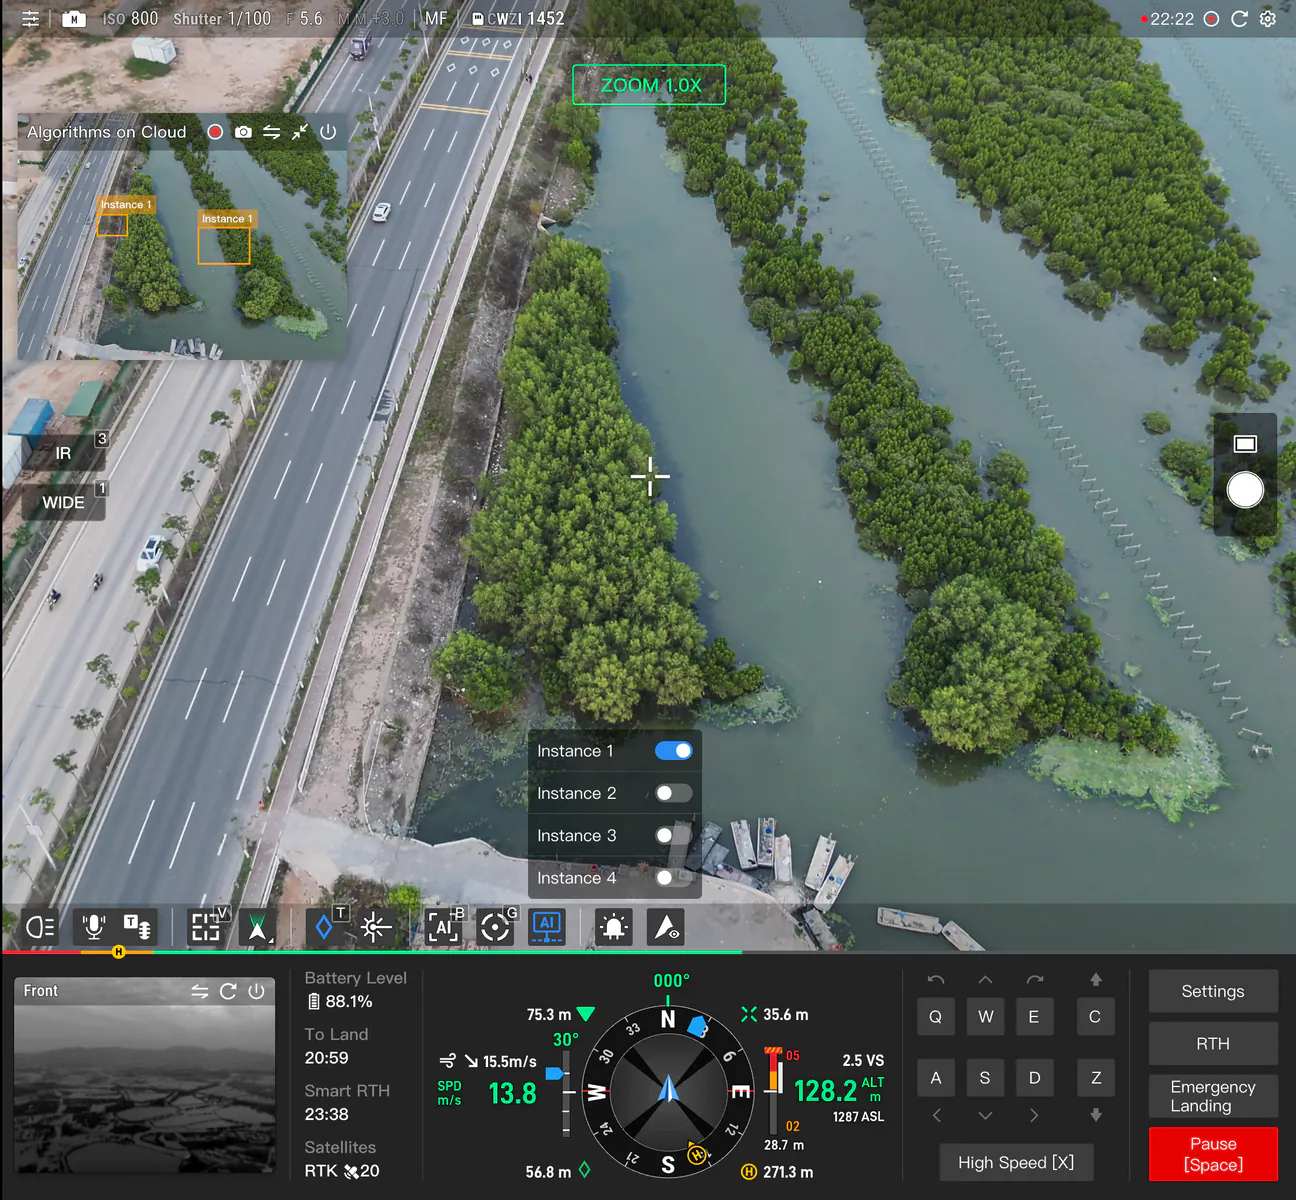
The "DJI Visible Light Stream Recognition" algorithm supports recognition of target objects such as people, vehicles, and boats, with confidence level setting and alert support.
DJI Infrared Recognition
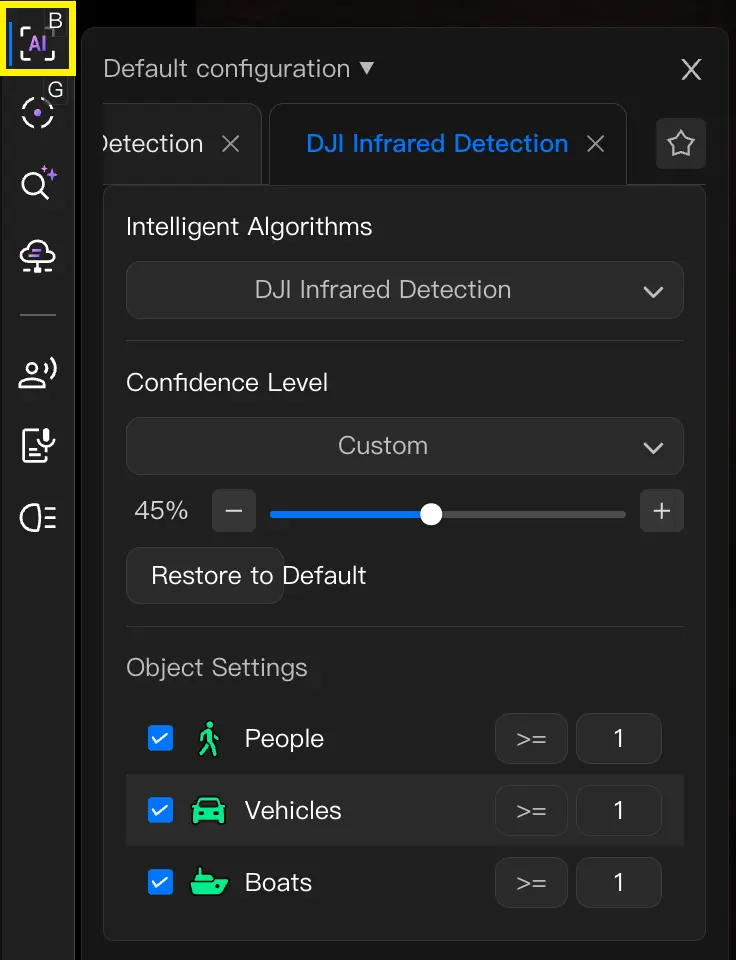
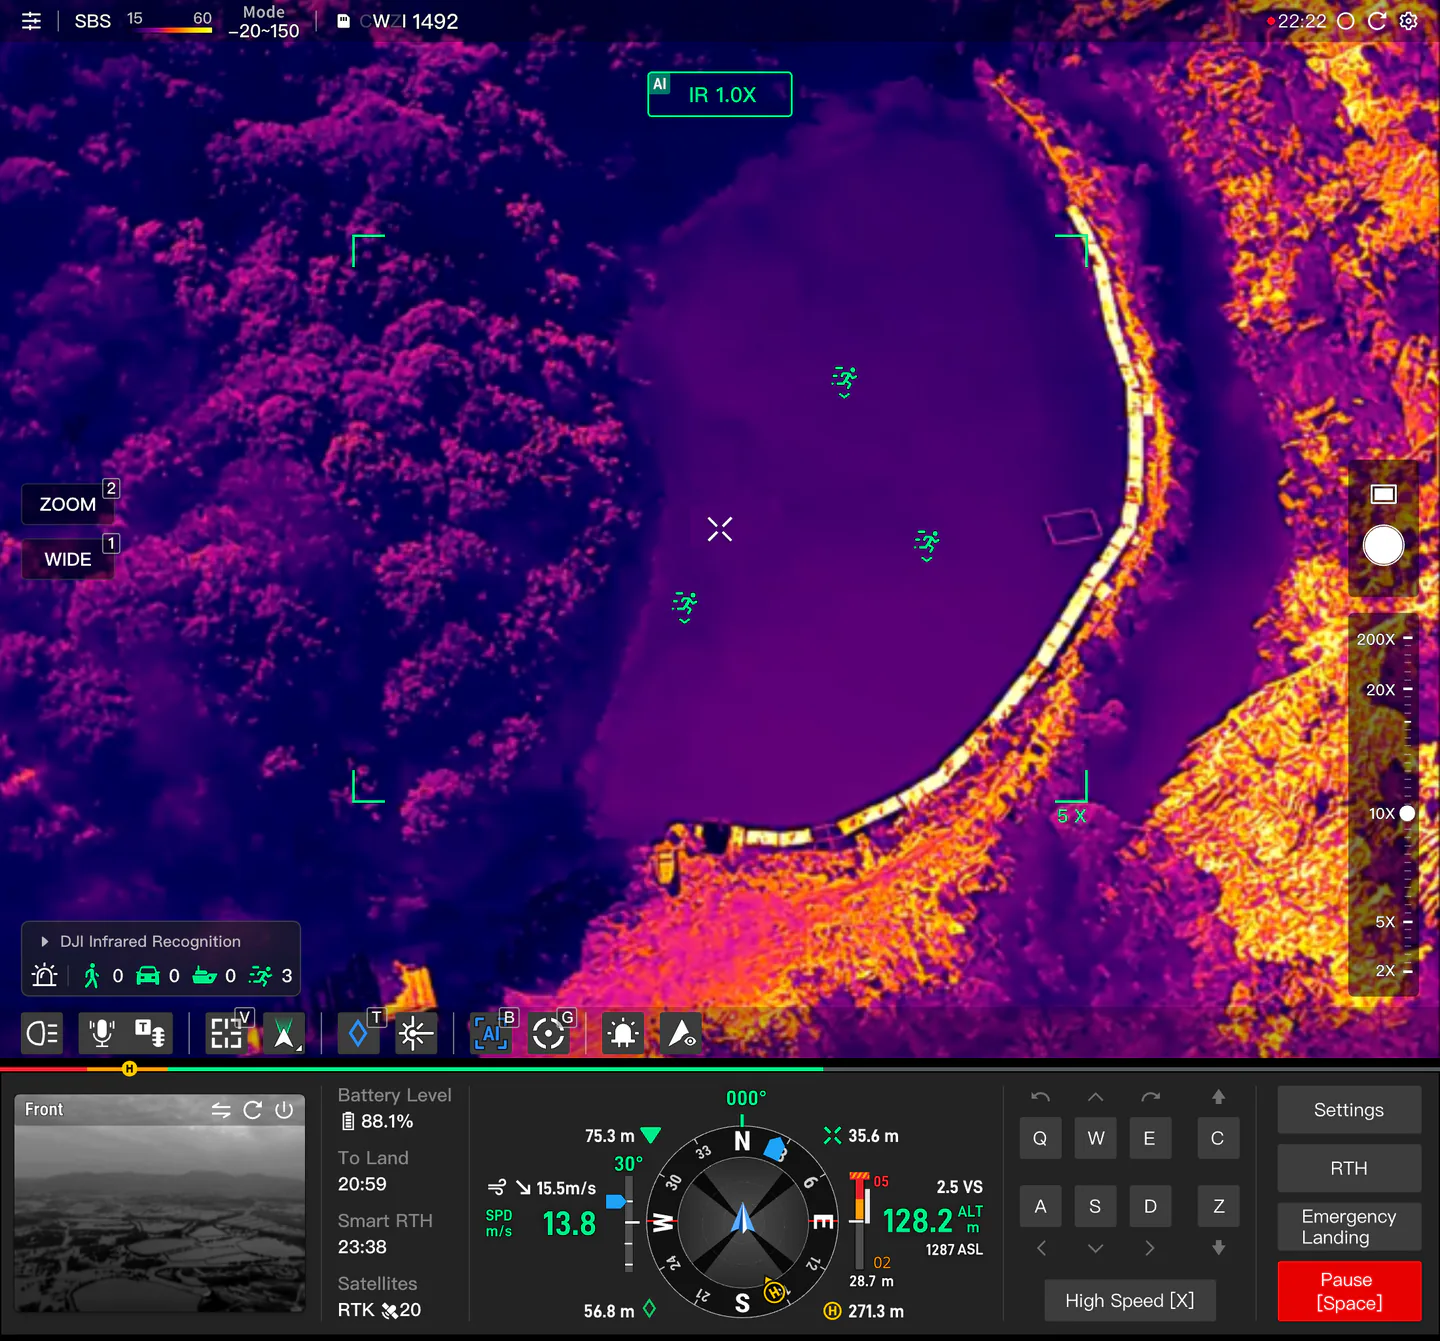
Select "DJI Infrared Recognition"; the algorithm supports recognition of people, vehicles, and boats, with confidence level setting and alert support.
Target Alert
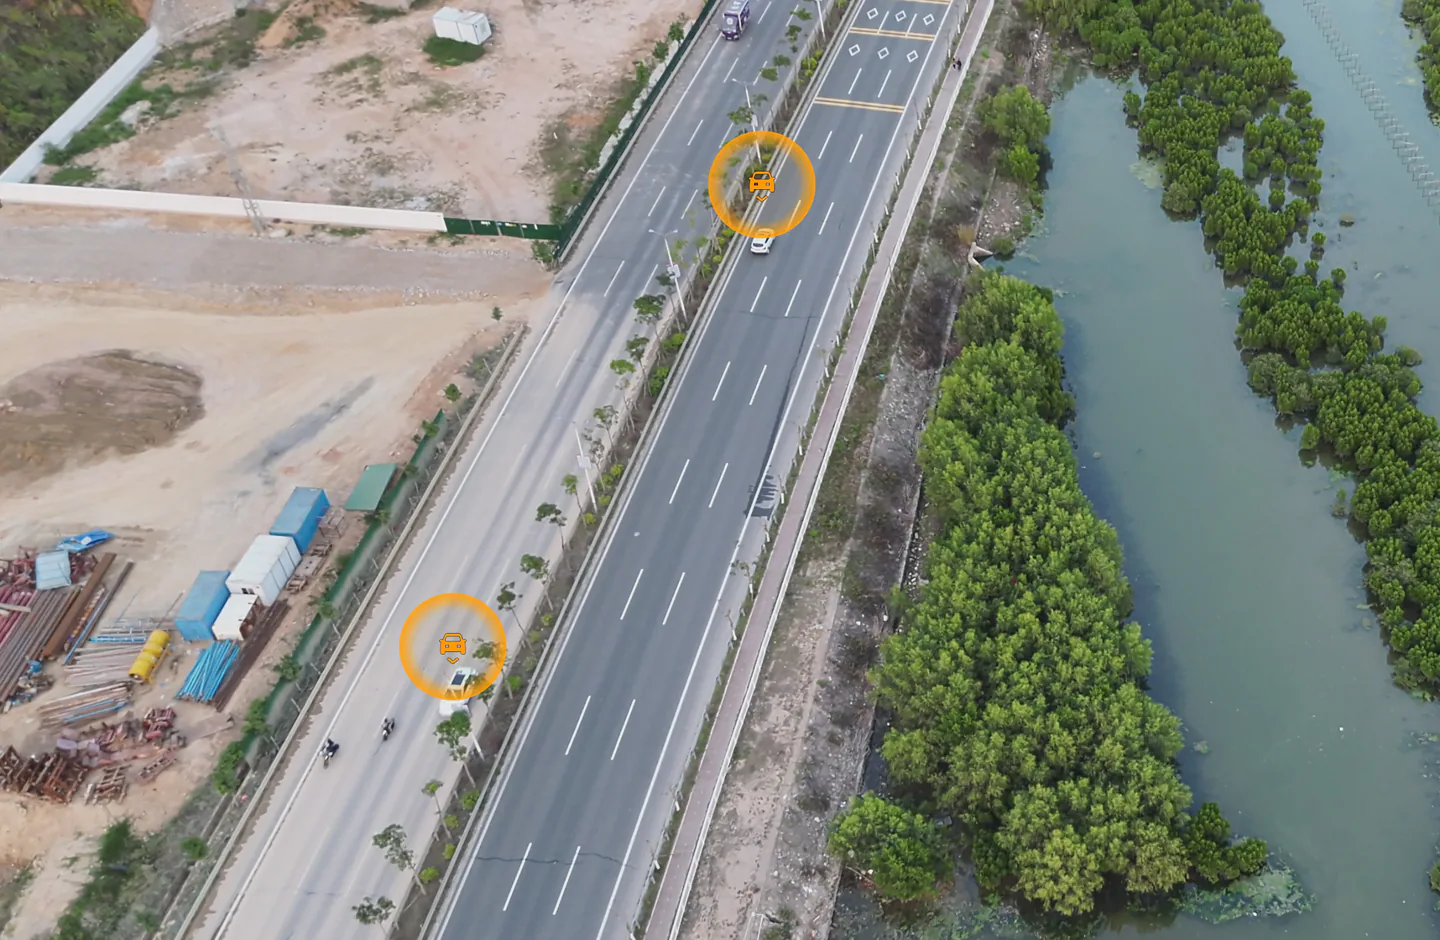
After enabling "Target Alert", when a corresponding target is identified, the target will produce a breathing light effect, and the system will emit an alert sound.
Third-Party Algorithm
If a third-party algorithm developed via the DJI AI platform is installed and configured on the aircraft, a third-party AI algorithm tab will appear in the pull-up menu. Switch to it and select the corresponding third-party model label for recognition.
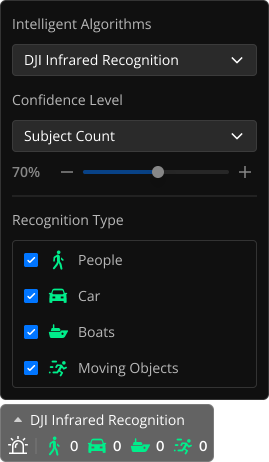
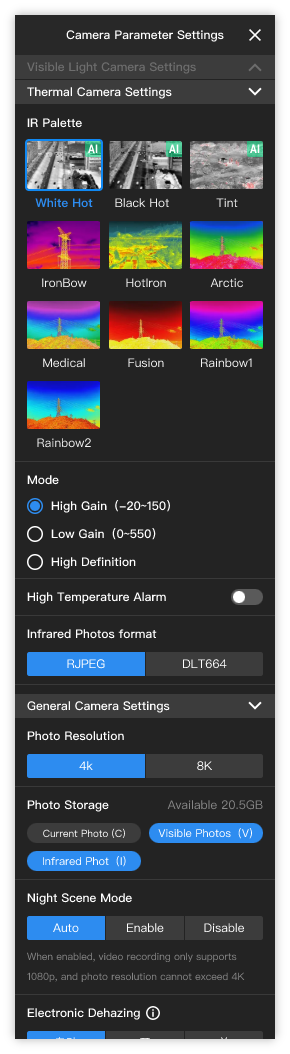
Selecting DJI infrared AI recognition or a third-party infrared AI recognition algorithm will automatically switch to the recommended compatible infrared color palette.
To use this function normally, Chrome 92 or above is required.
Smart Tracking
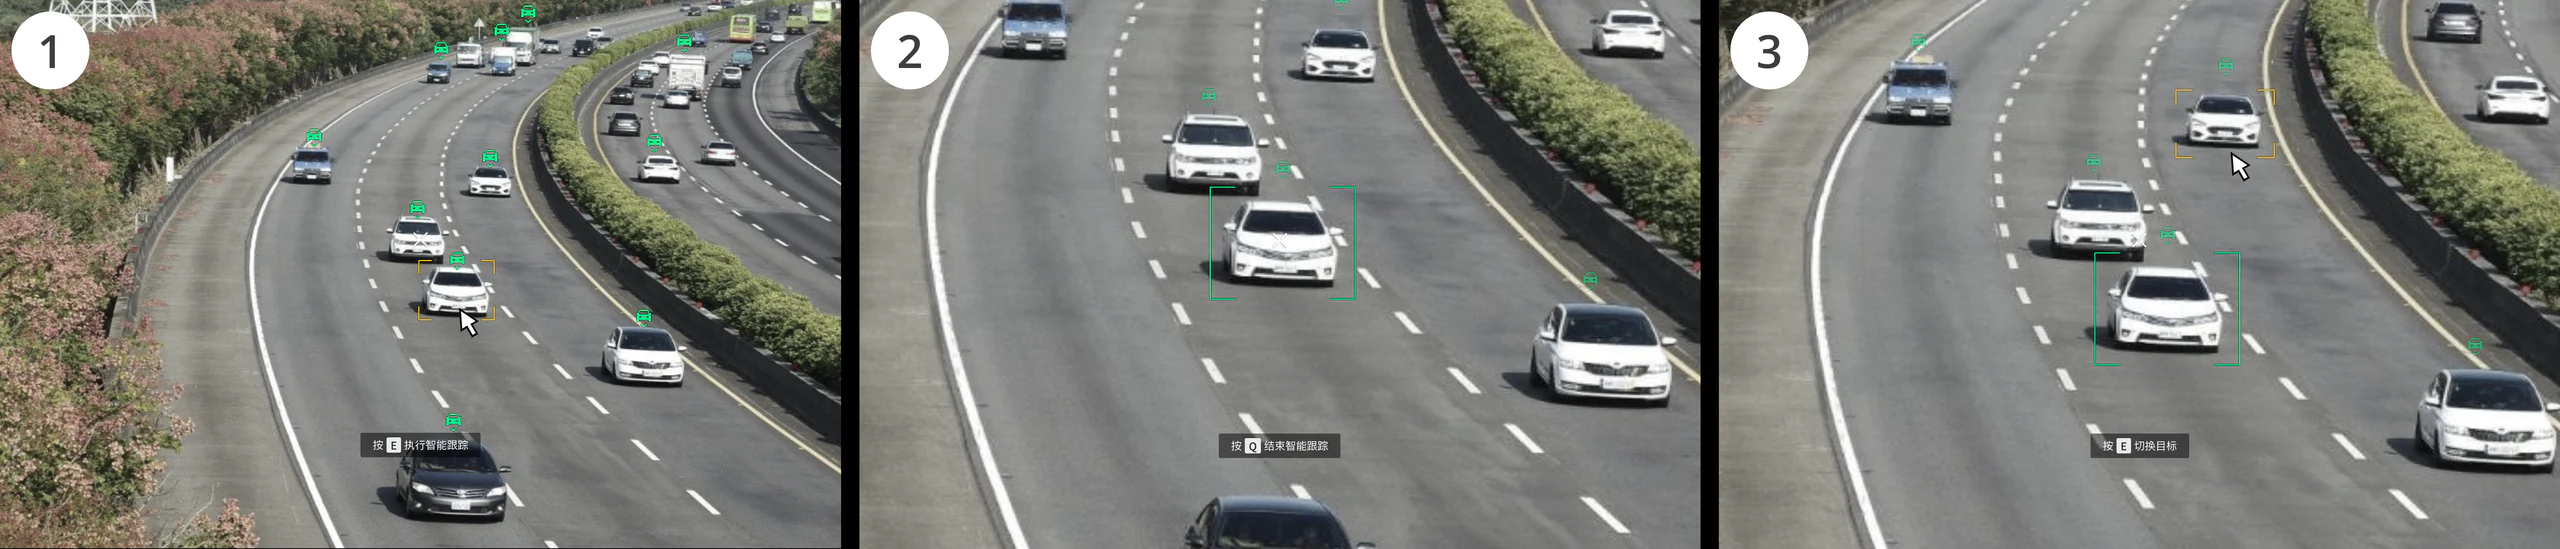
After enabling the Smart Tracking function, move the mouse over a recognized target and press [E] key or right-click and hold to box-select, to quickly lock onto the target for continuous tracking.
In the locked state, press [Q] key to cancel target lock tracking.
During target tracking, move the mouse over other recognized targets and press [E] key to quickly switch the tracking target. During locked target tracking, if the target is lost, the system will attempt to automatically re-acquire it.
Note: To use this function normally, Chrome 92 or above is required.
Multimodal Target Detection
After obtaining payload control authority in the Virtual Cockpit and while in the visible light lens, a multimodal target detection entry is available. Click to bring up the target search input panel.
Target Detection Step 1: Input
| Target Detection Input Method | Operation Description |
|---|---|
Search for targets via text description.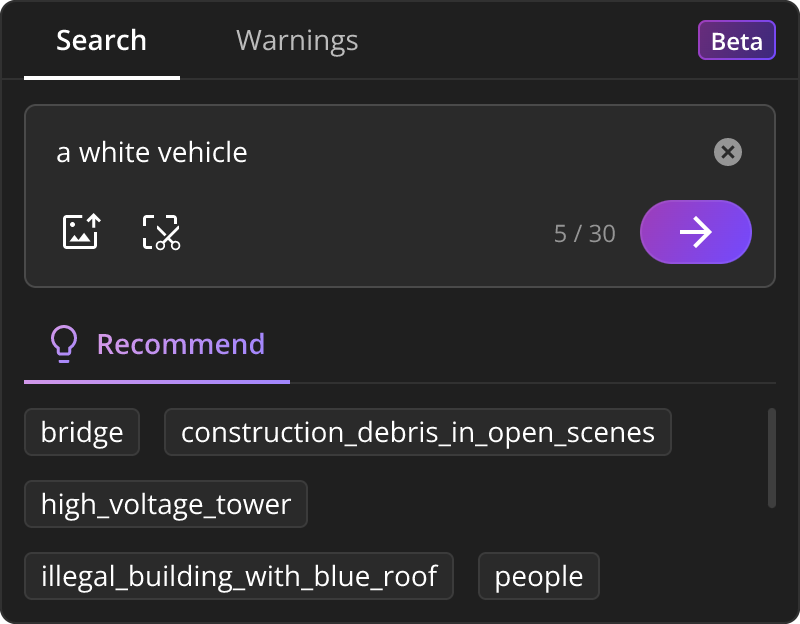 | Briefly describe the features of the target you want to search for, such as "small black sedan", up to 30 characters. Recommended high-frequency scene prompt words can be selected; clicking will automatically fill in the Prompt text box for quick input. |
Search for targets by uploading an image.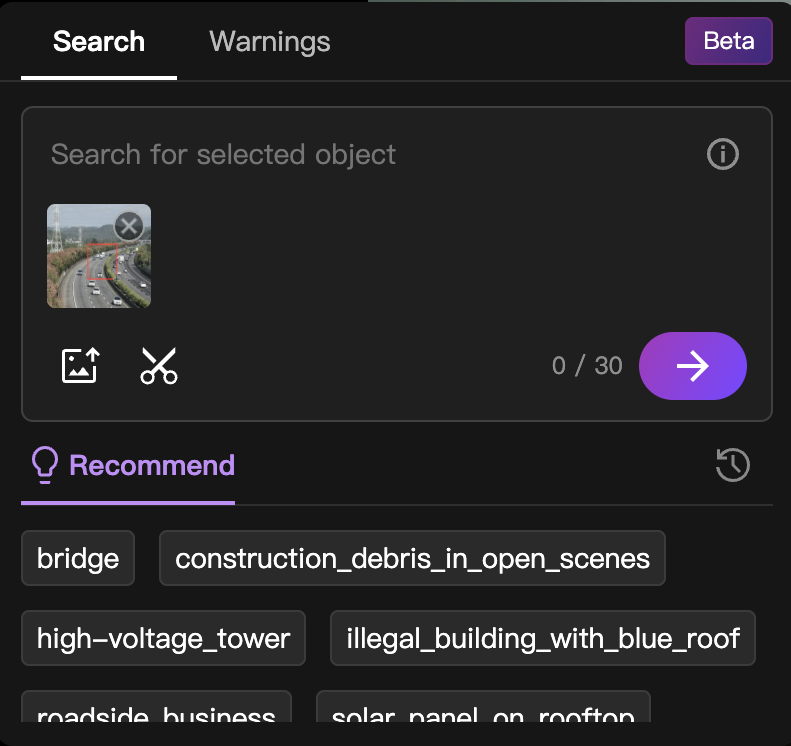 | Click to upload a photo, select the photo file; after uploading, you can box-select the target within the photo. After successful upload, the text box will be automatically filled with "Please find the target in the photo", which users can further edit. |
Search for targets by capturing the current live feed.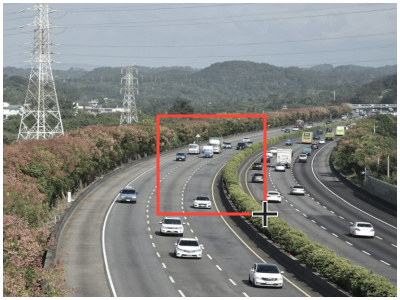 | Click the capture aircraft feed button to take a screenshot of the current live feed; box-selecting the target within the screenshot is supported. |
Target Detection Step 2: Intent Recognition
After confirming the target input to be searched, click the Next button for intent analysis.
The AI large model will perform intent analysis on the input and output summarized alert target labels (up to 10 labels), with support for setting alert thresholds (1–128) for labels, and multi-target combination searches. Labels do not currently support editing or modification. After confirming the labels are correct, click the Start Search button to begin target detection, and the panel will automatically collapse.
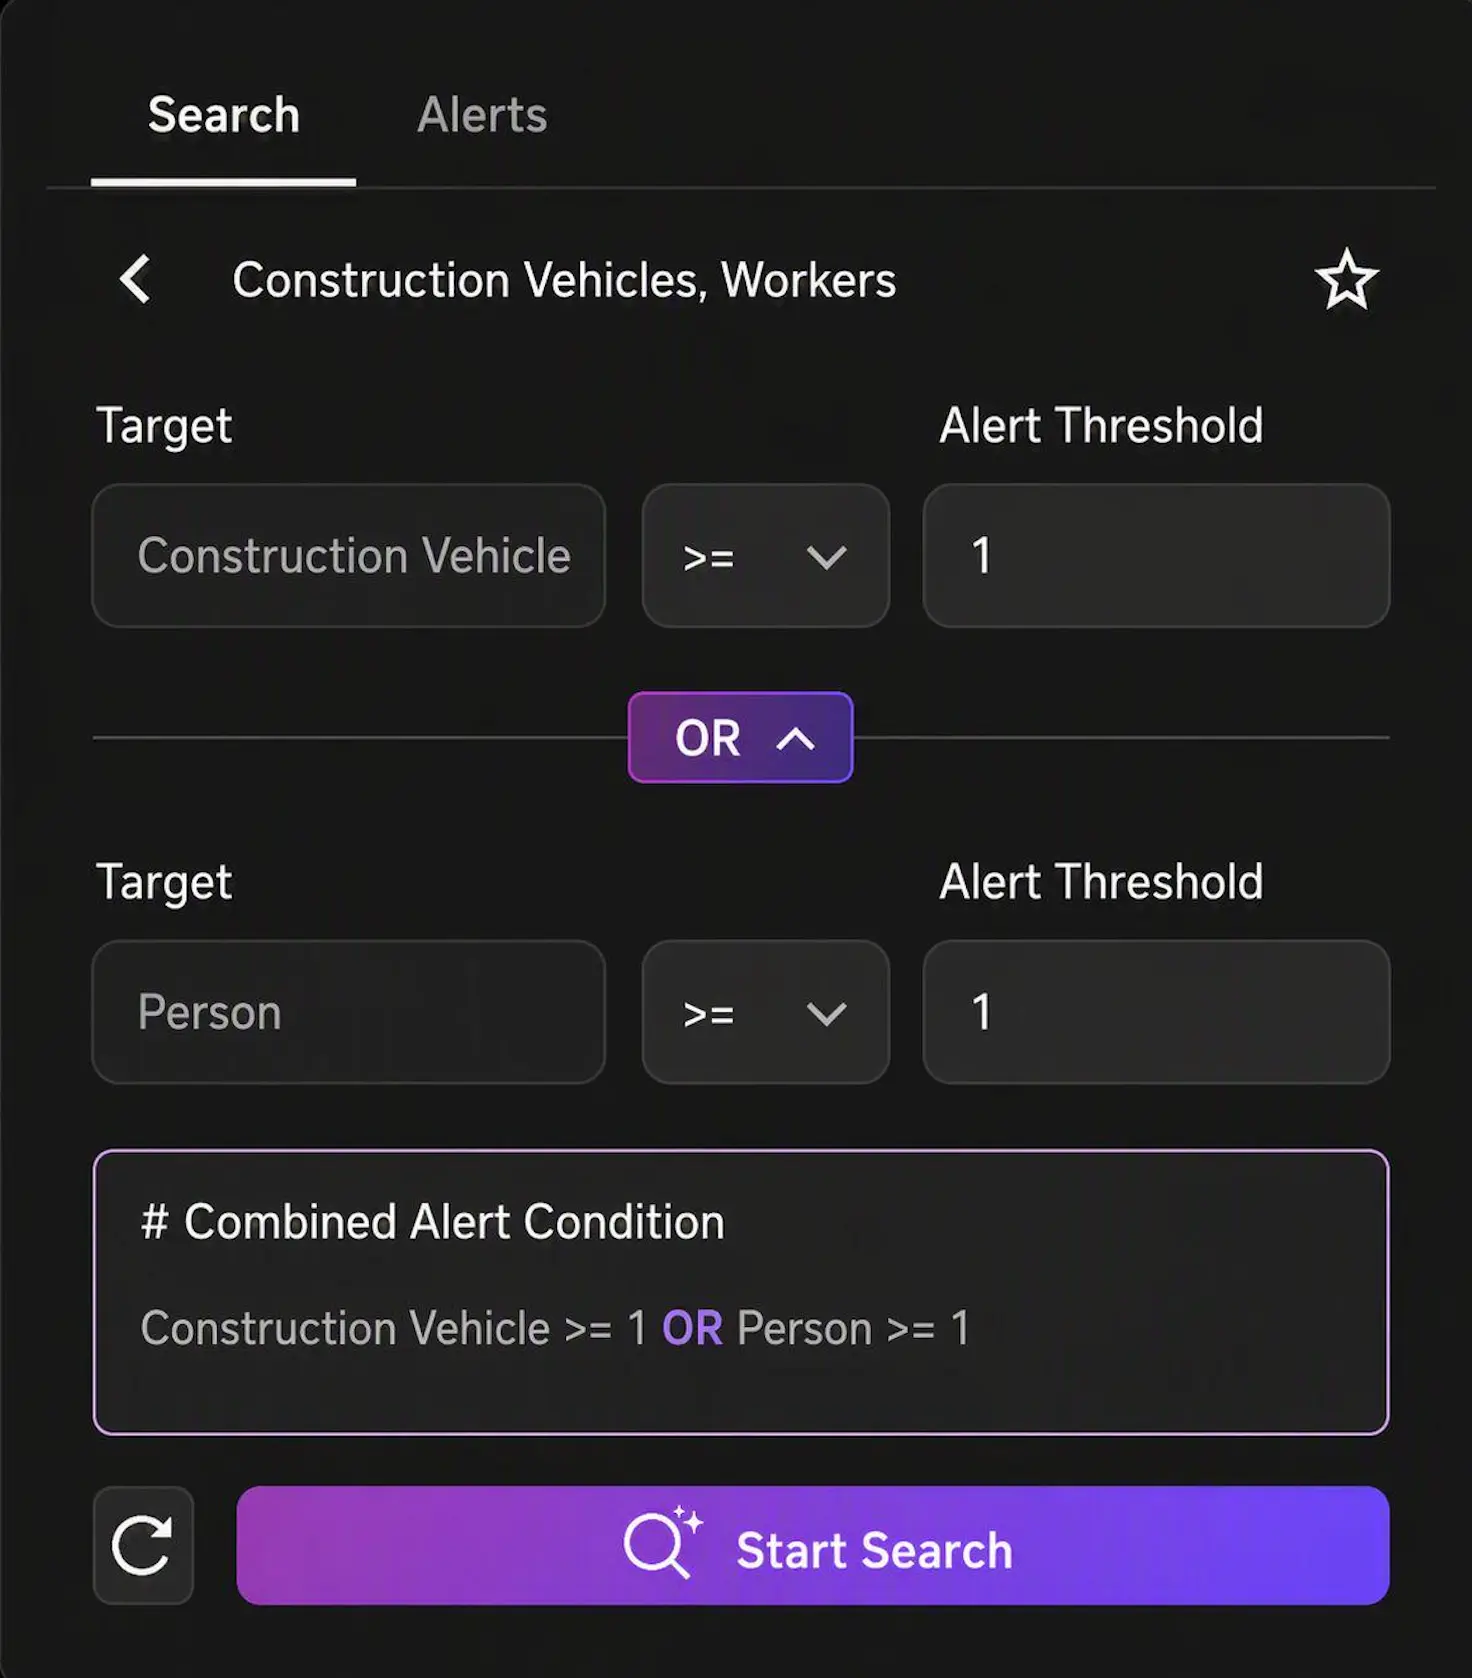
Target Detection Step 3: Start Detection
After starting target search, the multimodal target detection floating island will remain displayed with a dynamic effect: 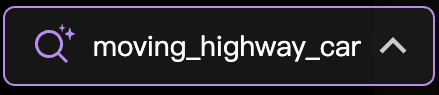
Target Alert
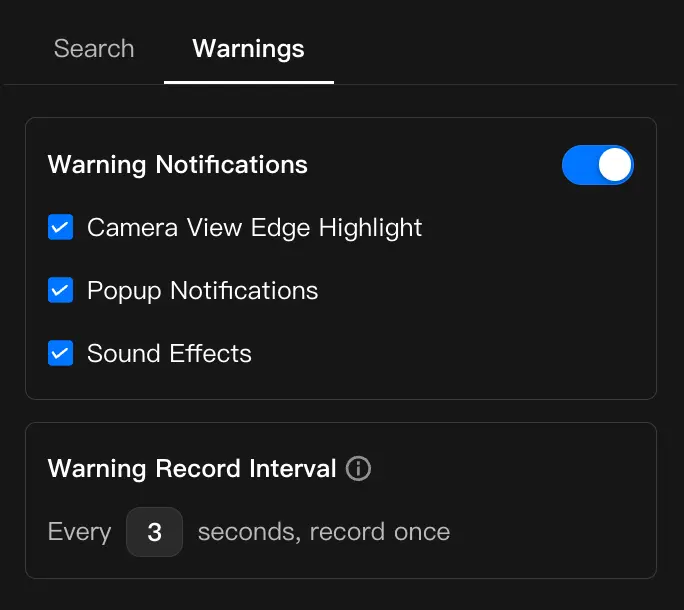
Multimodal target detection supports setting target alerts and alert record intervals. If "Alert Notification" is enabled, "Additional Alert Notification Categories" can be selected.
- Screen Edge Indicator: When a target is detected, flickering light effects will appear on both edges of the live feed.
- Pop-up Notification: When a target is detected, a pop-up window will appear in the live feed. Clicking it will automatically expand the Virtual Cockpit AI Alert Records list.
- Sound Effect: When enabled, a buzzing sound effect will be played when a target is detected.
- Alert Record Interval Configuration: Supports setting the recognition interval for the large model; the minimum interval is 2 seconds.
Note: If alert notification is not enabled, when a qualifying search target is detected, it will only be archived in the AI Alert Records list, as shown below:
Resource Consumption Description
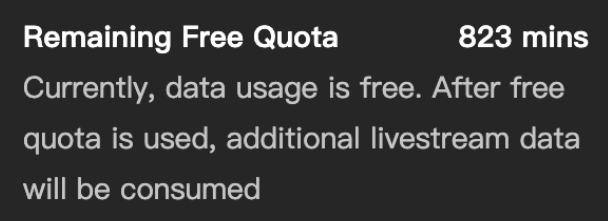
Using the multimodal target detection function will consume the organization's live stream duration resources. Each organization has a default free 1,000-minute quota. After the free quota is exhausted, billing will proceed based on live stream traffic consumption as normal. Users can view specific resource consumption details under the "Live Stream (Multimodal Target Detection)" category in the organization's billing list.
Cloud AI Algorithm Call
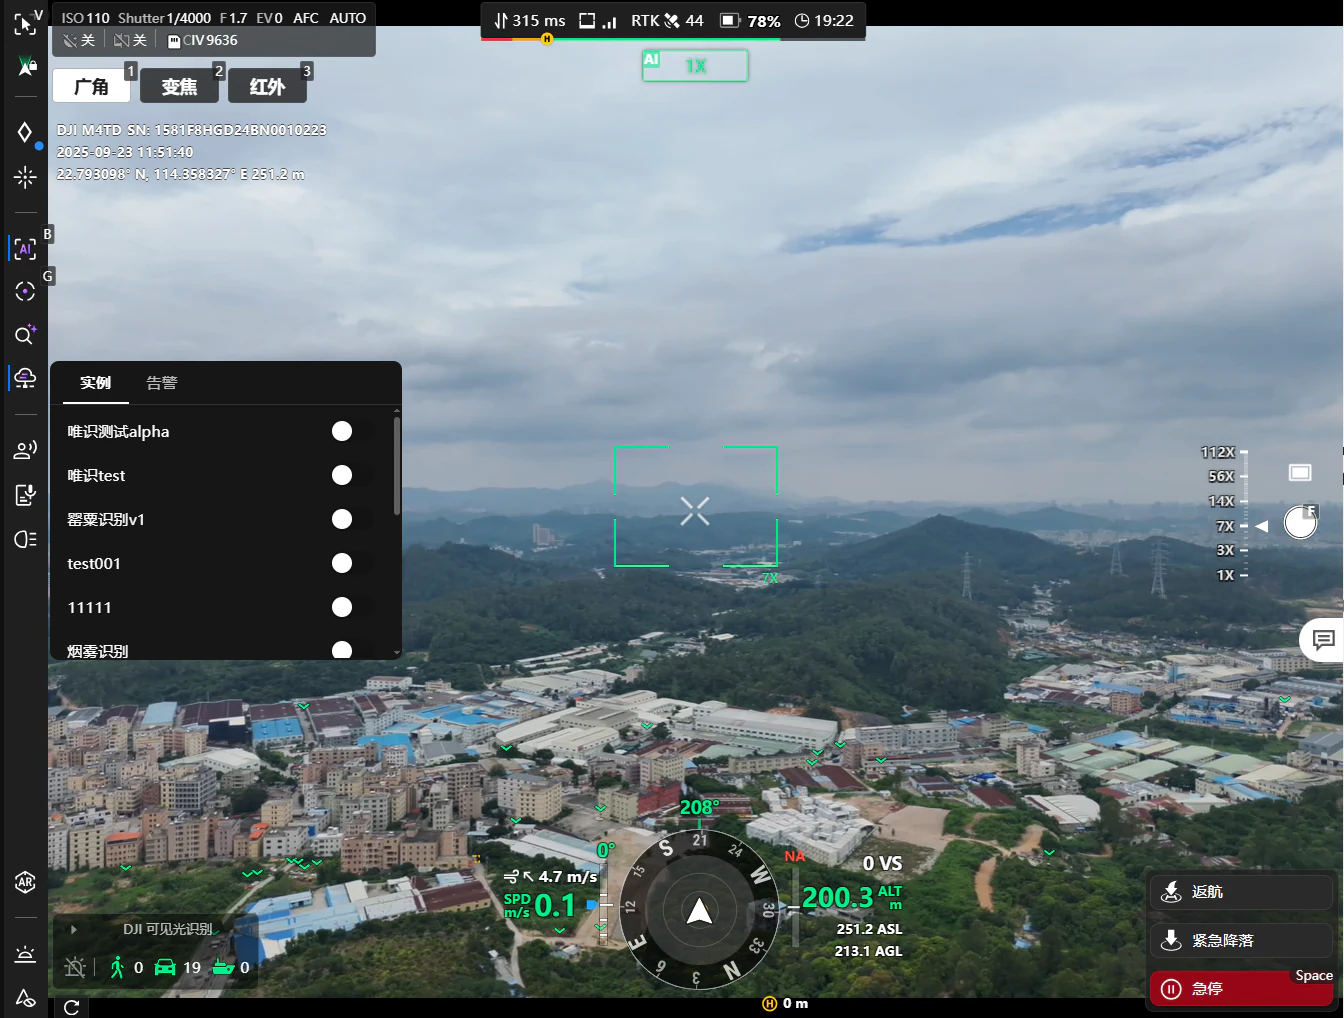
- Select an algorithm instance: In the Virtual Cockpit, click the cloud AI algorithm call button. In the expanded list, all successfully created algorithm instances can be viewed. For details, refer to the Organization Management - Algorithm Management module description.
- Enable an algorithm instance: After enabling the corresponding instance, the real-time call window for the third-party cloud AI algorithm will appear in the upper-left corner of the live feed. Users can view the corresponding video live stream processed by the cloud algorithm through this window. The window supports switching views, minimizing, and closing the live stream.
- Notes: Due to latency in cloud algorithm calls (depending on the performance of third-party vendor services), pay attention to flight safety after switching the cloud AI algorithm live stream to the main view.
"DJI AS1 Speaker", "DJI AL1 Spotlight", and Third-Party PSDK
"DJI Dock 3" and "DJI Dock 4" support mounting the DJI AS1 Speaker and DJI AL1 Spotlight. The Matrice 400 drone supports mounting the Zenmuse S1 Spotlight, Zenmuse V1 Speaker, and third-party speakers. Users can perform the corresponding operations in the Virtual Cockpit.
Note: Installing accessories may affect flight power performance or visual system performance. Please pay attention to flight safety.
(1) DJI AS1 Speaker
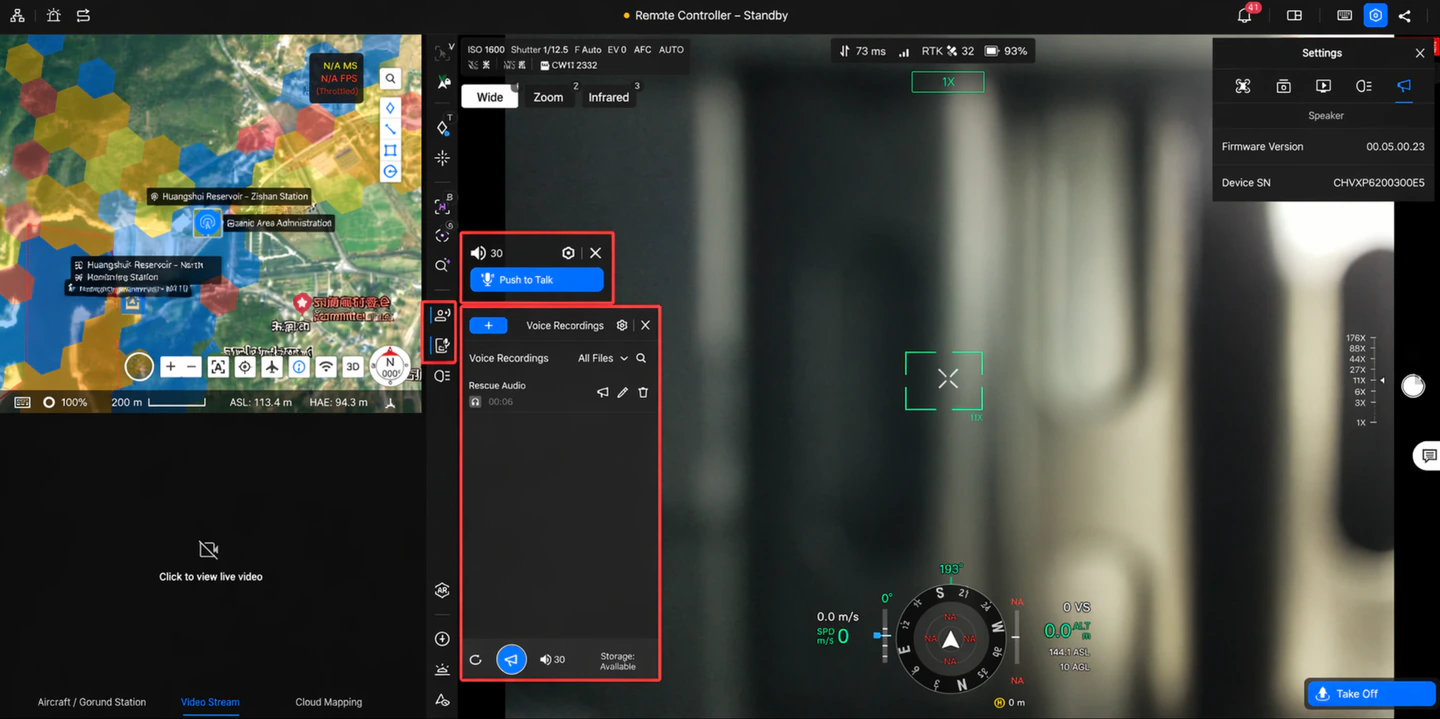
After entering the Virtual Cockpit, click for file broadcasting; click for live broadcasting.
- File broadcasting includes voice file uploading and Text-to-Speech (TTS) broadcasting. The speaker only supports audio files in AAC, MP3, and WAV formats, and each audio file must be within 10 MB in size.
- Audio file upload: You can import multiple audio files at once through the file dialog. Files that are not in AAC, MP3, or WAV format are automatically filtered out during import. Audio files support play-while-uploading, so you can start playing without waiting for the upload to complete.
- Text-to-Speech (TTS): After selecting "Text-to-Speech", enter text to automatically synthesize and play realistic speech. You can select the voice (male, female) and language (Chinese, English, Japanese, Korean, French, Spanish), adjust the speech rate and pitch, and control playback pauses with commas for better comprehension.
- For real-time broadcasting, a voice input device needs to be configured, and the browser must be authorized for voice permissions. PTT (Push-to-Talk) mode is also supported: press and hold the shortcut key to start broadcasting, release it to stop. A prompt tone is played on the computer when pressing and releasing to confirm the operation.
(2) DJI AL1 Spotlight
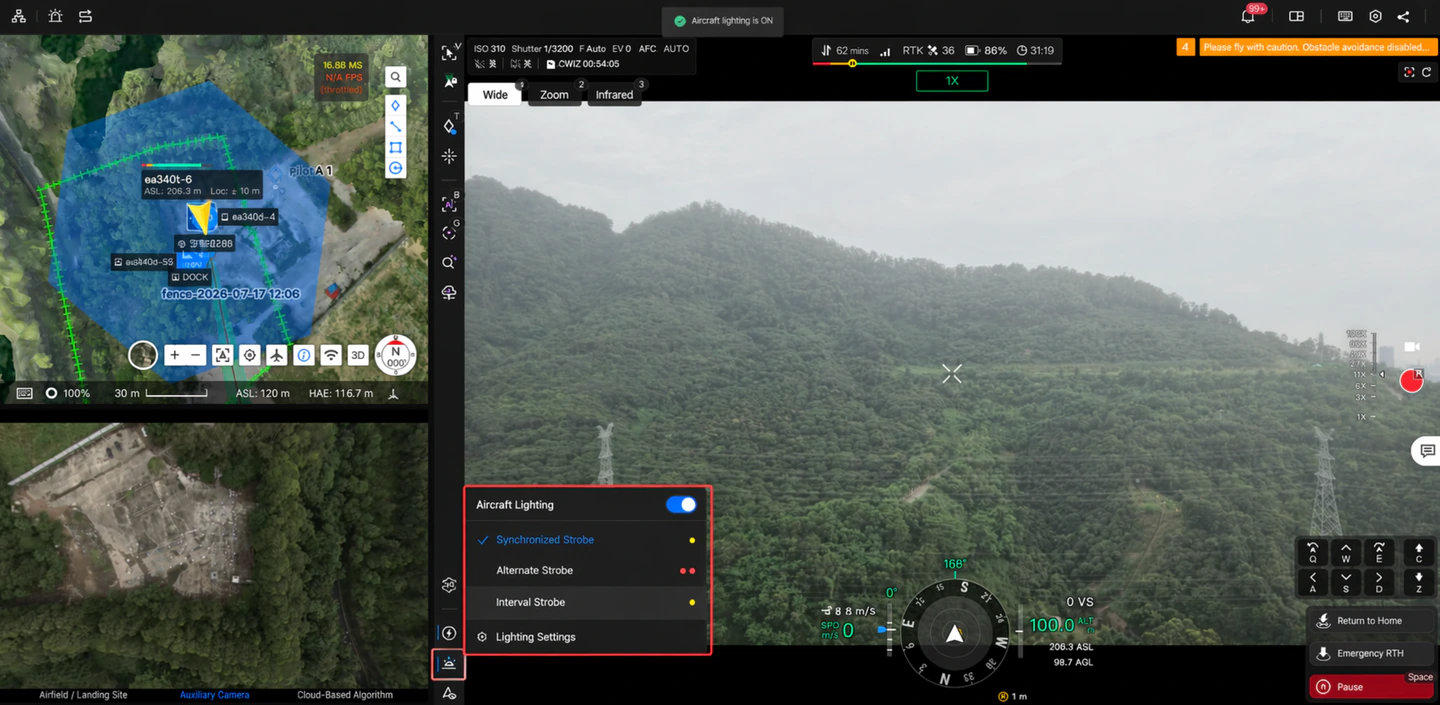
After entering the Virtual Cockpit, click to open the spotlight control panel and set the spotlight operating mode. The spotlight is linked with the camera gimbal by default, which can enhance the aircraft's nighttime operational capability.
- Click the switch button to turn the spotlight on or off, and drag the brightness slider to adjust brightness (0-100%). The spotlight supports two operating modes: Constant and Strobe.
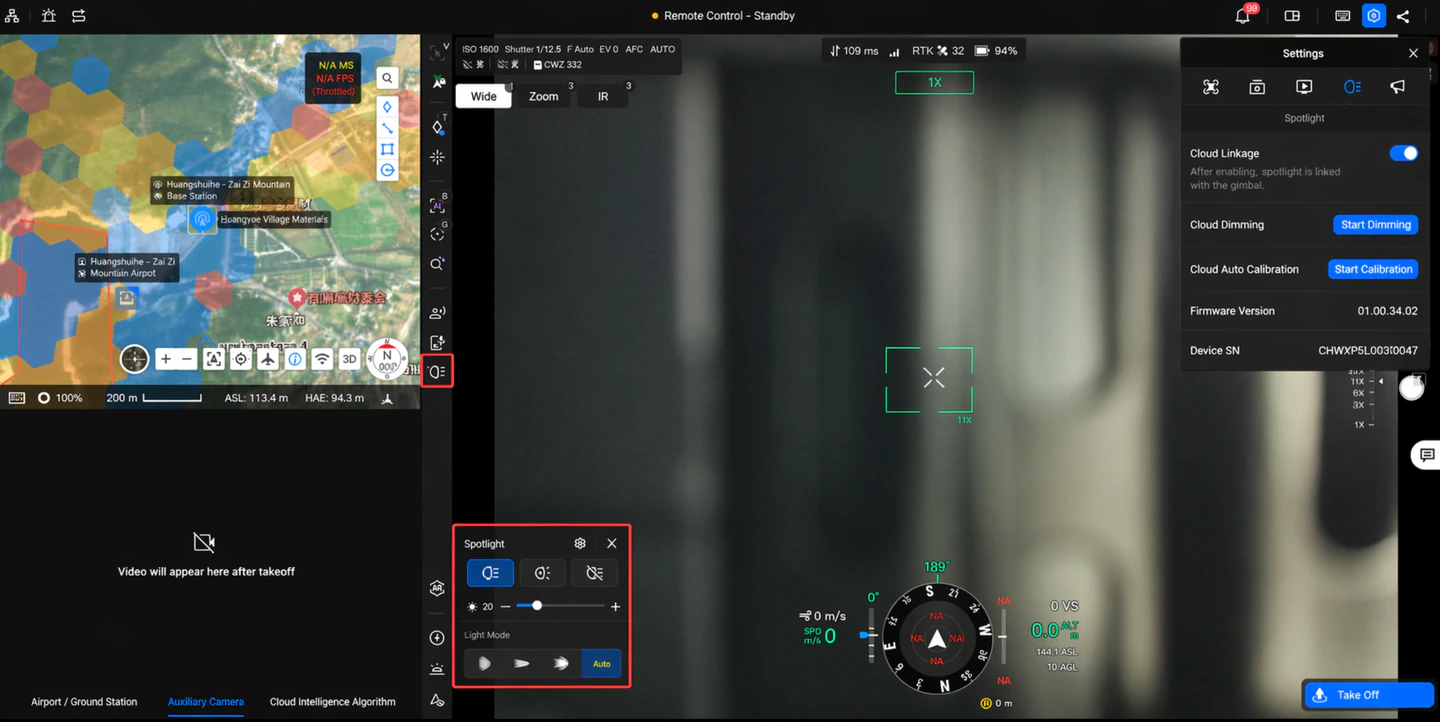
- Lighting mode: The spotlight supports three modes: Spot (concentrated beam, suitable for long-distance illumination), Flood (diffused beam, suitable for wide-area fill light), and All On (Spot and Flood enabled simultaneously).
- In Auto mode, the spotlight automatically switches between Spot and Flood based on camera zoom level (high zoom switches to Spot, low zoom switches to Flood). Auto mode is supported only in Constant mode.
- Follow mode: By default, the spotlight is linked with the camera gimbal (Follow mode enabled), improving nighttime operation capability. To control spotlight orientation independently, disable "Follow Mode" in spotlight settings. After disabling, the spotlight gimbal is decoupled from the main gimbal and can be adjusted independently.
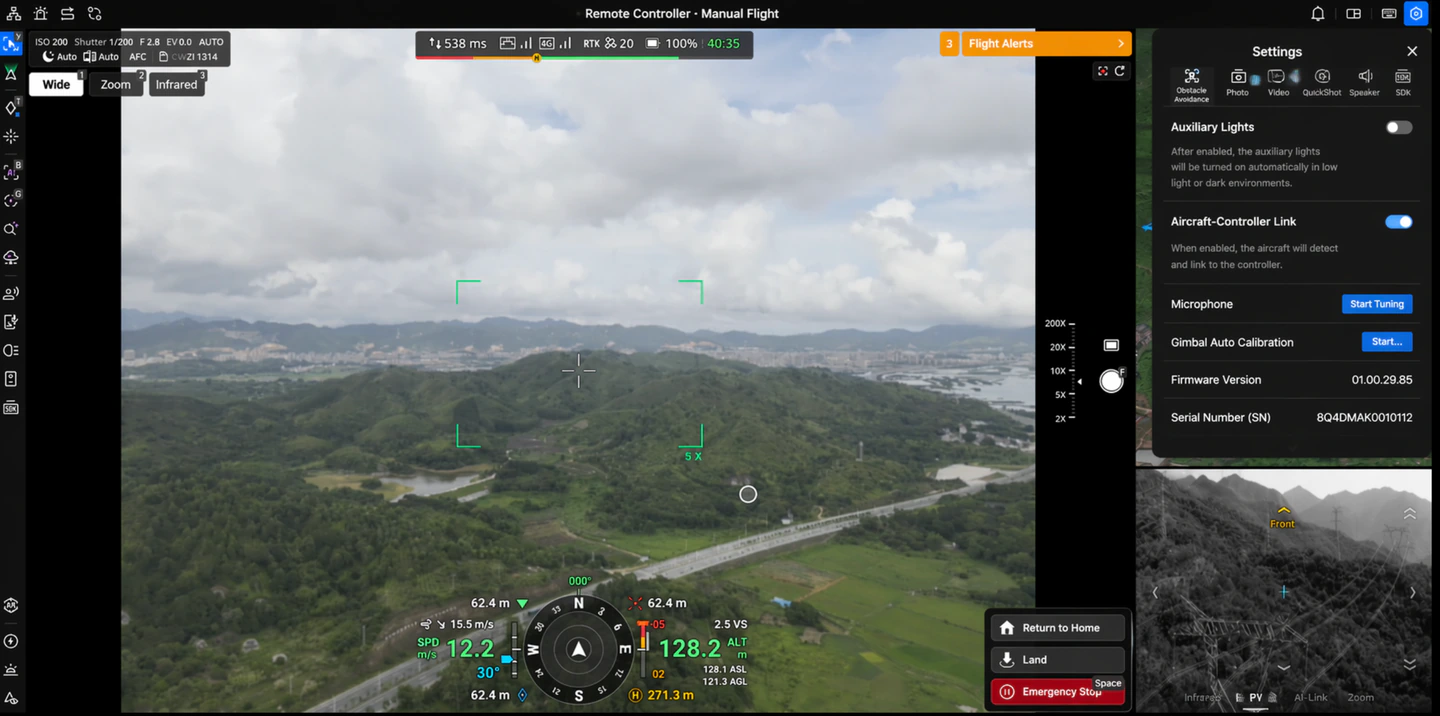
- Gimbal fine-tuning and calibration: Use directional keys to fine-tune the illumination angle of the spotlight gimbal; click "Calibrate" to start automatic calibration. A progress bar is shown in the panel, and normal operation resumes after completion.
- Strobe mode: After enabling Strobe mode, the spotlight flashes in strobe operation. In this mode, it automatically switches to Spot and does not support Flood, All On, or Auto mode.
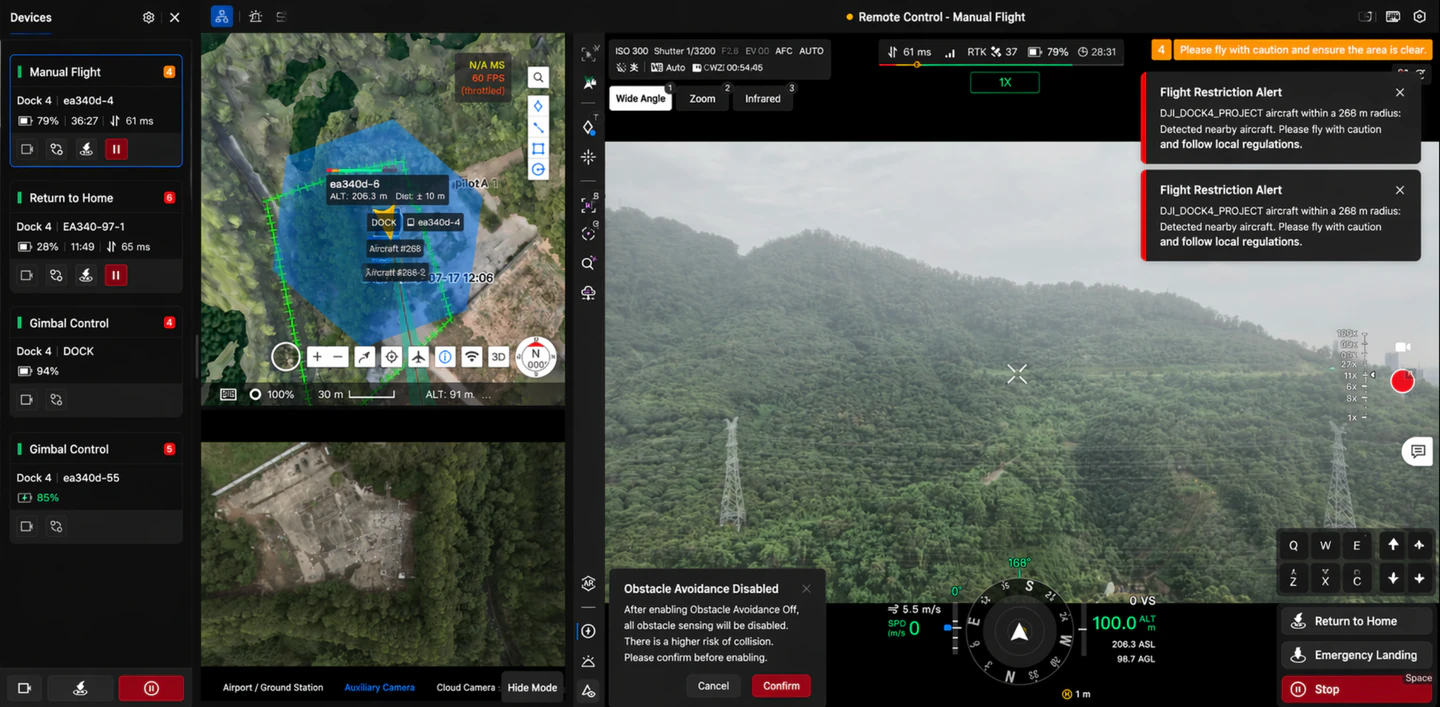
- Stealth mode: When Stealth mode is enabled, the spotlight automatically turns off; after Stealth mode is disabled, the spotlight does not automatically recover and must be turned on manually.
- It is recommended to appropriately reduce spotlight brightness and enable it only as needed to reduce impact on aircraft endurance.
- When the spotlight is enabled for the first time after takeoff, brightness is automatically set to 60%.
- When the aircraft has not taken off, spotlight maximum brightness is forcibly limited to 50%. A ground visual protection prompt is shown in the UI to prevent visual injury to people on the ground.
(3) Speaker and Spotlight Mounted Simultaneously
When DJI AS1 Speaker and DJI AL1 Spotlight are mounted at the same time, the main toolbar displays independent operation entries for both accessories simultaneously. They do not interfere with each other and can be controlled separately. The accessory panel also displays firmware version and serial number (SN) for easier maintenance troubleshooting.
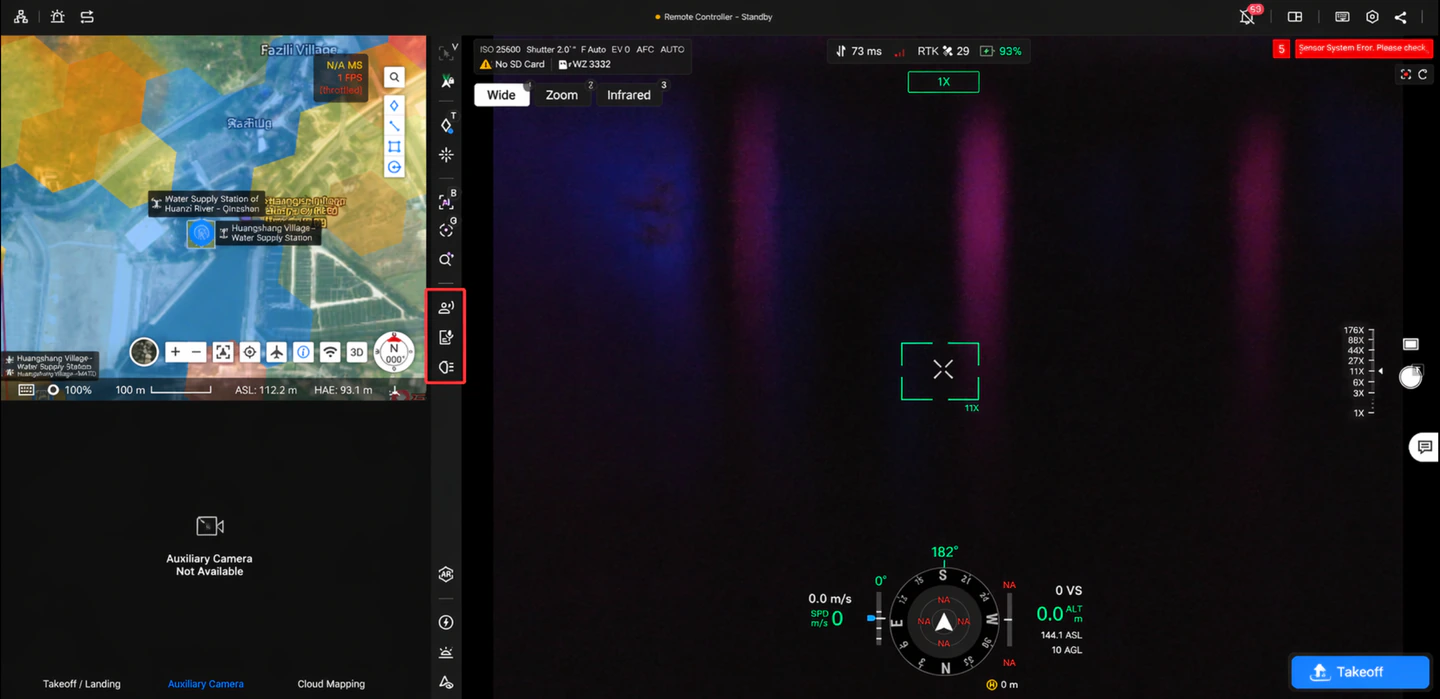
(4) Third-Party PSDK Accessories
The Virtual Cockpit also supports controlling third-party PSDK accessories. After a third-party PSDK accessory is successfully connected, click  to enter the PSDK main interface.
- PSDK Main Interface: Displays common PSDK operations, including but not limited to speaker controls, lighting switches, and gimbal control.
- PSDK Settings Interface: Click
 to customize PSDK settings.
Using a third-party PSDK device as an example:
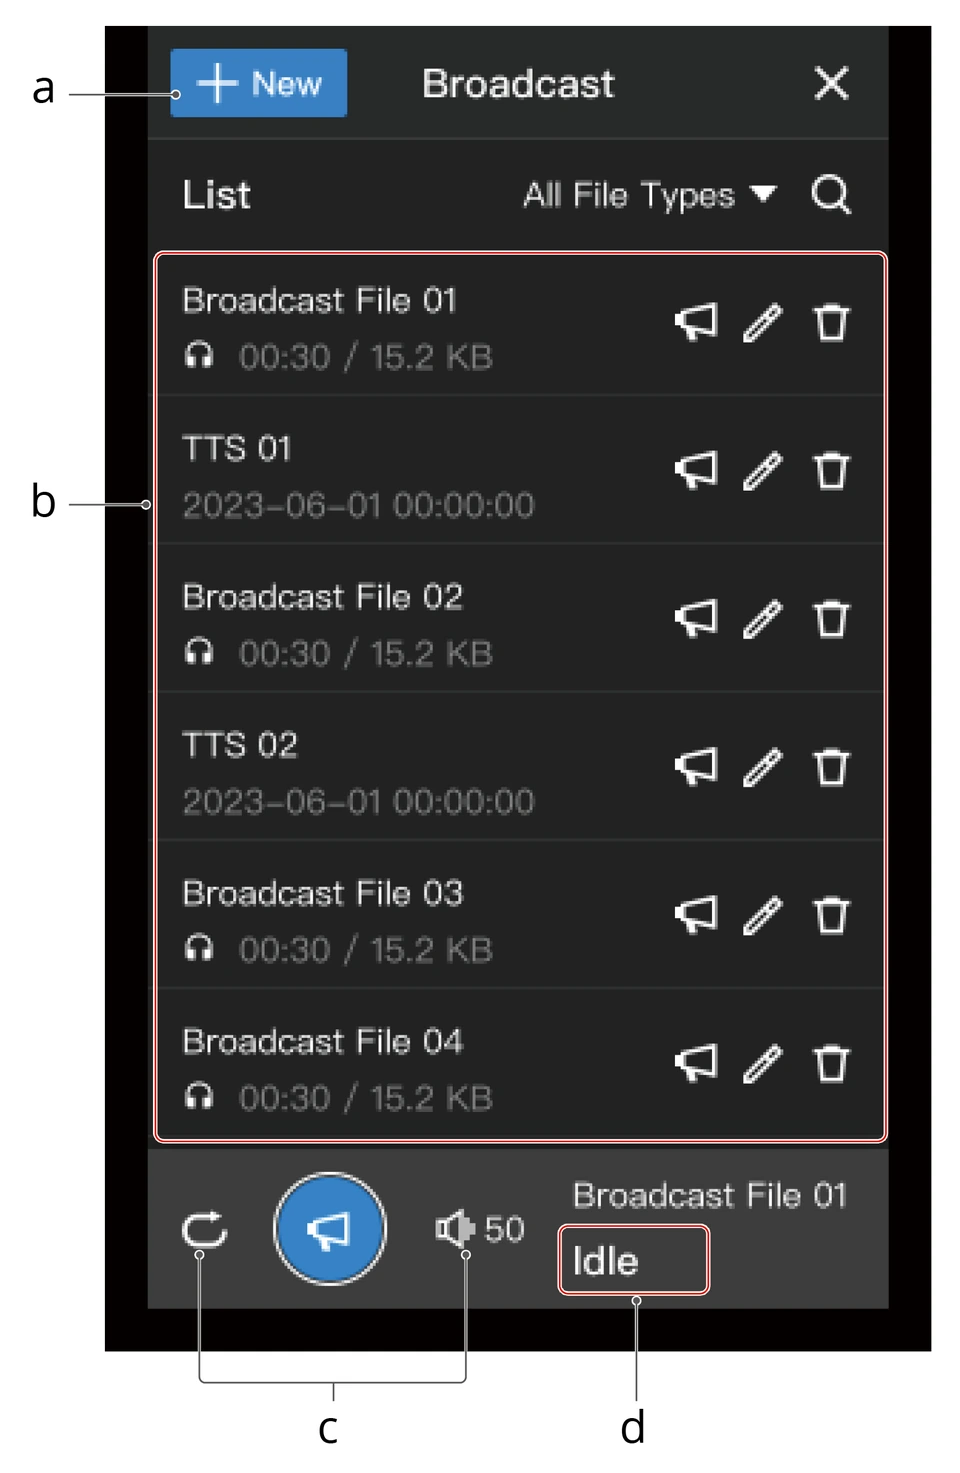
a. Create New Broadcast File: Click "New" to choose recording, text-to-speech, or import audio file.
b. Broadcast List: Only includes cloud broadcast files within the current project; does not include audio files on the PSDK device.
c. Broadcast Settings: Supports loop playback and volume settings. Supports quick speaker volume adjustment via shortcut keys (see shortcut list for details), making it convenient to operate with a handheld microphone.
d. Broadcast Status: Displays the current operating status of the speaker. During playback or live broadcast, the speaker icon on the main toolbar is highlighted, making it easier to remotely confirm speaker status.
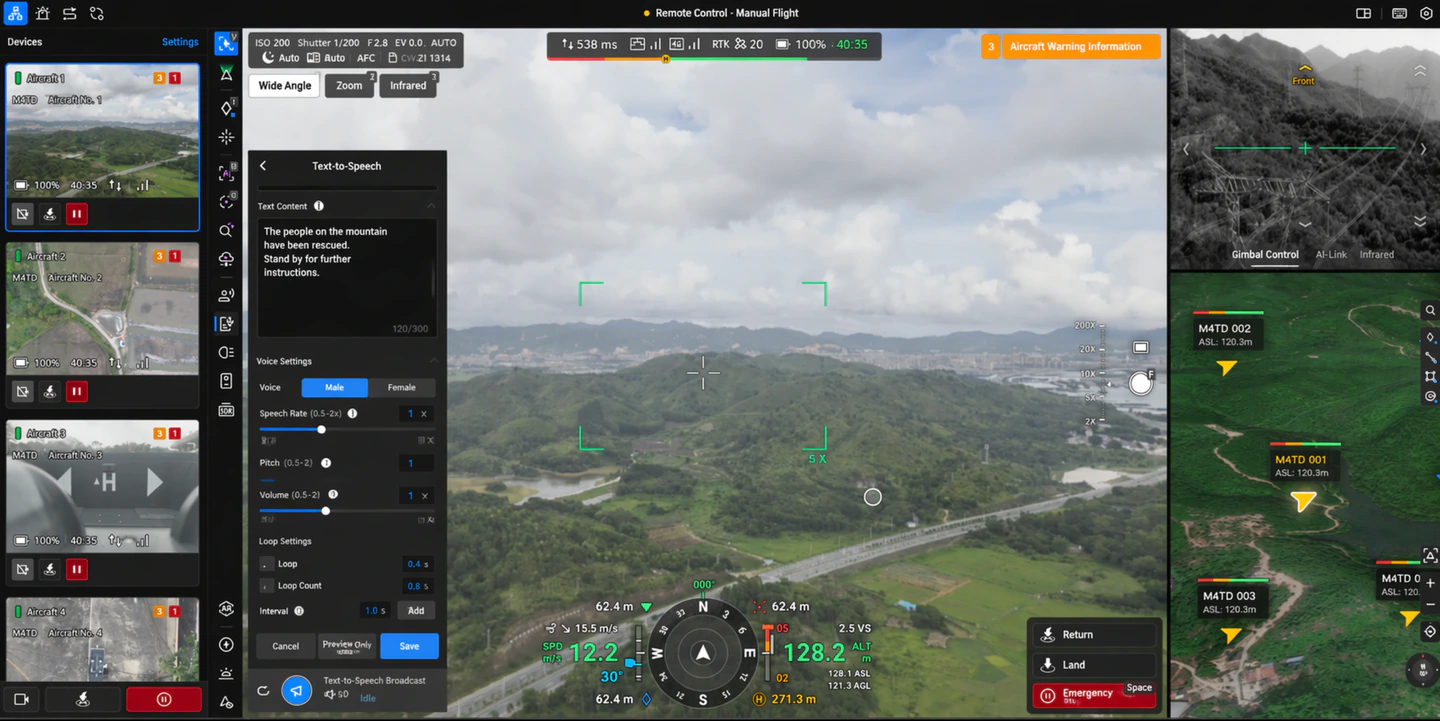
Click  to preview the audio file content; click
 to transfer the cloud audio file to the aircraft inside the dock, and the aircraft will play the broadcast content.
- Before recording a broadcast, ensure that the device logged into FlightHub 2 has voice input capability and that voice input permission is granted for the current web page.
- If microphone input signal is too weak during recording, the UI prompts "Please move closer to the microphone". It is recommended to run a recording test before use to confirm actual output effect in outdoor scenarios.
- During live broadcast and file playback, the system automatically performs audio normalization to improve loudness consistency in weak-signal scenarios.
- When the speaker is enabled for the first time after takeoff, volume is automatically set to 80%.
- After landing back in dock, the speaker automatically turns off (applicable to command flight, route flight, and mid-mission pause/resume scenarios).
- If playback volume is high before takeoff, the system displays a popup reminder to prevent hearing damage to nearby operators.
- If the accessory is not activated, the speaker function entry is grayed out and prompts: "Some functions are restricted. Please restart the device to activate."
- If a prompt indicates the PSDK device version is too low, please contact the device manufacturer to upgrade to the latest firmware.
Peripheral Device Control - Red and Blue Strobe Light
Supports controlling the external red and blue strobe light on "DJI Dock 4", including turning the strobe light on and off.
Note: The red and blue strobe light is a different function from the spotlight strobe mode. Please distinguish between them.
AR Projection
The Virtual Cockpit AR projection supports annotation points, annotation lines, annotation areas, return-to-home points, and AR street projection.
Note: Currently, only annotation lines and areas drawn in DJI Pilot 2 can be synced and displayed on FlightHub 2.
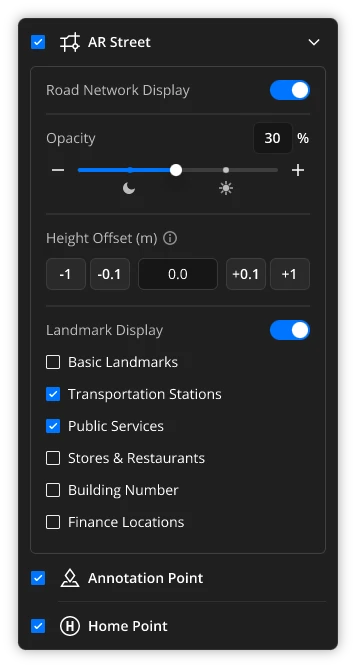
Expand the AR projection settings panel, check the required projection types, and targets will be projected in the real-time live feed. AR streets can be enabled and disabled via a quick entry, and support detailed parameter settings including opacity, altitude offset, and landmark point display type.
Note: To use this function normally, Chrome 92 or above is required.
Manifold 3 App Invocation
By importing an app, after entering the Virtual Cockpit with a successfully connected Manifold 3 aircraft, the Manifold 3 app invocation entry will be visible. Click to expand the app menu.
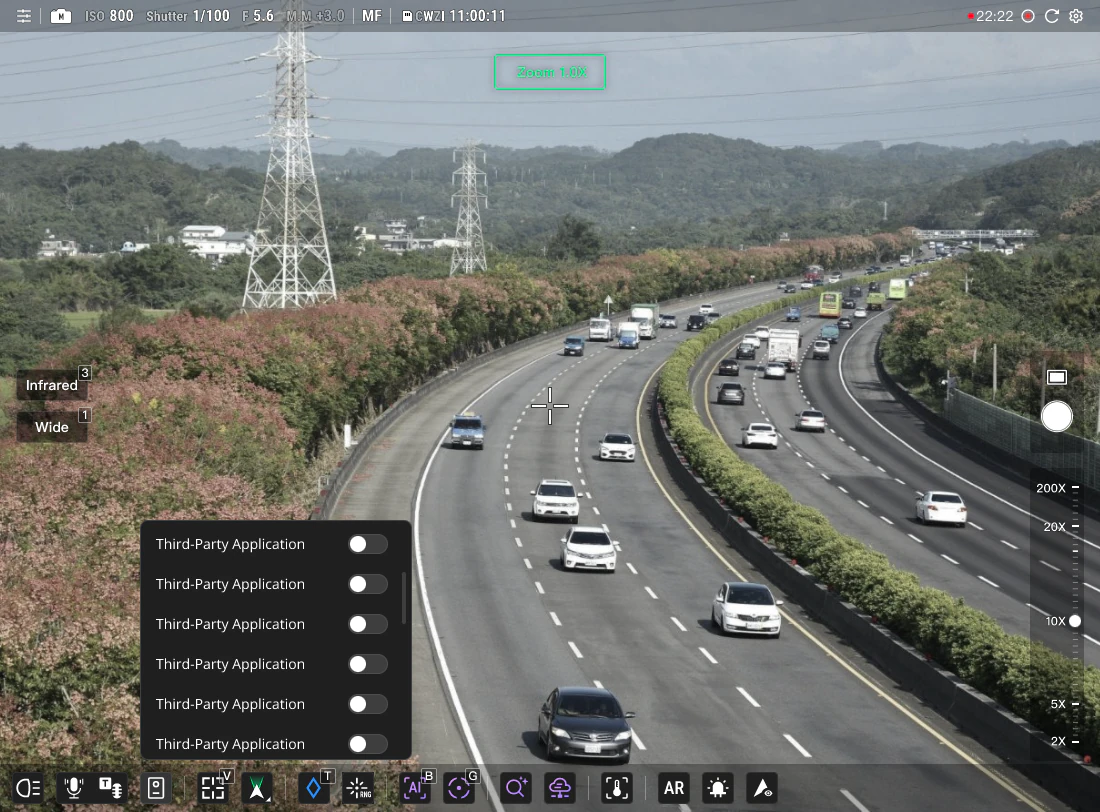
After enabling an app, the third-party PSDK widget will be automatically invoked. If the app is an AI-related intelligent application, the AI recognition results and labels will be displayed in the real-time feed.
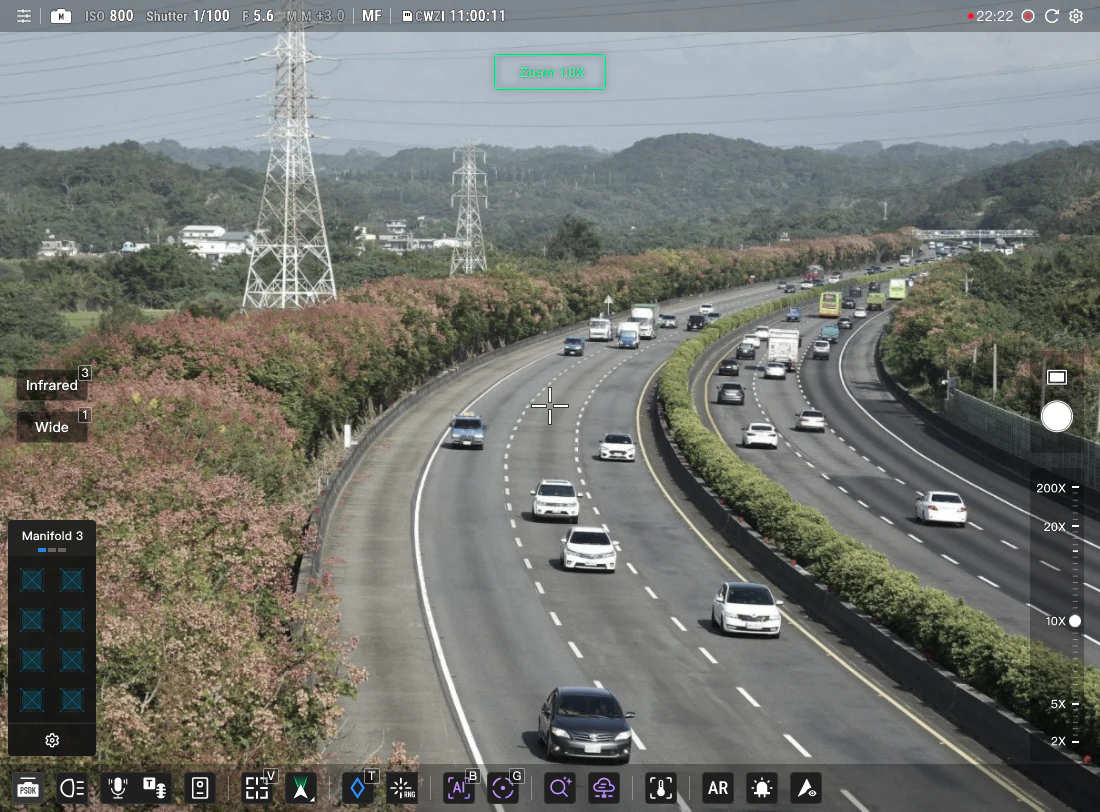
Note:
- Currently only supported by aircraft from "DJI Dock 3".
- It is recommended to use the latest version of Chrome for the best experience.
Feature List
Refer to the following table for details of the features supported by different aircraft models:
| Feature Category | Feature Name | Dock Aircraft | Independent Aircraft | ||||||||||
| DJI Dock | DJI Dock 2 | DJI Dock 3 | DJI Dock 4 | DJI Mavic 3 Enterprise Series | DJI Matrice 4 Enterprise Series | Matrice 400 | |||||||
| Matrice 30 | Matrice 30T | Matrice 3D | Matrice 3TD | Matrice 4D | Matrice 4TD | Matrice 5TD | Mavic 3E | Mavic 3T | Matrice 4E | Matrice 4T | |||
| Flight Control | Obtain Flight Control Authority | ✔ | ✔ | ✔ | ✔ | ✔ | ✔ | ✔ | ✘ | ✘ | ✔ | ✔ | ✔ |
| Flight Control | One-Tap Takeoff | ✔ | ✔ | ✔ | ✔ | ✔ | ✔ | ✔ | ✘ | ✘ | ✔ | ✔ | ✔ |
| Flight Control | Tap-to-Fly | ✔ | ✔ | ✔ | ✔ | ✔ | ✔ | ✔ | ✘ | ✘ | ✔ | ✔ | ✔ |
| Flight Control | Keyboard Controls (WASD/QE/CZ) | ✔ | ✔ | ✔ | ✔ | ✔ | ✔ | ✔ | ✘ | ✘ | ✔ | ✔ | ✔ |
| Flight Control | Flight Parameter Settings | ✔ | ✔ | ✔ | ✔ | ✔ | ✔ | ✔ | ✘ | ✘ | ✔ | ✔ | ✔ |
| Flight Control | One-Tap Return-to-Home | ✔ | ✔ | ✔ | ✔ | ✔ | ✔ | ✔ | ✘ | ✘ | ✔ | ✔ | ✔ |
| Flight Control | Emergency/One-Tap Landing | ✔ | ✔ | ✔ | ✔ | ✔ | ✔ | ✔ | ✘ | ✘ | ✔ | ✔ | ✔ |
| Flight Control | One-Tap Emergency Stop | ✔ | ✔ | ✔ | ✔ | ✔ | ✔ | ✔ | ✘ | ✘ | ✔ | ✔ | ✔ |
| Flight Control | High-Speed Mode | ✔ | ✔ | ✔ | ✔ | ✔ | ✔ | ✔ | ✘ | ✘ | ✔ | ✔ | ✔ |
| Flight Control | Resume Route | ✔ | ✔ | ✔ | ✔ | ✔ | ✔ | ✔ | ✘ | ✘ | ✘ | ✘ | ✔ |
| Flight Control | Pause Route | ✔ | ✔ | ✔ | ✔ | ✔ | ✔ | ✔ | ✘ | ✘ | ✘ | ✘ | ✔ |
| Flight Control | Exit Route | ✔ | ✔ | ✔ | ✔ | ✔ | ✔ | ✔ | ✘ | ✘ | ✔ | ✔ | ✔ |
| Flight Control | Smart Orbit | ✔ | ✔ | ✘ | ✘ | ✔ | ✔ | ✔ | ✘ | ✘ | ✔ | ✔ | ✔ |
| Flight Control | Distribute Flight Route in Flight | ✘ | ✘ | ✔ | ✔ | ✔ | ✔ | ✔ | ✘ | ✘ | ✔ | ✔ | ✔ |
| Flight Control | Relay Task | ✘ | ✘ | ✘ | ✘ | ✔ | ✔ | ✔ | ✘ | ✘ | ✘ | ✘ | ✘ |
| Payload Control | Obtain Payload Control Authority | ✔ | ✔ | ✔ | ✔ | ✔ | ✔ | ✔ | ✔ | ✔ | ✔ | ✔ | ✔ |
| Payload Control | Switch Camera Using Shortcut Keys | ✔ | ✔ | ✔ | ✔ | ✔ | ✔ | ✔ | ✔ | ✔ | ✔ | ✔ | ✔ |
| Payload Control | Mechanical Shutter | ✘ | ✘ | ✔ | ✘ | ✔ | ✘ | ✔ | ✘ | ✘ | ✔ | ✔ | ✔ |
| Payload Control | Distortion Correction | ✘ | ✘ | ✔ | ✘ | ✔ | ✘ | ✔ | ✘ | ✘ | ✔ | ✔ | ✔ |
| Payload Control | Watermark | ✘ | ✘ | ✔ | ✔ | ✔ | ✔ | ✔ | ✔ | ✔ | ✔ | ✔ | ✔ |
| Payload Control | Lens Defog | ✘ | ✘ | ✔ | ✔ | ✔ | ✔ | ✔ | ✘ | ✘ | ✘ | ✘ | ✔ |
| Payload Control | Reset Camera Parameters | ✘ | ✘ | ✘ | ✘ | ✔ | ✔ | ✔ | ✘ | ✘ | ✔ | ✔ | ✘ |
| Payload Control | Adjust Camera Parameters | ✘ | ✘ | ✔ | ✔ | ✔ | ✔ | ✔ | ✔ | ✔ | ✔ | ✔ | ✔ |
| Payload Control | Focus Mode | ✔ | ✔ | ✔ | ✔ | ✔ | ✔ | ✔ | ✔ | ✔ | ✔ | ✔ | ✔ |
| Payload Control | Single Shot | ✔ | ✔ | ✔ | ✔ | ✔ | ✔ | ✔ | ✔ | ✔ | ✔ | ✔ | ✔ |
| Payload Control | Timed Shot | ✘ | ✘ | ✔ | ✔ | ✔ | ✔ | ✔ | ✘ | ✘ | ✔ | ✔ | ✔ |
| Payload Control | Smart Low-Light | ✔ | ✔ | ✔ | ✔ | ✔ | ✔ | ✔ | ✔ | ✔ | ✔ | ✔ | ✔ |
| Payload Control | Panorama Photo | ✔ | ✔ | ✔ | ✔ | ✔ | ✔ | ✔ | ✔ | ✔ | ✔ | ✔ | ✔ |
| Payload Control | Video Recording | ✔ | ✔ | ✔ | ✔ | ✔ | ✔ | ✔ | ✔ | ✔ | ✔ | ✔ | ✔ |
| Payload Control | Resolution Settings | ✘ | ✘ | ✔ | ✔ | ✔ | ✔ | ✔ | ✘ | ✘ | ✔ | ✔ | ✘ |
| Payload Control | Storage Settings | ✘ | ✘ | ✔ | ✔ | ✔ | ✔ | ✔ | ✘ | ✘ | ✔ | ✔ | ✔ |
| Payload Control | Zoom | ✔ | ✔ | ✔ | ✔ | ✔ | ✔ | ✔ | ✔ | ✔ | ✔ | ✔ | ✔ |
| Payload Control | Infrared Linked Zoom | ✘ | ✘ | ✘ | ✔ | ✘ | ✔ | ✔ | ✘ | ✘ | ✘ | ✔ | ✔ |
| Payload Control | Laser Ranging | ✔ | ✔ | ✘ | ✘ | ✔ | ✔ | ✔ | ✘ | ✘ | ✔ | ✔ | ✔ |
| Payload Control | Laser Pin Drop | ✔ | ✔ | ✘ | ✘ | ✔ | ✔ | ✔ | ✘ | ✘ | ✔ | ✔ | ✔ |
| Payload Control | Gimbal Center | ✔ | ✔ | ✔ | ✔ | ✔ | ✔ | ✔ | ✔ | ✔ | ✔ | ✔ | ✔ |
| Payload Control | Gimbal Down | ✔ | ✔ | ✔ | ✔ | ✔ | ✔ | ✔ | ✔ | ✔ | ✔ | ✔ | ✔ |
| Payload Control | Gimbal Yaw Center | ✔ | ✔ | ✘ | ✘ | ✘ | ✘ | ✘ | ✘ | ✘ | ✘ | ✘ | ✘ |
| Payload Control | Gimbal Pitch Down | ✔ | ✔ | ✘ | ✘ | ✔ | ✔ | ✔ | ✘ | ✘ | ✘ | ✘ | ✘ |
| Payload Control | Double-Click to Center | ✔ | ✔ | ✔ | ✔ | ✔ | ✔ | ✔ | ✔ | ✔ | ✔ | ✔ | ✔ |
| Payload Control | Gimbal Fine-Tuning (Up/Down/Left/Right) | ✔ | ✔ | ✔ | ✔ | ✔ | ✔ | ✔ | ✔ | ✔ | ✔ | ✔ | ✔ |
| Payload Control | Box-Select Zoom | ✘ | ✘ | ✔ | ✔ | ✔ | ✔ | ✔ | ✘ | ✘ | ✔ | ✔ | ✔ |
| Payload Control | Navigation Light | ✘ | ✘ | ✔ | ✔ | ✔ | ✔ | ✔ | ✘ | ✘ | ✔ | ✔ | ✔ |
| Payload Control | Stealth Mode | ✘ | ✘ | ✔ | ✔ | ✔ | ✔ | ✔ | ✘ | ✘ | ✔ | ✔ | ✔ |
| Payload Control | Switch Infrared Color Palette | ✘ | ✔ | ✘ | ✔ | ✘ | ✔ | ✔ | ✘ | ✔ | ✘ | ✔ | ✔ |
| Payload Control | Infrared High-Temperature Alert | ✘ | ✔ | ✘ | ✔ | ✘ | ✔ | ✔ | ✘ | ✔ | ✘ | ✔ | ✔ |
| Payload Control | Infrared Split Screen | ✘ | ✔ | ✘ | ✔ | ✘ | ✔ | ✔ | ✘ | ✔ | ✘ | ✔ | ✔ |
| Payload Control | Temperature Bar | ✘ | ✔ | ✘ | ✔ | ✘ | ✔ | ✔ | ✘ | ✔ | ✘ | ✔ | ✔ |
| Payload Control | Gain Mode | ✘ | ✘ | ✘ | ✘ | ✘ | ✔ | ✔ | ✘ | ✘ | ✘ | ✔ | ✘ |
| Payload Control | Spot/Area Temperature Measurement | ✘ | ✔ | ✘ | ✔ | ✘ | ✔ | ✔ | ✘ | ✔ | ✘ | ✔ | ✔ |
| Payload Control | View Follow | ✔ | ✔ | ✔ | ✔ | ✔ | ✔ | ✔ | ✔ | ✔ | ✔ | ✔ | ✔ |
| Payload Control | AR Projection | ✘ | ✘ | ✔ | ✔ | ✔ | ✔ | ✔ | ✘ | ✘ | ✔ | ✔ | ✔ |
| Payload Control | AI Recognition | ✘ | ✘ | ✘ | ✘ | ✔ | ✔ | ✔ | ✘ | ✘ | ✔ | ✔ | ✔ |
| Payload Control | Smart Tracking | ✘ | ✘ | ✘ | ✘ | ✔ | ✔ | ✔ | ✘ | ✘ | ✘ | ✘ | ✔ |
| Payload Control | Night Scene Mode | ✘ | ✘ | ✘ | ✘ | ✔ | ✔ | ✔ | ✘ | ✘ | ✘ | ✘ | ✔ |
| Payload Control | Cloud AI Algorithm Call | ✔ | ✔ | ✔ | ✔ | ✔ | ✔ | ✔ | ✔ | ✔ | ✔ | ✔ | ✔ |
Sound Effects / Voice
To ensure users can effectively perceive the aircraft's status and some abnormal information during Virtual Cockpit aircraft control, the Virtual Cockpit provides sound effects/voice prompts for certain aircraft scenarios.
Supported sound effects/voice list:
| Prompt Scenario | Description | Type |
|---|---|---|
| Aircraft Low Battery | Triggered when the aircraft battery drops into the yellow zone of the energy bar | Voice |
| Aircraft Critical Low Battery | Triggered when the aircraft battery drops into the red zone of the energy bar | Voice |
| Aircraft Low Battery Prompt | Triggered when the aircraft battery is in the yellow or red zone of the energy bar | Sound Effect |
| Obstacle Avoidance Prompt | When the aircraft detects an obstacle, different frequency prompts are triggered based on obstacle distance | Sound Effect |
| Return to Home | Triggered when the aircraft begins return-to-home | Voice |
| Landing | Triggered when the aircraft begins landing | Voice |
| Return to Home / Landing | Continuously broadcast during aircraft return-to-home or landing process | Sound Effect |
| Aircraft Altitude Limit Triggered | Triggered when the aircraft reaches its altitude limit | Voice |
| Aircraft Distance Limit Triggered | Triggered when the aircraft reaches its distance limit | Voice |
| Photo Capture | Triggered when a photo is taken | Sound Effect |
| Video Recording | Triggered when recording starts or stops | Sound Effect |
| Panorama Photo | Triggered when panorama photo starts, completes, or is abnormally interrupted | Voice |
| AI Recognition Alert | Triggered when AI identifies a target object | Sound Effect |
Note: It is recommended that users turn on the computer sound after entering the Virtual Cockpit. To disable prompts, go to "Personal Center > Preferences > Sound Effects/Voice".