
Device Management
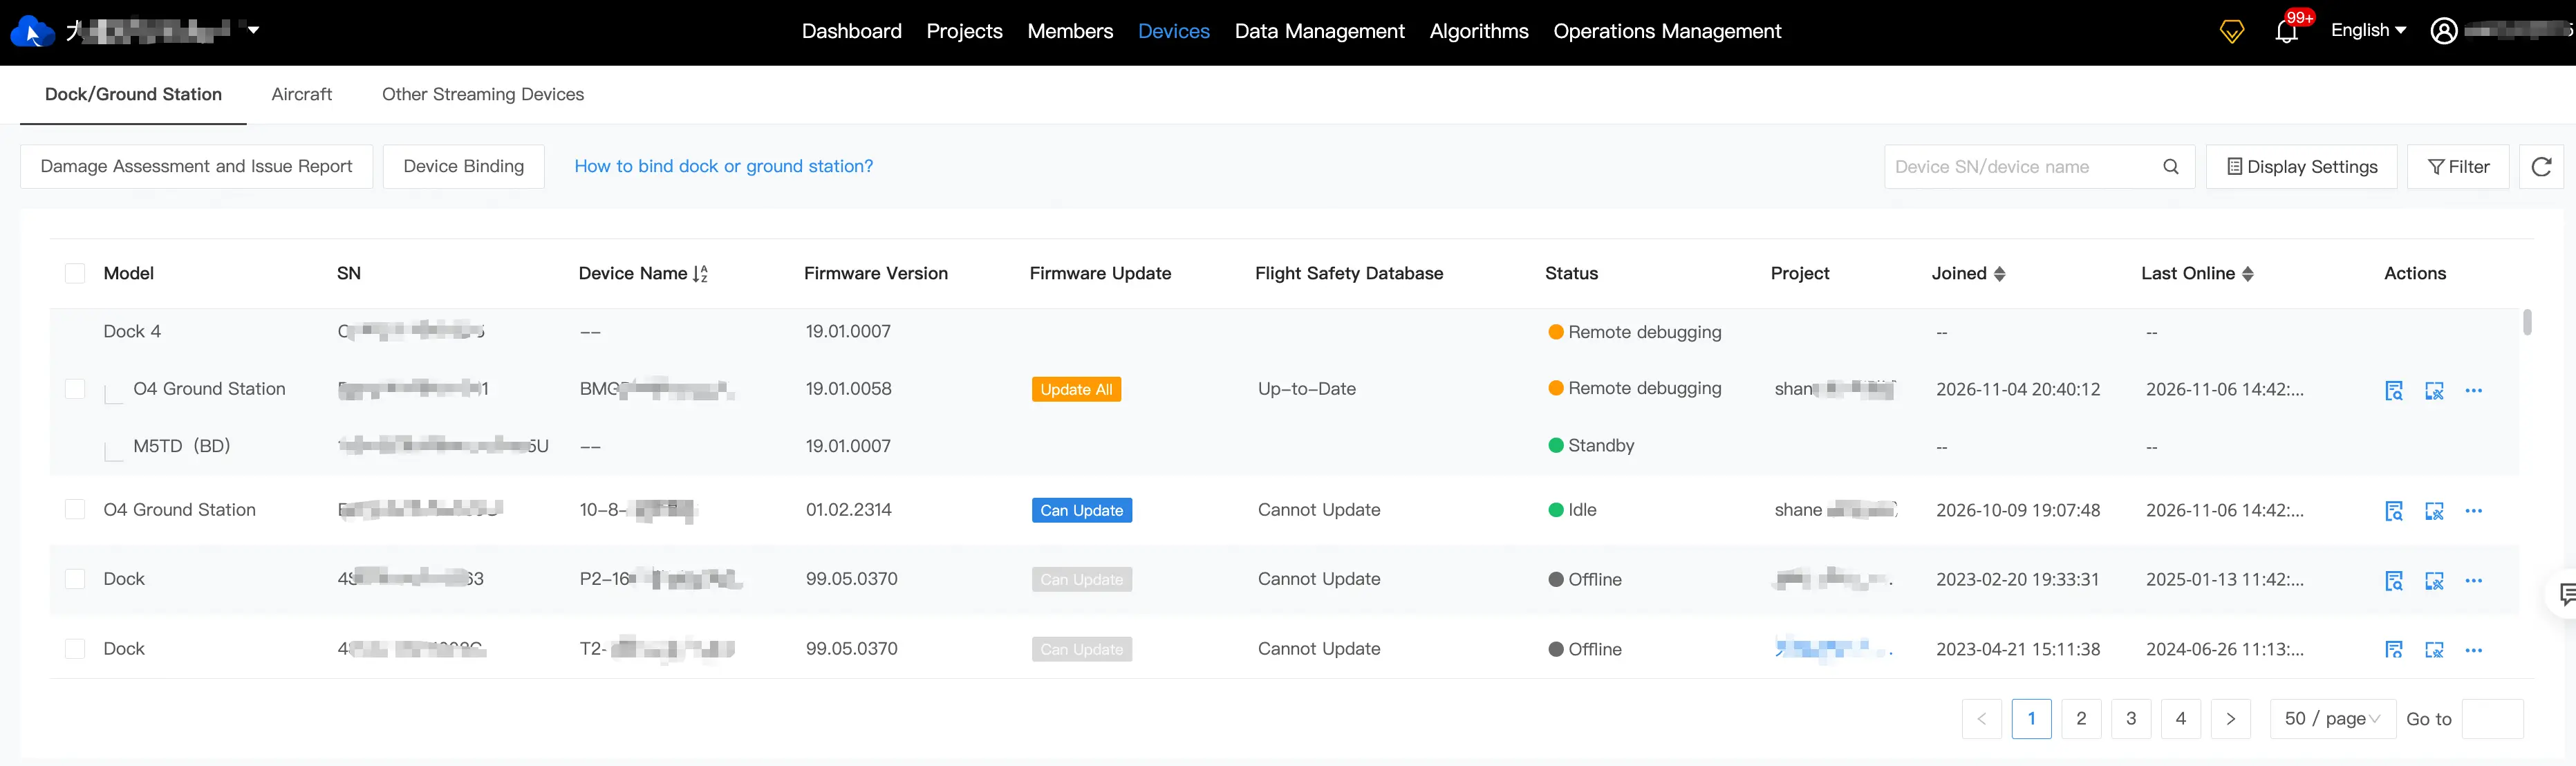
The Devices page displays all devices in the organization in a list for viewing and management. All lists support filtering by Project Name, Device Model, and Working Status. The Dock/Ground Station list also supports filtering by Update Status. Click a device card to view device details and perform operations such as remote debugging and log retrieval.
| Device | List Information | Supported Operations | Additional Operations |
|---|---|---|---|
| Dock/Ground Station | Device model, serial number (SN), device name, firmware version, firmware update status, Flight Safety Database update status, working status, associated project, time joined the organization, and last online time. | View warning messages, monitor and maintain devices, edit the device name and project, migrate the device between cloud services, and delete the device. | Damage Assessment and Issue Report, and Device Binding Code. |
| Aircraft | Device model, serial number (SN), device name, firmware version, online status, associated project, time joined the organization, and last online time. | Edit the device name and delete the device. | Export aircraft information. |
| Other Streaming Devices | Device type, device name, stream URL, working status, associated project, validity period, and time joined the organization. | Edit the device name and delete the device. | Add a live stream device. |
Bind Docks/Ground Stations to an Organization
You can bind docks/ground stations to an organization through DJI Pilot 2 or the DJI Enterprise app.
- DJI Dock and DJI Dock 2 can be bound to an organization through DJI Pilot 2.
- DJI Dock 3, DJI Dock 4, and O4 Ground Station can be bound to an organization through the DJI Enterprise app.
Bind through DJI Pilot 2
Make sure the dock is connected to a wired or 4G network. Open DJI Pilot 2 and enter the home screen.
- Connect the USB-A port on the dock to the USB-C port on the remote controller with a USB cable.
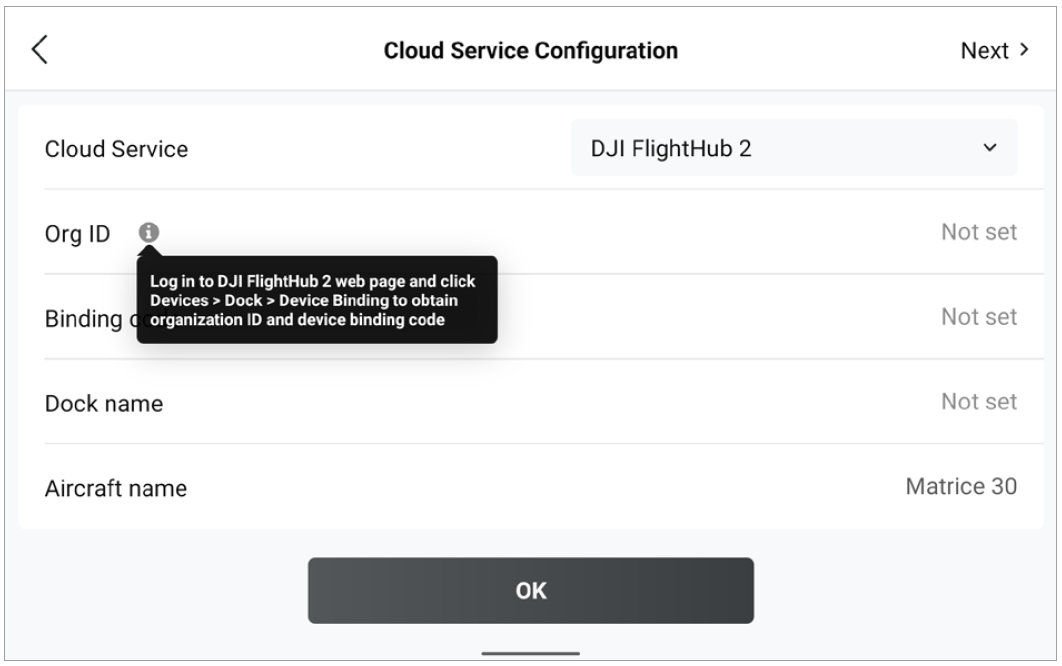
- When the dock deployment page appears, follow the on-screen instructions to deploy the dock. On the Cloud Service Configuration page, select FlightHub 2 and enter the organization ID, device binding code, dock name, and aircraft name.
- After completing the information, tap OK to bind the dock to the organization.
Bind through the DJI Enterprise App
Make sure the dock/ground station is connected to a wired or 4G network. Open the DJI Enterprise app and enter the home screen.
- Use a USB-C to USB-C cable to connect the mobile phone to the dock/ground station.
- When the dock/ground station deployment page appears, follow the on-screen instructions to deploy the dock/ground station. On the Cloud Service Configuration page, select FlightHub 2 and enter the organization ID, device binding code, ground station name, dock name, and aircraft name.
- After completing the information, tap OK to bind the dock/ground station to the organization.
- On the FlightHub 2 Devices page, go to Dock/Ground Station > Device Binding Code to obtain the organization ID and device binding code.
- A dock/ground station can only be bound to one organization. To bind it to a new organization, unbind it on the FlightHub 2 Devices page, then bind it again through DJI Pilot 2 or the DJI Enterprise app.
Manage Docks/Ground Stations on the Cloud
After binding, administrators can view and manage docks/ground stations on the web-based Devices page. Operations include assigning the dock/ground station to a project, viewing warning messages, monitoring and maintaining devices, and updating the Flight Safety Database.
Note: To update the Flight Safety Database, DJI Dock firmware must be v01.06.17.02 or later.
Assign Docks/Ground Stations to a Project
Click the  button for a dock/ground station in the list and select Edit to assign the dock to a project.
Note: A dock or ground station can only operate in one project at a time.
View Warning Messages
Click  to view warning messages for docks, ground stations, and aircraft.
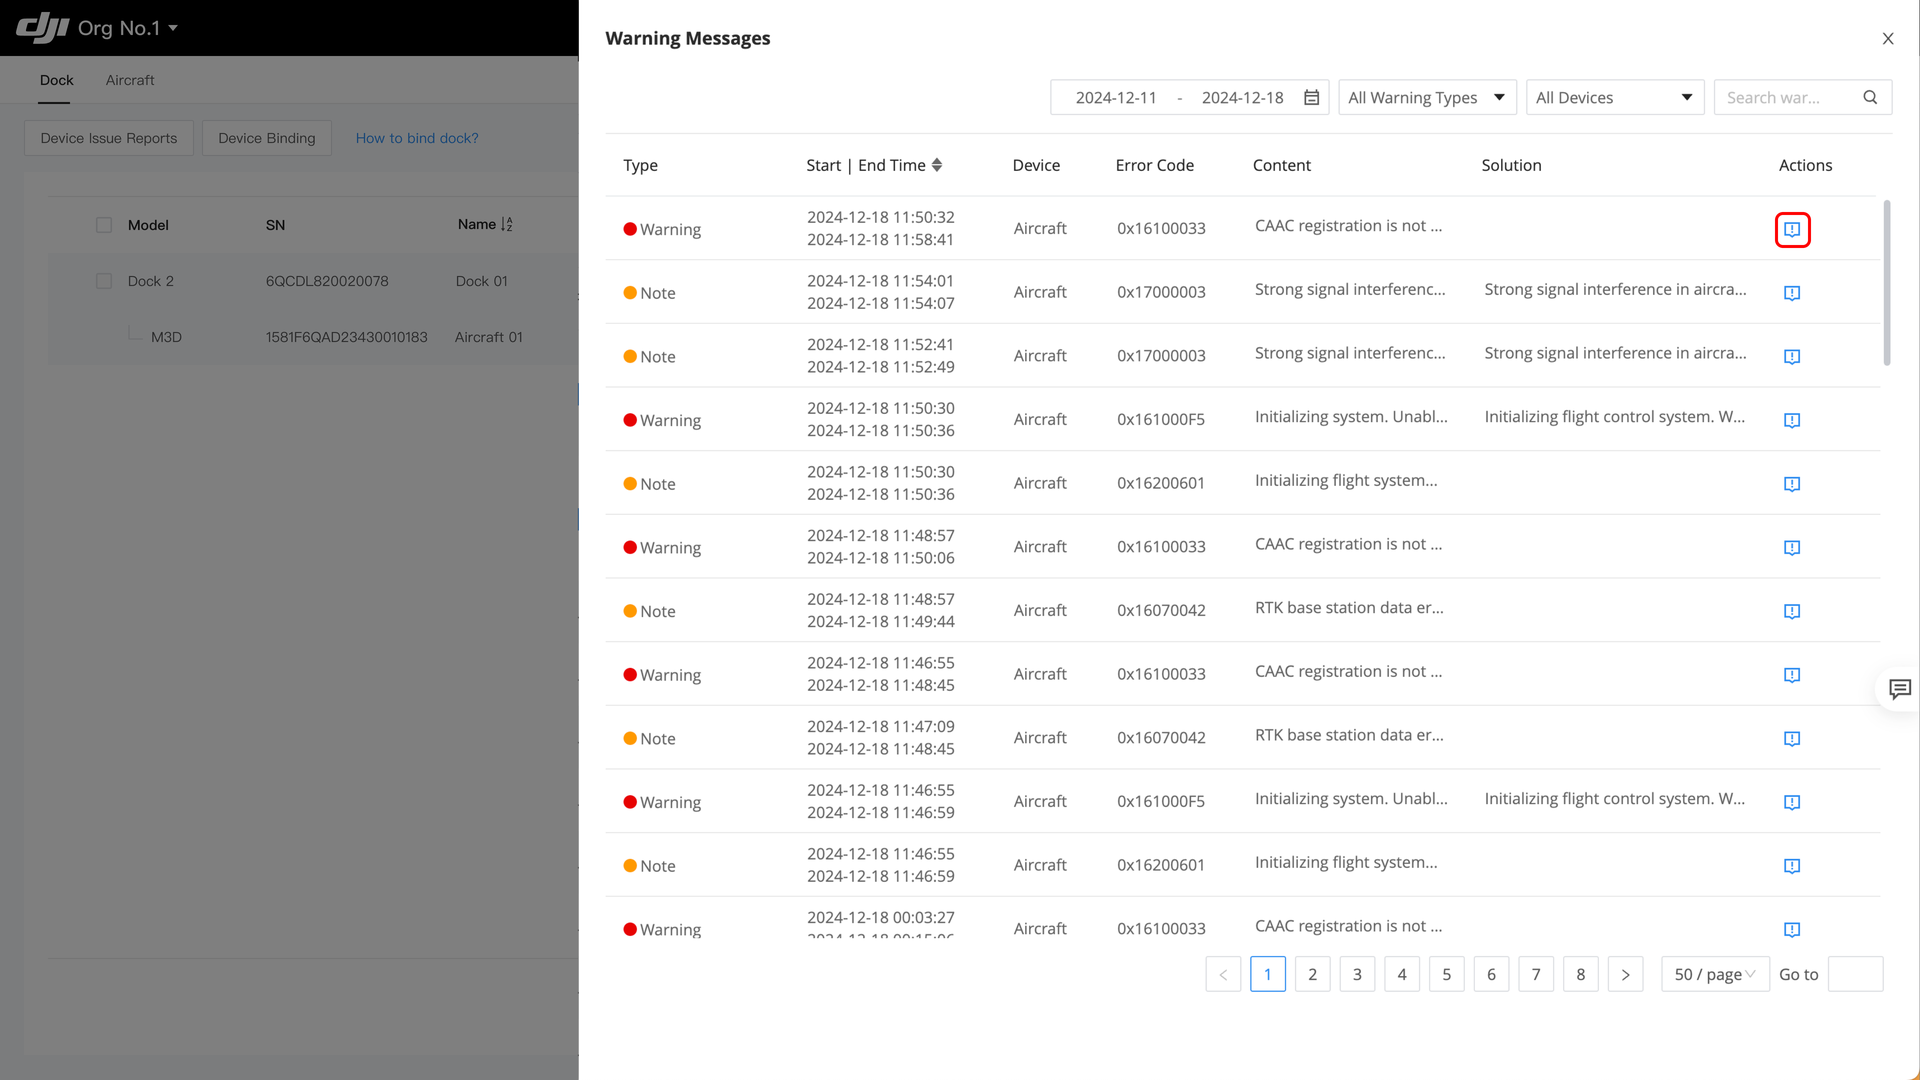
Warning messages include the warning level, start and end time, device, error code, warning details, and recommended solution.
In the corresponding warning message list, click Actions to submit a device issue report.
Monitor and Maintain Devices
Click  to view dock, ground station, and aircraft details and perform remote debugging.
Dock Information
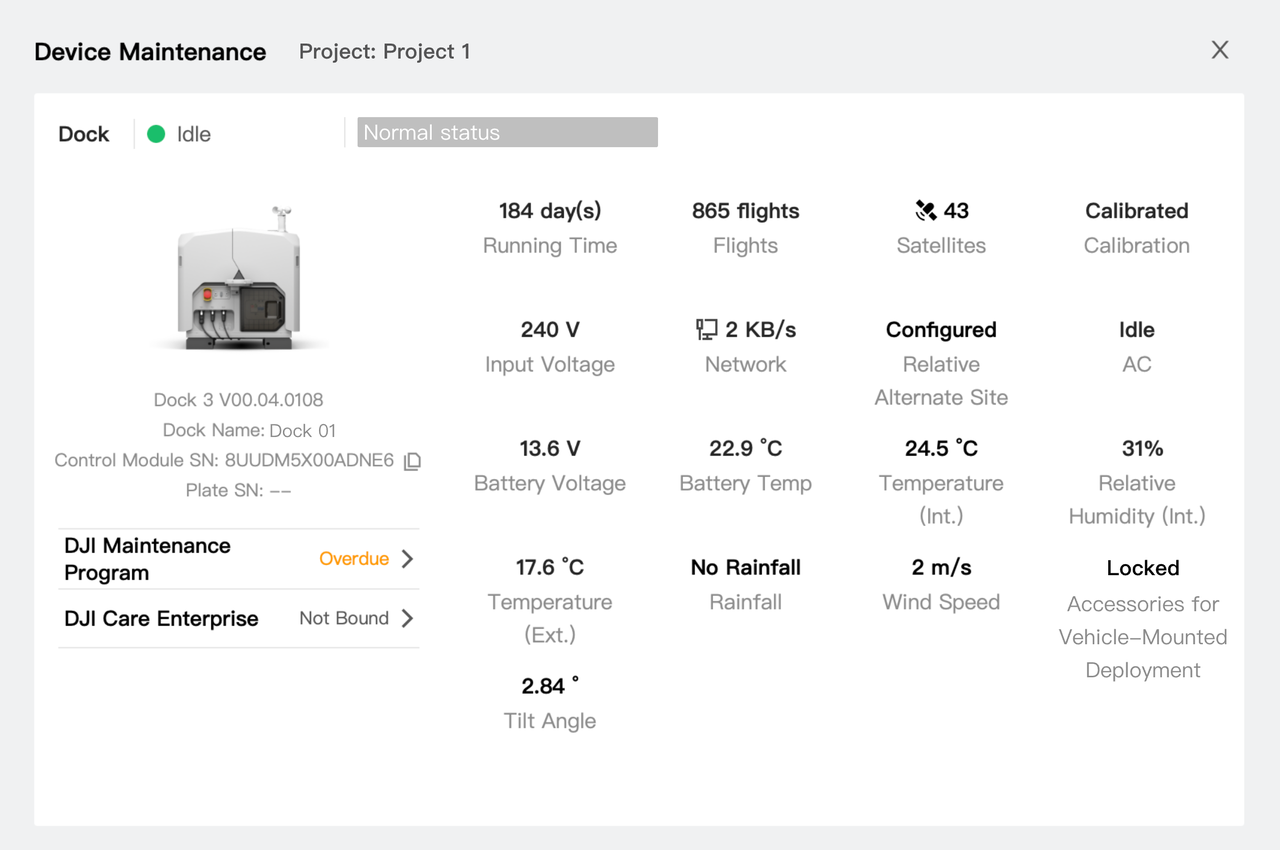
The dock information panel displays the dock name, model, firmware version, SN, Maintenance Program, DJI Care Enterprise, and dock status data. If an entry/exit route is configured, the dock aircraft follows the entry/exit route before performing the task to ensure safe departure. To modify the entry/exit route, contact your dealer to reevaluate the dock site using DJI Pilot 2.
Ground Station Information
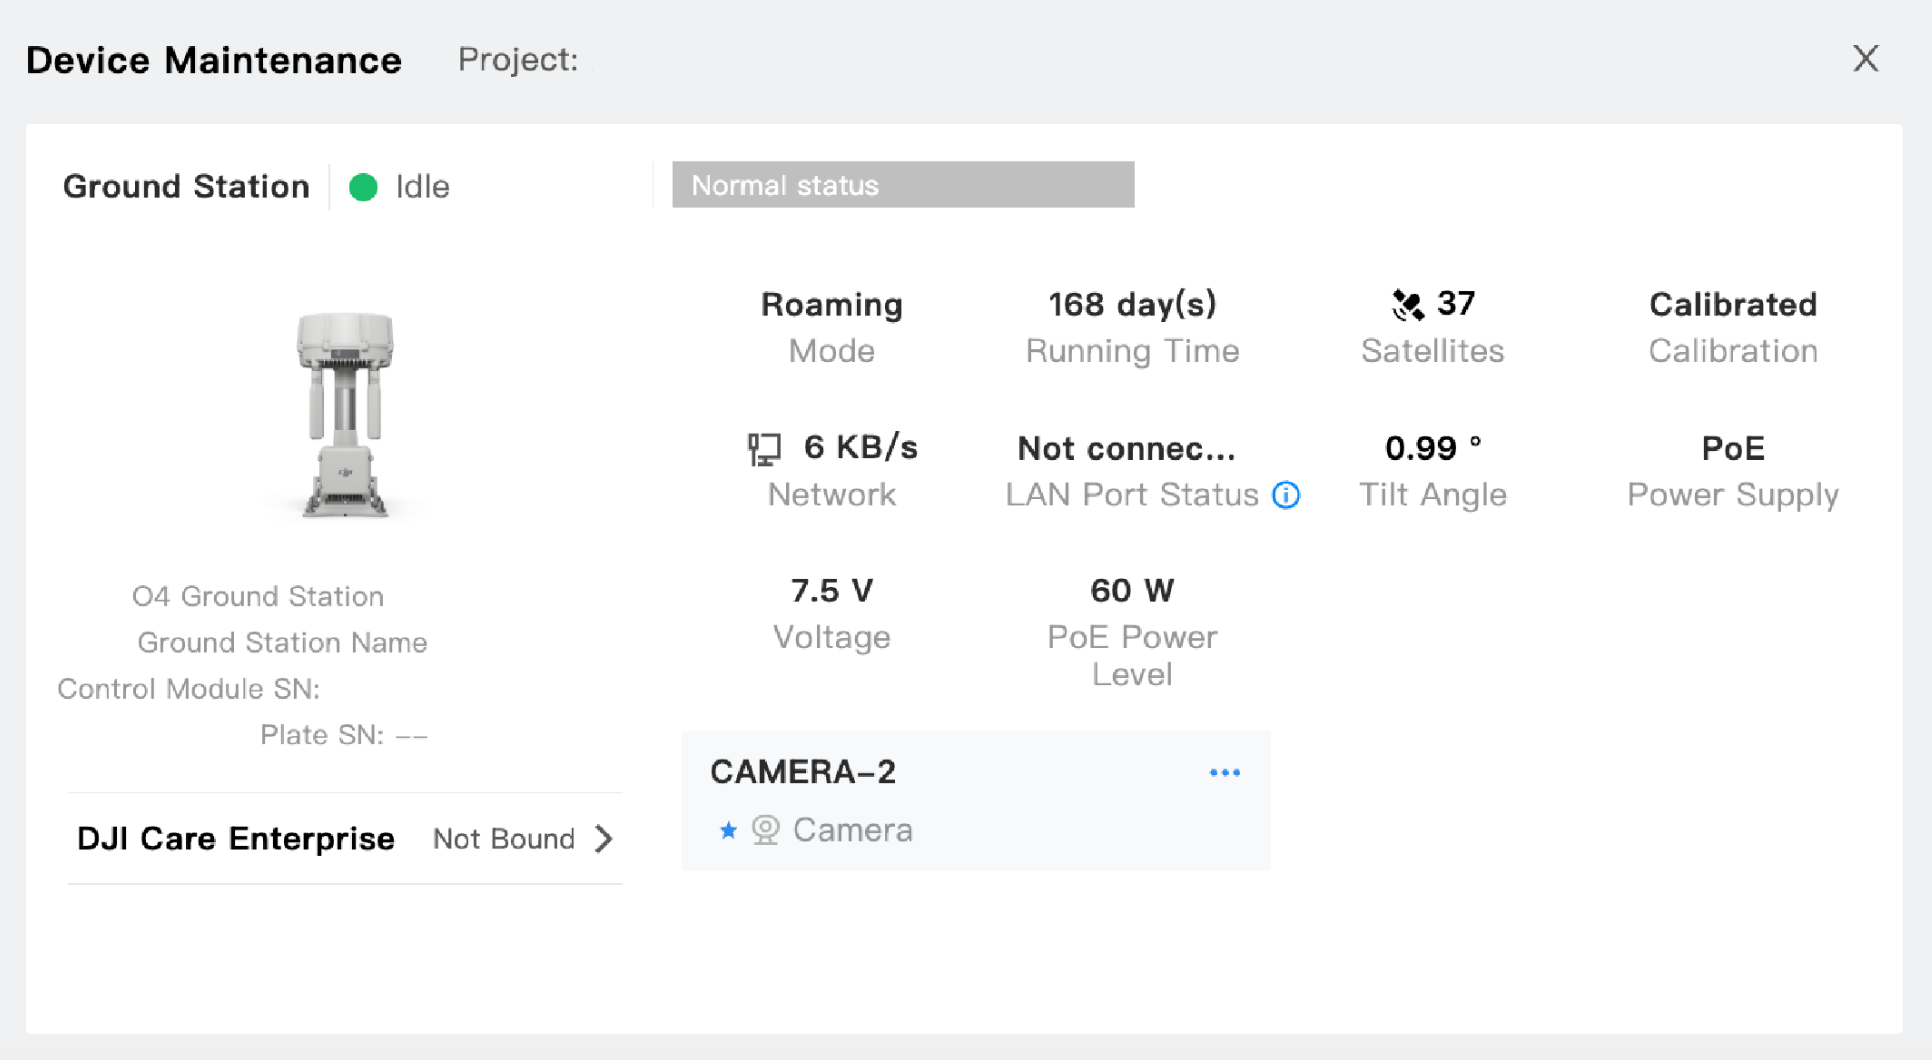
The ground station information panel displays the ground station name, model, firmware version, SN, Maintenance Program, DJI Care Enterprise, and ground station status data. If an IP camera is connected to the ground station, you can modify its settings on the device card, such as its name, the main camera selection, and device login verification. The main camera view is displayed first when the ground station live stream is started.
Aircraft Information
The aircraft information panel displays the aircraft name, model, firmware version, SN, left/right battery SN, Maintenance Program, DJI Care Enterprise, and other aircraft data. You can modify the beacon status, maximum flight altitude and distance, obstacle sensing status, operating mode, and reserve battery level for return-to-home.
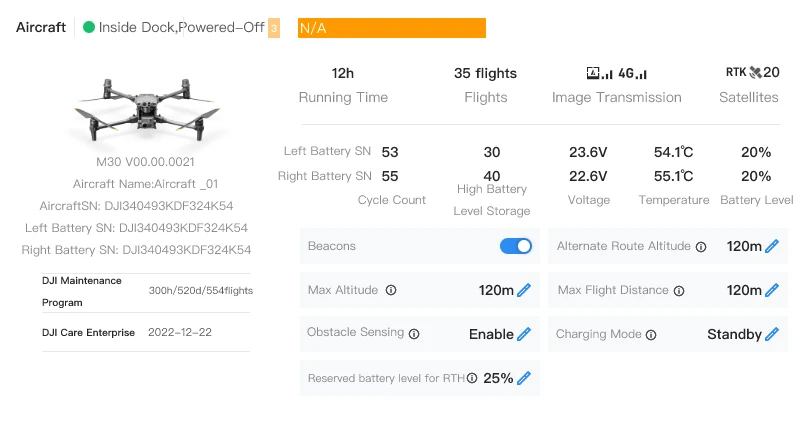
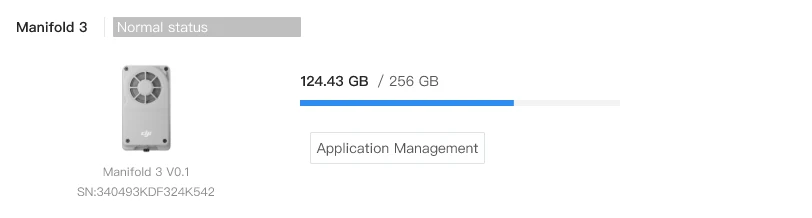
Manifold 3 Information
The Manifold 3 information panel displays the status, firmware version, SN, and memory usage of the Manifold 3 device connected to the aircraft.
Manifold 3 Application Management
Application Management allows you to manage applications installed on the Manifold 3 device. The procedure is as follows:
- In the Manifold 3 information panel, click
 to enter the Application Management configuration page.
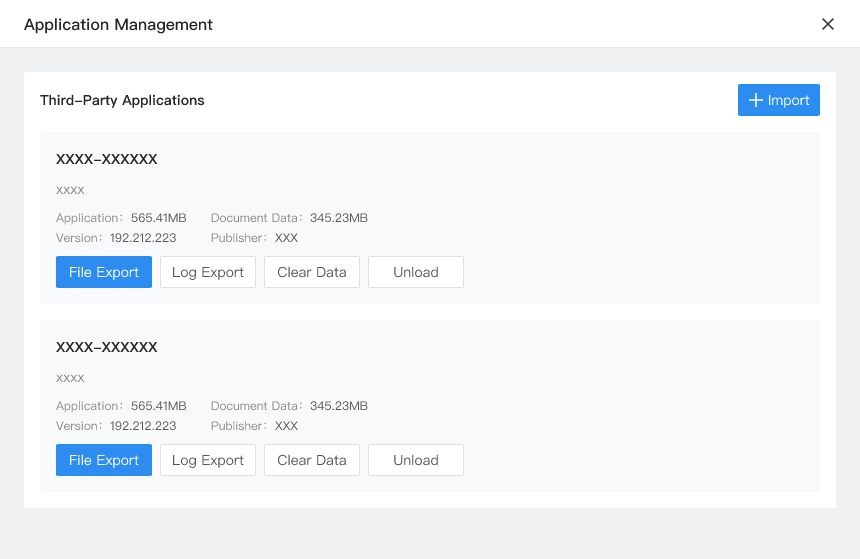
- On the Application Management page, you can perform the following operations:
- Local Import: Import application files in dpkg format from local storage.
- Click
 and select a local application file to upload. Once imported, the application appears in the application panel.
- Click
- Information Displayed in the Application Panel:
- Application Name: The name of the application.
- Application Description: A brief description of the application.
- Application Size: The size of the application file.
- Document Data Size: The storage space occupied by the application data.
- Application Version: The current version of the application.
- Publisher Information: Information about the application publisher.
- Application File Export: Export installed application files.
- Log Export: Export application log files for troubleshooting and analysis.
- Data Clearing: Clear application cache data and files.
- Uninstall Application: Uninstall applications from the Manifold 3 device.
- Use the Application
After importing the application, enter the virtual cockpit of the corresponding aircraft to activate and use the application.
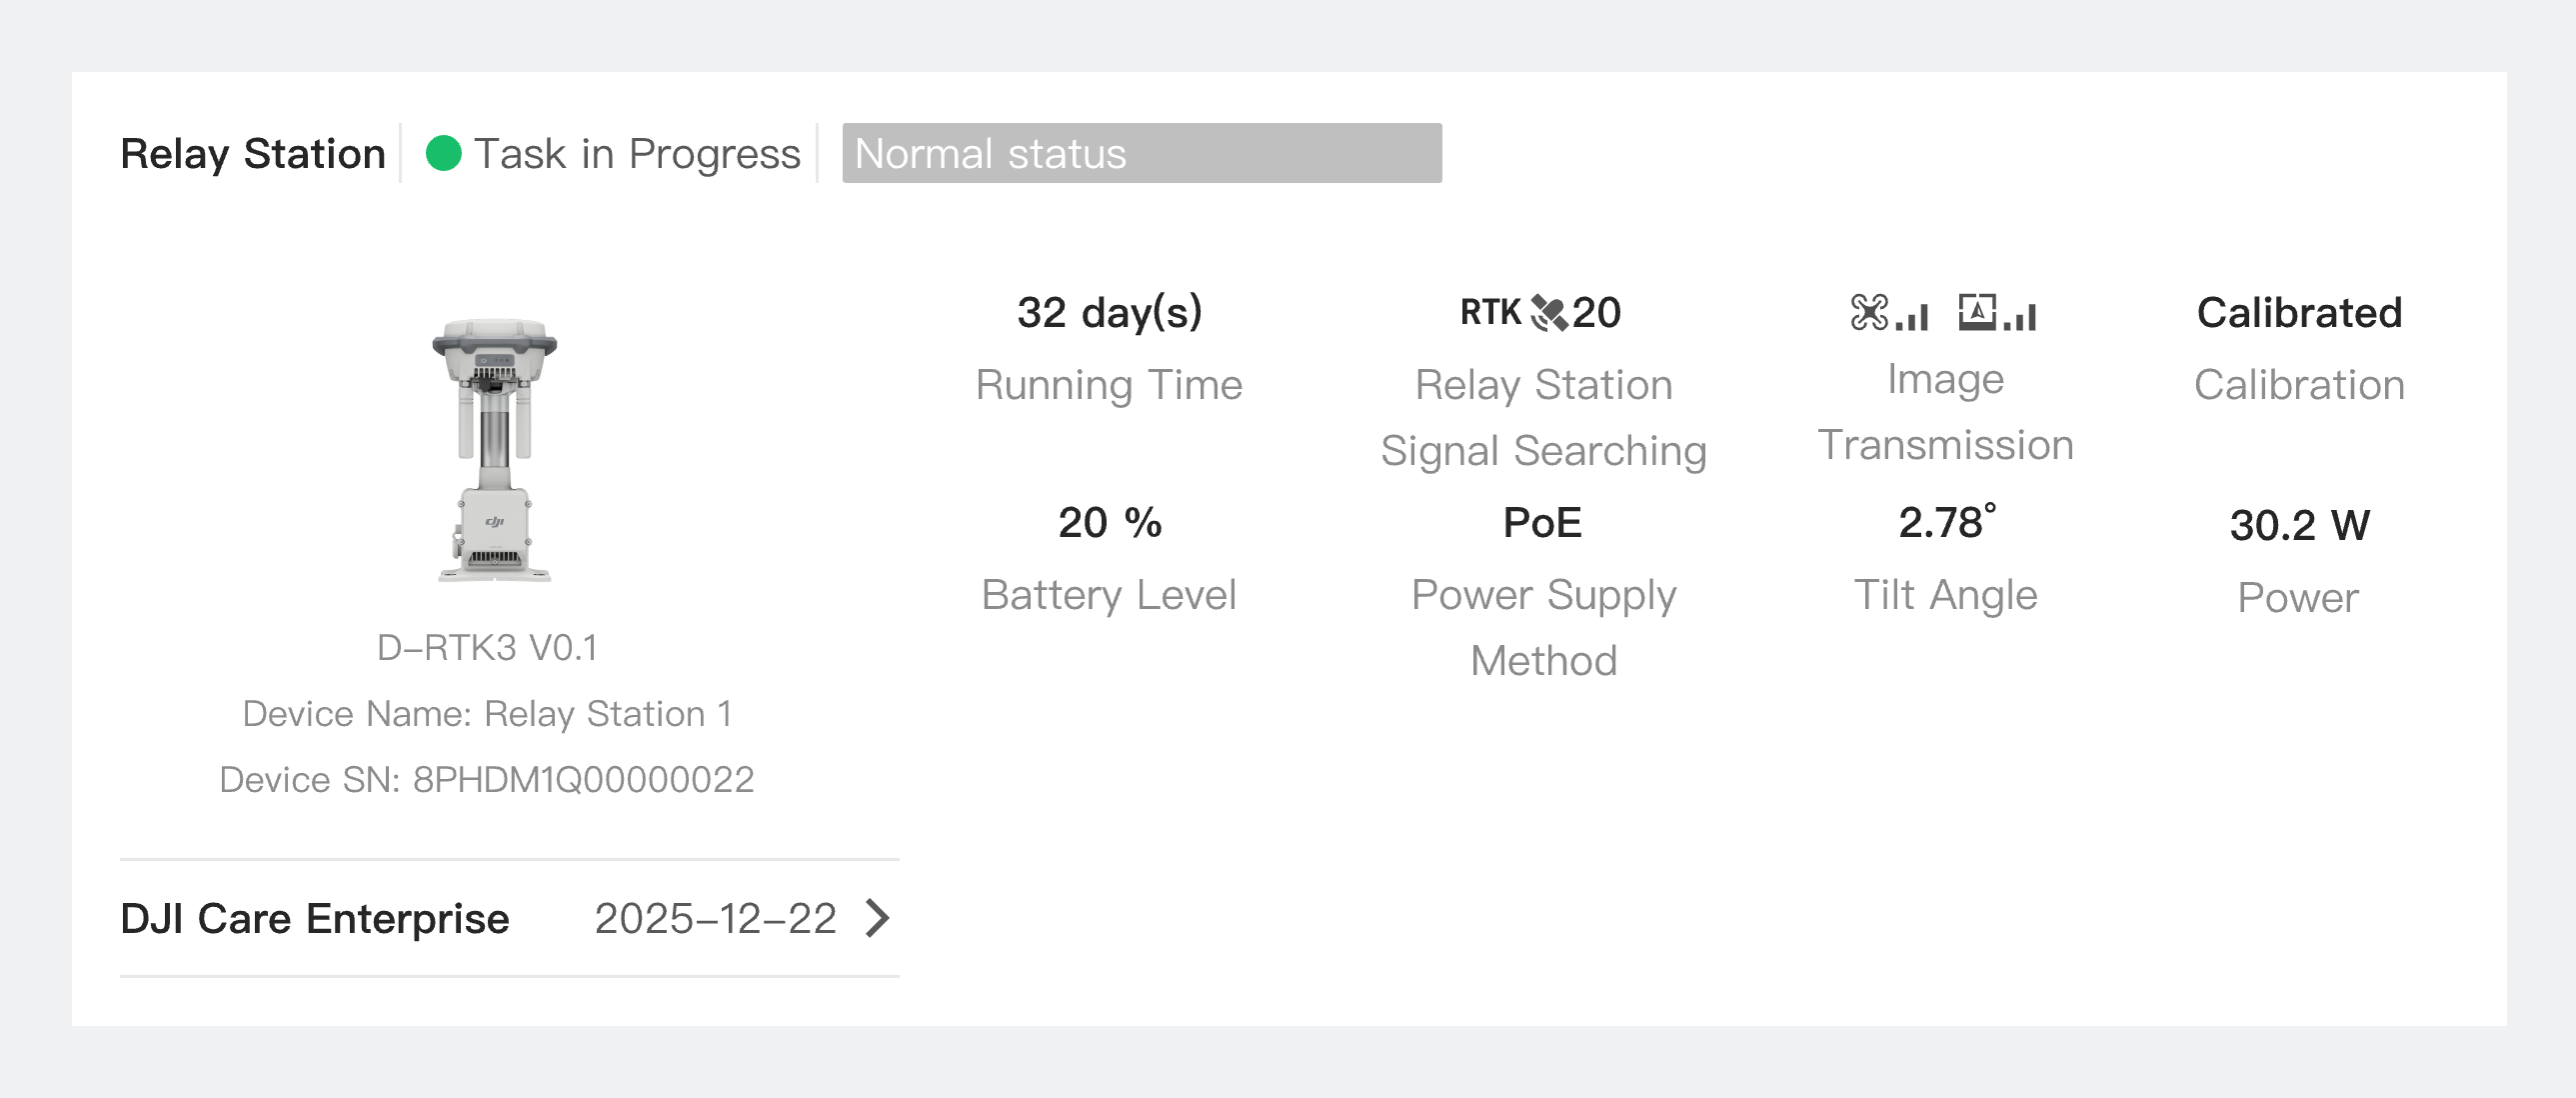
Relay Station Information
The relay station information panel displays the relay station name, model, firmware version, SN, DJI Care Enterprise, and other relay station data.
Remote Debugging
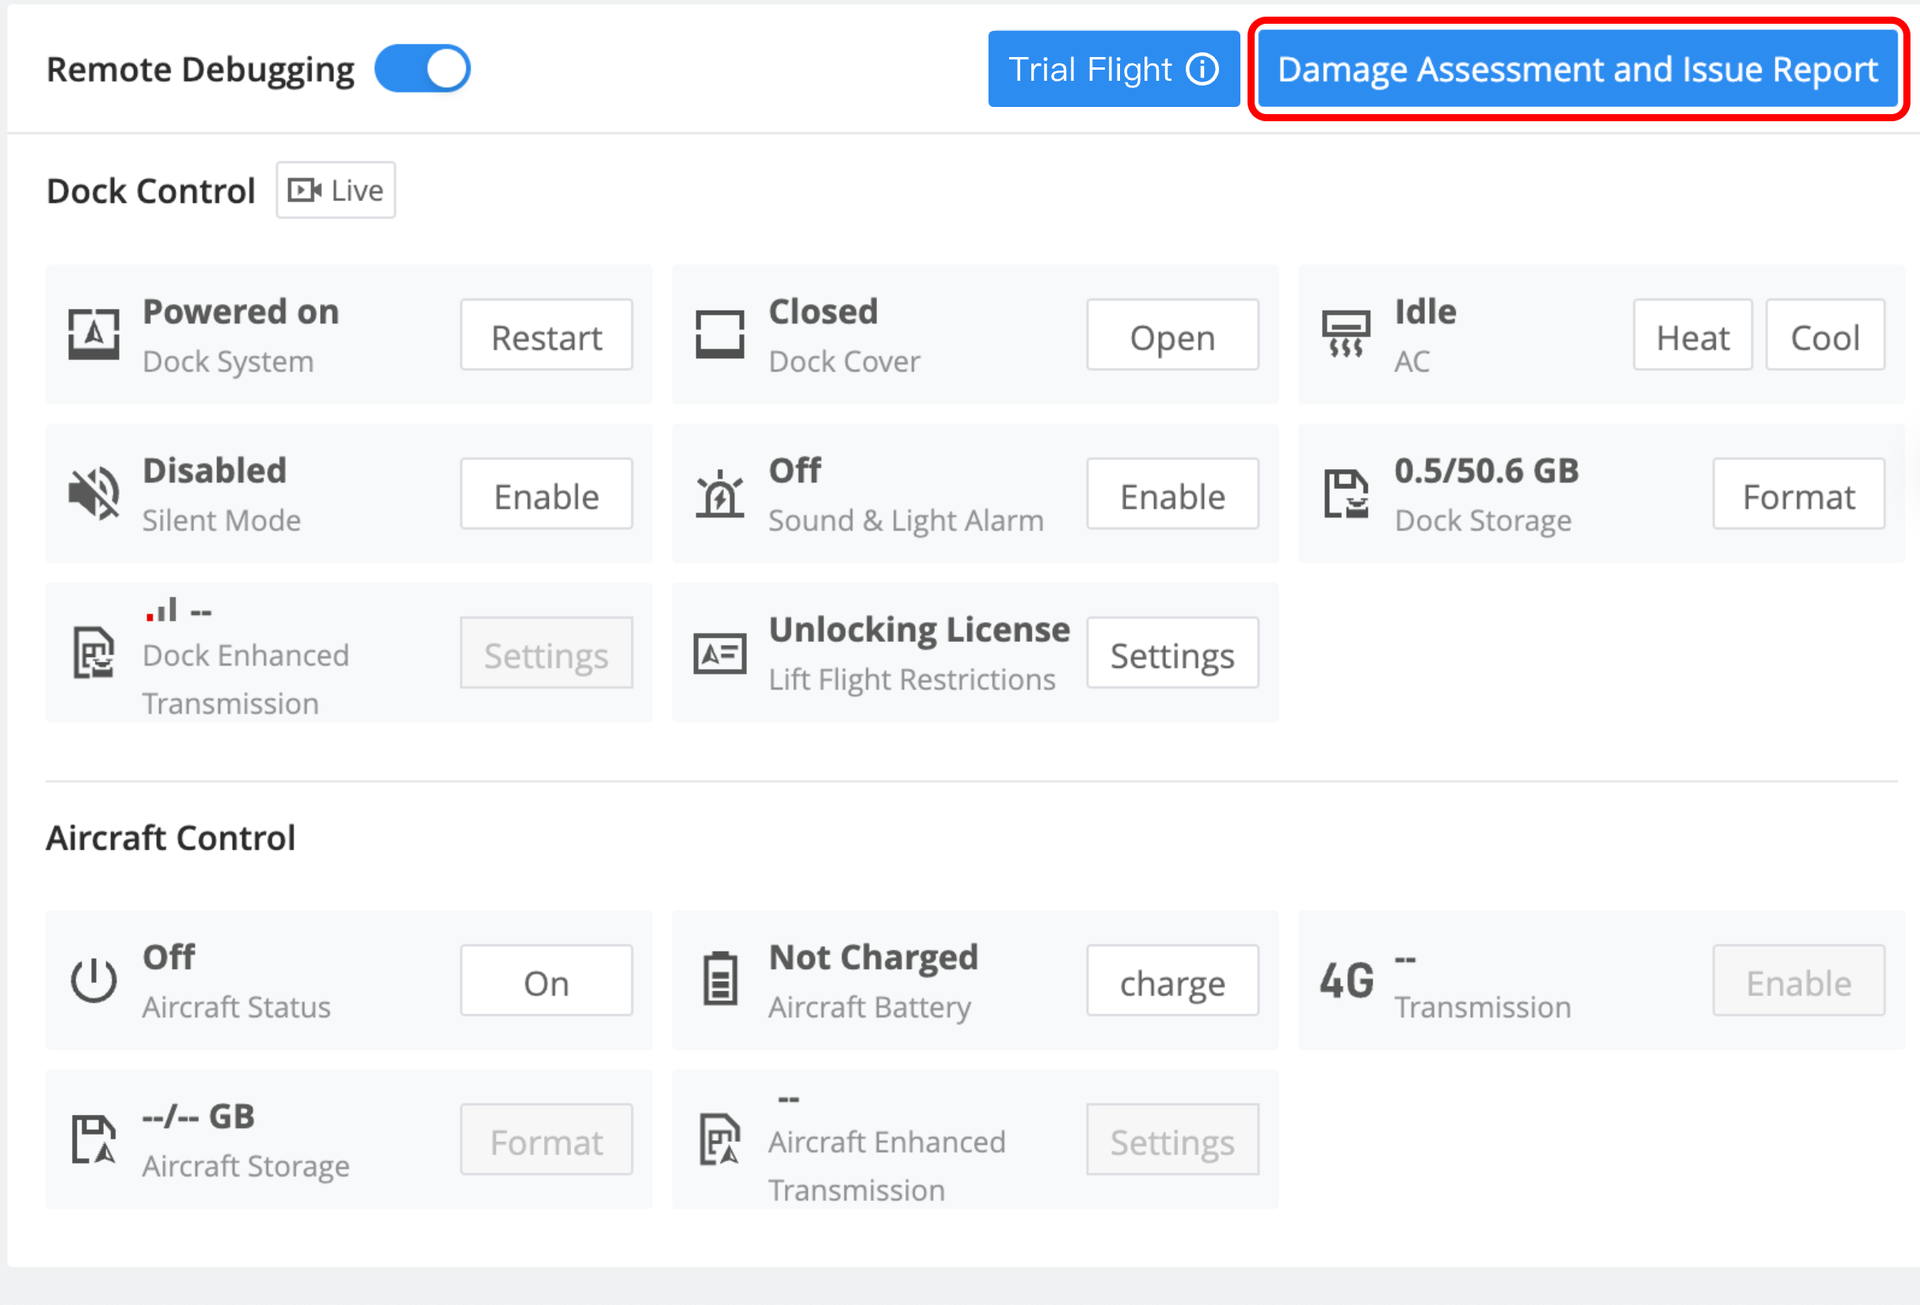
The remote debugging panel supports remote debugging of ground stations, docks, and aircraft, including ground station control, dock control, aircraft control, and device issue reporting. Docks/ground stations cannot perform flight tasks while remote debugging is enabled. Flight tasks can resume after remote debugging is exited.
Dock Control
The dock control panel includes the dock system, dock cover, air conditioner, silent mode, sound-light alarm control, dock storage formatting, enhanced transmission, and unlocking license settings. Click Live to view the dock live stream.
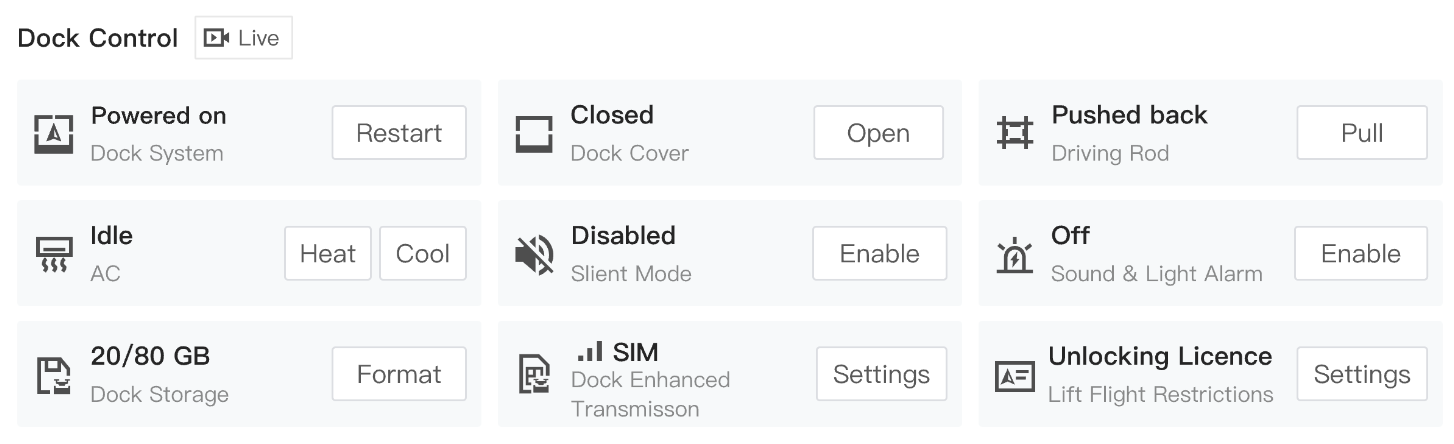
Note: Only DJI Dock supports driving rod settings.
Ground Station Control
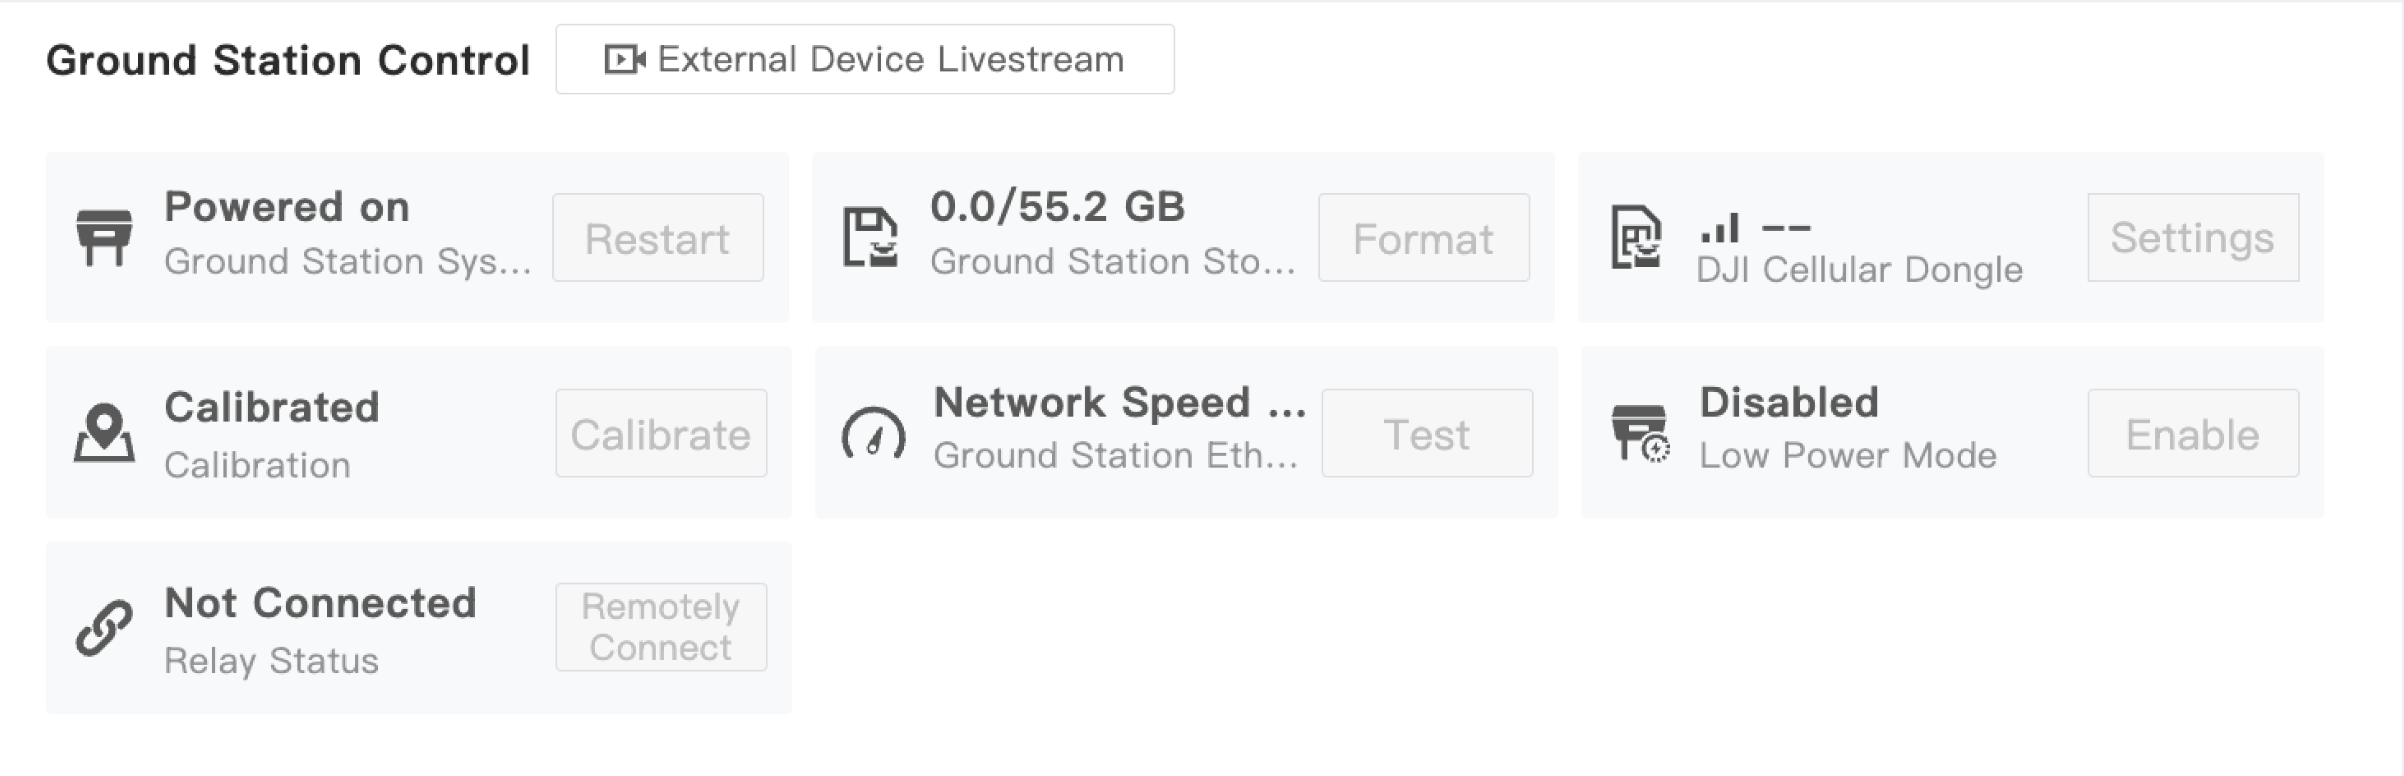
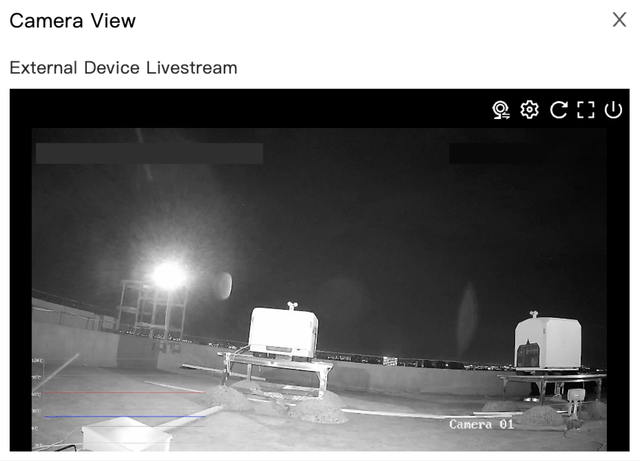
The ground station control panel includes system restart, storage formatting, enhanced transmission settings, ground station calibration, network speed testing, energy-saving mode, and relay connection settings. Click the peripheral live stream button on the right side of Ground Station Control to view the external IP camera feed.
If multiple external camera feeds are connected to the ground station, you can switch between views. Click the  live stream switch button in the upper right corner of the live stream window to switch camera feeds.
Aircraft Control
The aircraft control panel includes aircraft power, charging, aircraft storage formatting, and enhanced transmission switches and settings. Click the flight camera or gimbal camera button on the right side of Aircraft Control to view the corresponding camera feed.
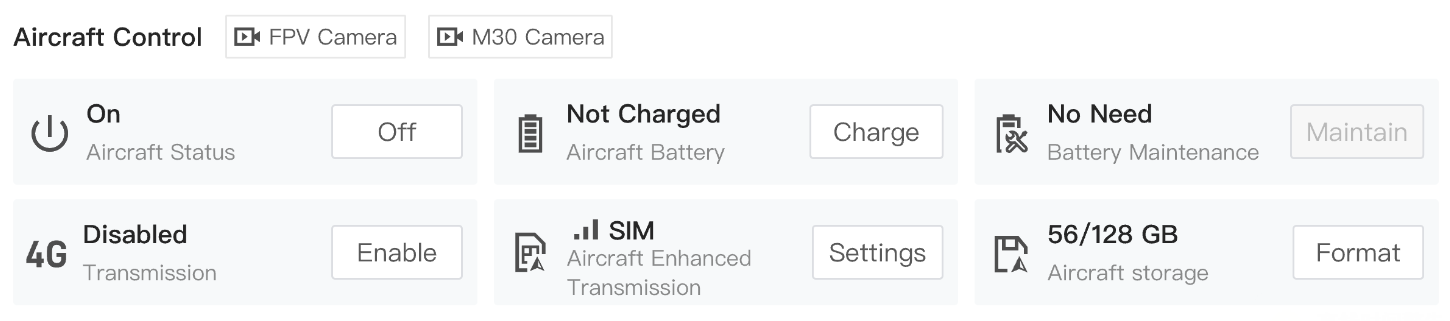
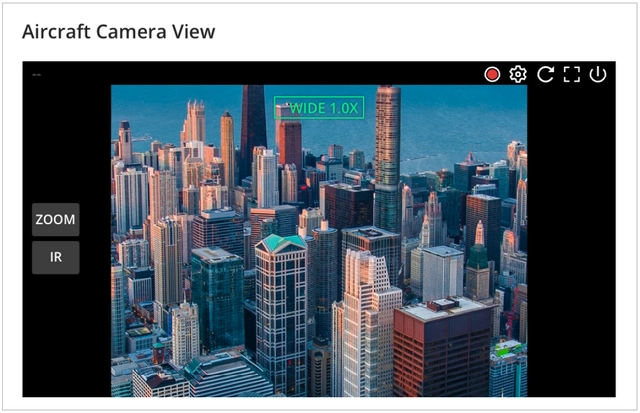
Lens switching is supported in the aircraft gimbal camera live stream. Click a lens button on the left side of the live stream window to switch to that lens. During live streaming, click  to start recording. After recording ends, the file is automatically saved to Media Files.
Relay Station Control
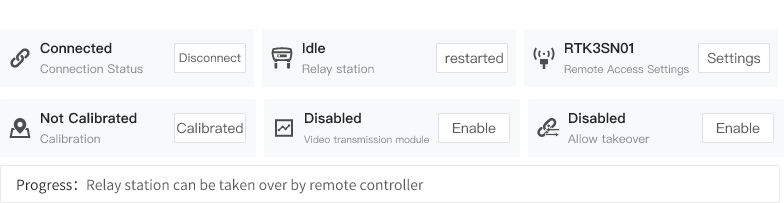
When a dock/ground station is not connected to a relay, its control panel supports remote relay connection. You can search for relay remote access signals near O4 Ground Station and DJI Dock 3, select a device, and enter its password to connect. After the first connection, change the password immediately and remember it.

After the dock/ground station is connected to a relay, the relay station control panel includes relay system restart, location calibration, video transmission switches, relay disconnection, remote relay access, and relay takeover settings. Remote relay access settings allow you to configure the signal name, password, and visibility.
Dock Aircraft Trial Flight
Dock Aircraft Trial Flight provides a quick check of dock status by verifying task execution and media file transfer.
Click Dock Aircraft Trial Flight to automatically create a scheduled task and quickly verify whether the dock can perform flight tasks normally.
For DJI Dock and DJI Dock 2, the aircraft ascends vertically to 60 m, tilts the gimbal down to -90°, takes a photo, and returns to home. For DJI Dock 3 without an entry/exit route, the aircraft follows the same procedure. If an entry/exit route is configured, the aircraft follows that route first, then ascends vertically to 5 m above the entry/exit point, tilts the gimbal down to -90°, takes a photo, and returns to home.
Requirements for Dock Aircraft Trial Flight:
- The dock must be assigned to a project.
- The user must be an administrator of that project and have device management permission.
- The dock must be idle.
Device Issue Report
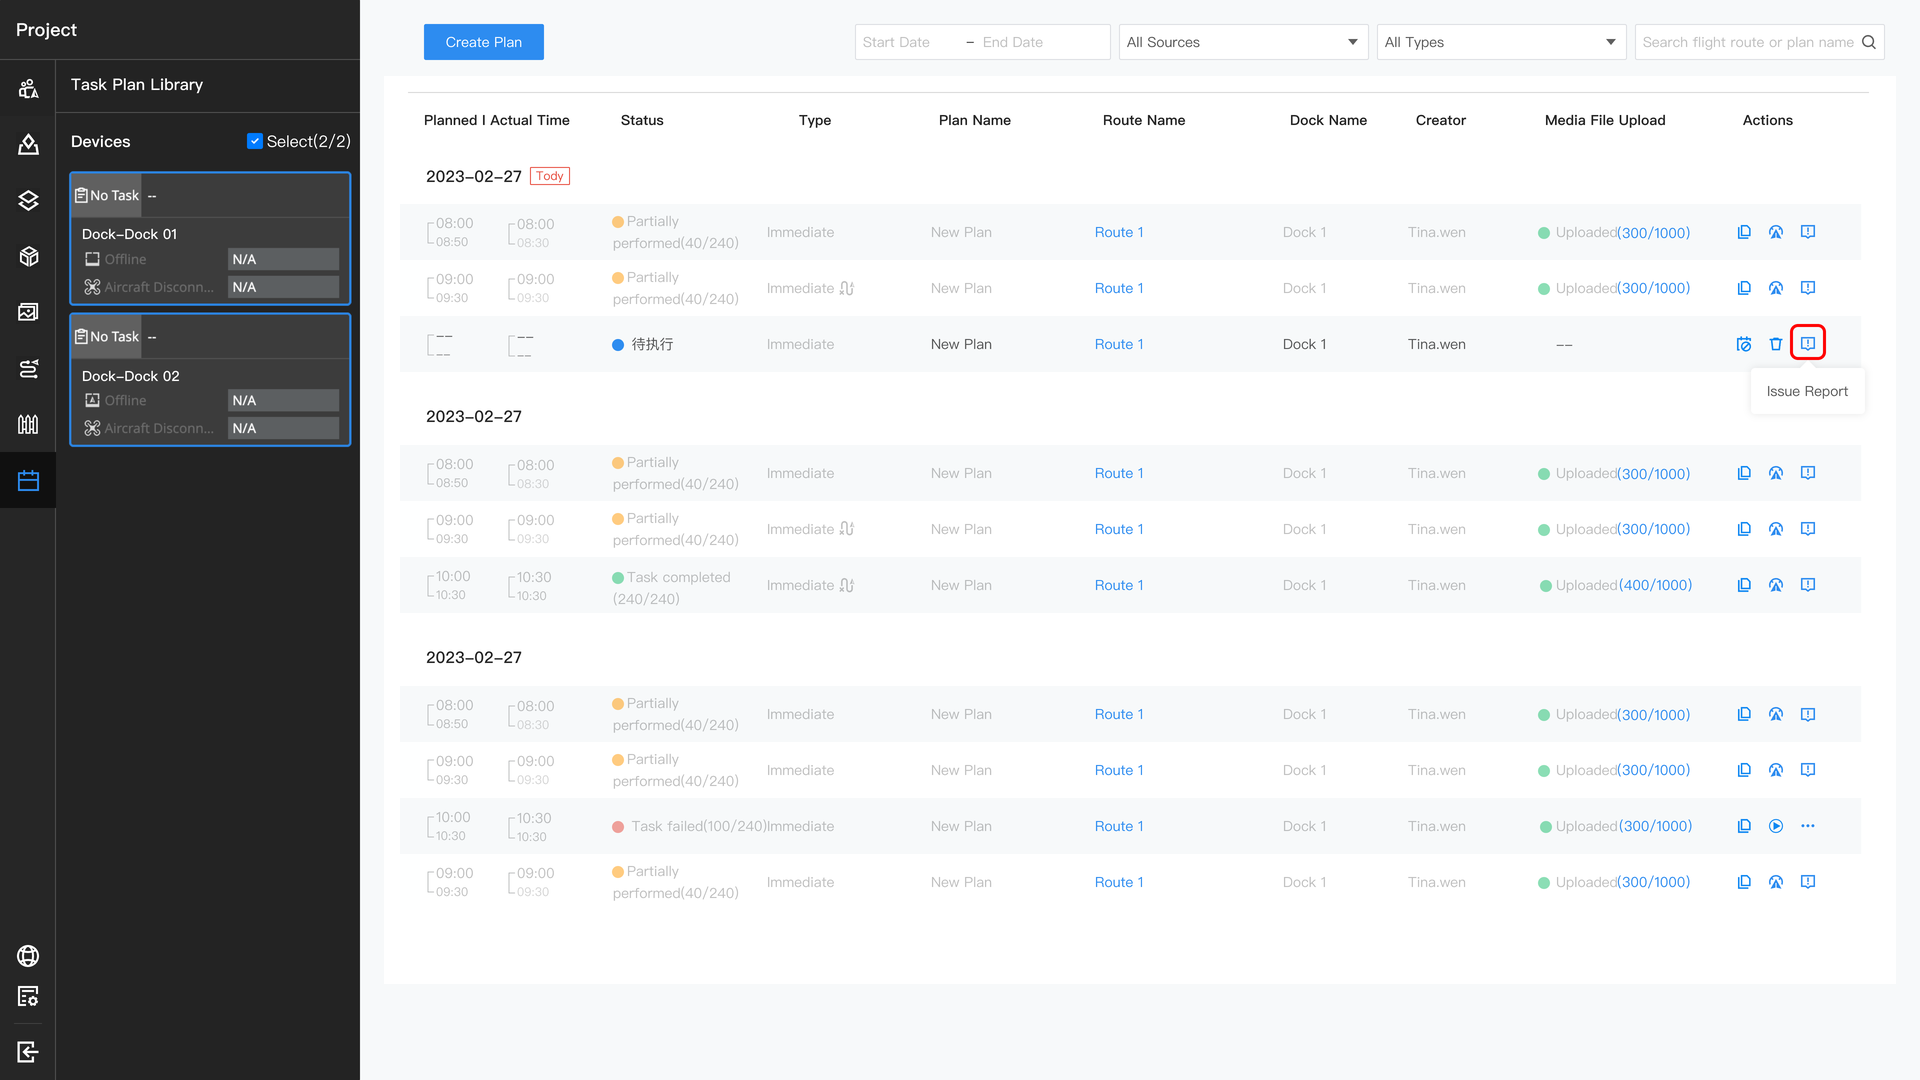
When a task fails, you can submit an issue report directly from the failed task in the task plan library. The error code and description are automatically filled in on the log feedback page.
If a device has a warning message, click the message directly to submit an issue report. The error code and description are automatically filled in on the log feedback page.
If the issue cannot be traced using the methods above, administrators can go to Damage Assessment and Issue Report > Create Damage Assessment or Issue Report, then select Log Feedback to enter the feedback page.
Provide a detailed issue description and error code, specify the exact time of the issue, and select logs for the corresponding time period.
- When Synchronize Selection is enabled, selecting dock/ground station logs also selects aircraft logs for overlapping time periods.
- Administrators should submit feedback promptly to avoid logs being overwritten, which would prevent issue analysis and diagnosis.
- If the aircraft is powered off when you enter the feedback page, it is powered on automatically.
- If logs cannot be loaded, click
 to retry.
After submission, wait for feedback from DJI Support. You can later view DJI's analysis results in the log feedback list under Damage Assessment and Issue Report.
Note: For more instructions, refer to the DJI Dock User Manual, DJI Dock 2 User Manual, DJI Dock 3 User Manual, and O4 Ground Station User Manual.
Device Damage Assessment
If a dock has an issue, administrators can go to Device Maintenance > Damage Assessment and Issue Report > Device Damage Assessment > New to enter the assessment page. Select the damage type as needed and initiate the assessment.
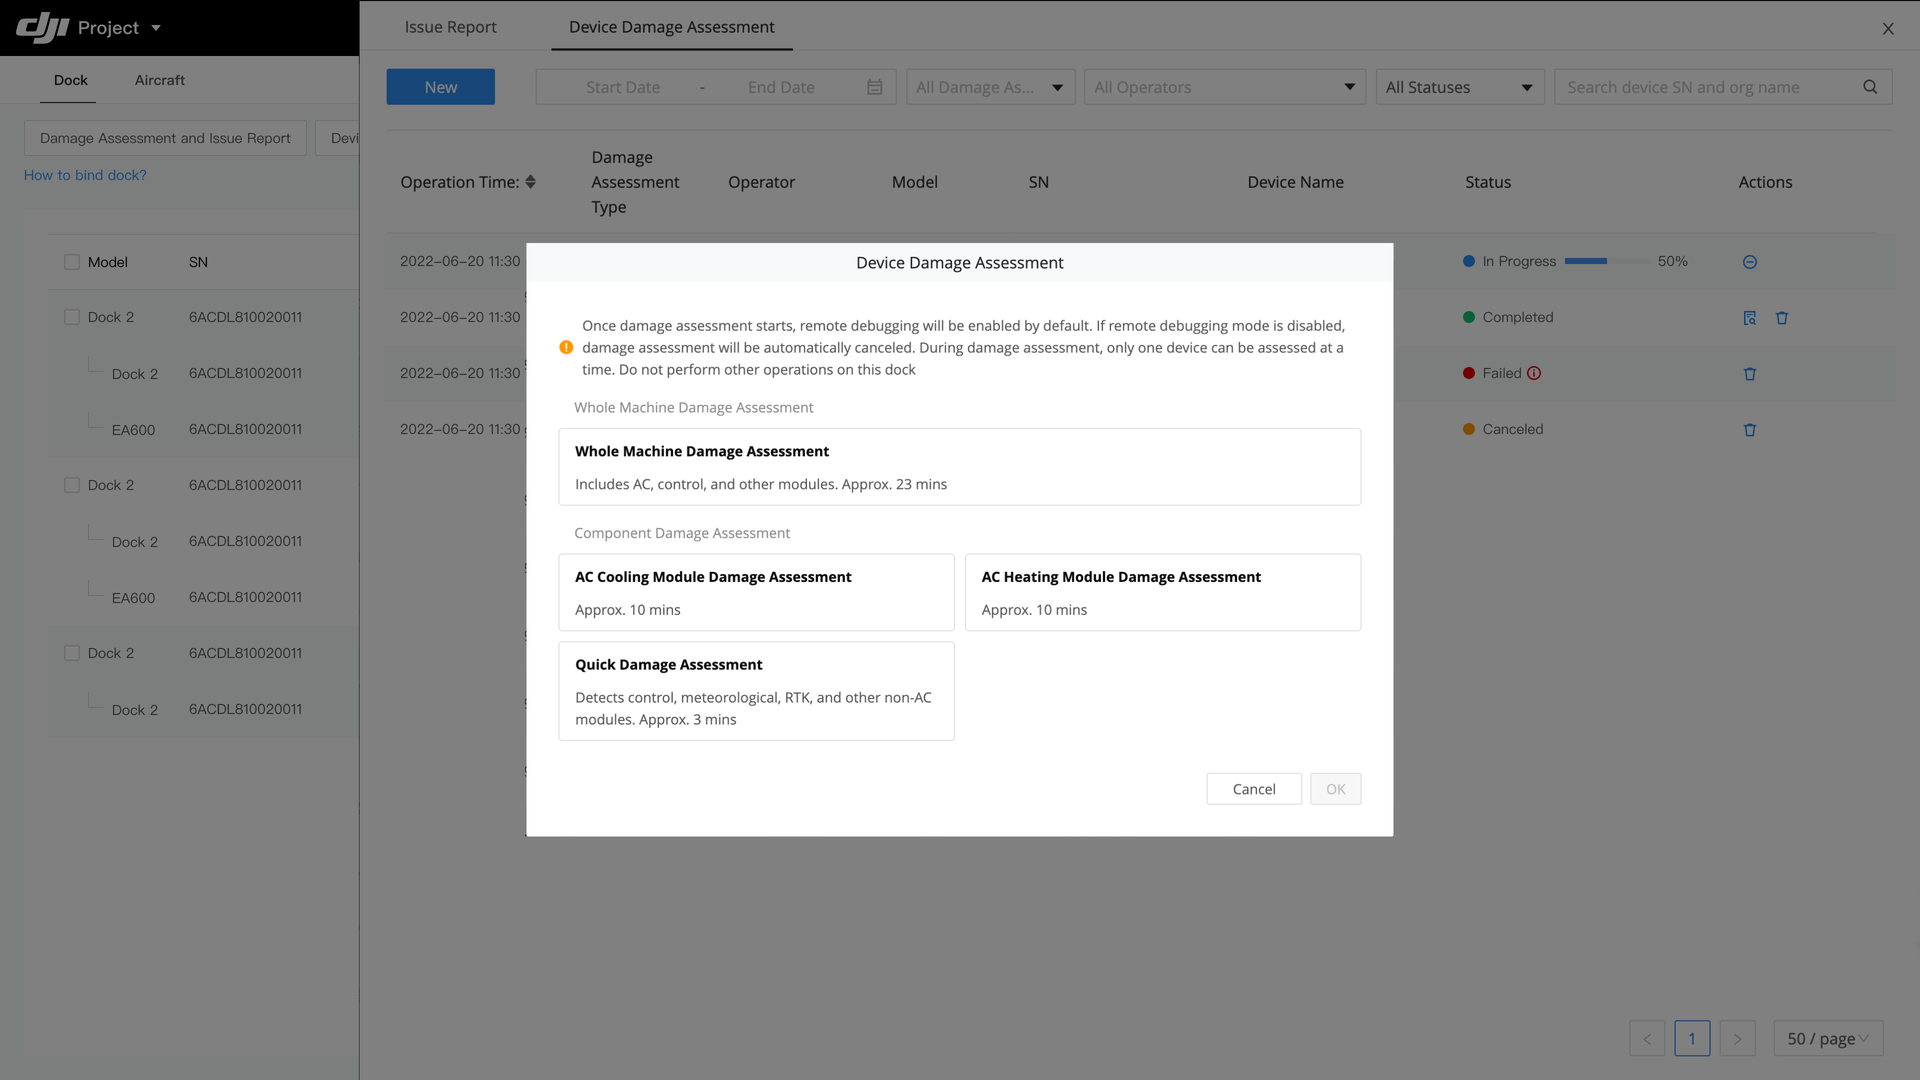
After the assessment is completed, promptly contact a DJI dealer for repairs.
- Device damage assessment is supported only in Chinese mainland.
- Remote debugging is enabled by default when an assessment starts. Do not perform other operations on the dock during the assessment. Disabling remote debugging automatically cancels the assessment.
- Do not initiate multiple damage assessments for the same dock at the same time.
Device Repair
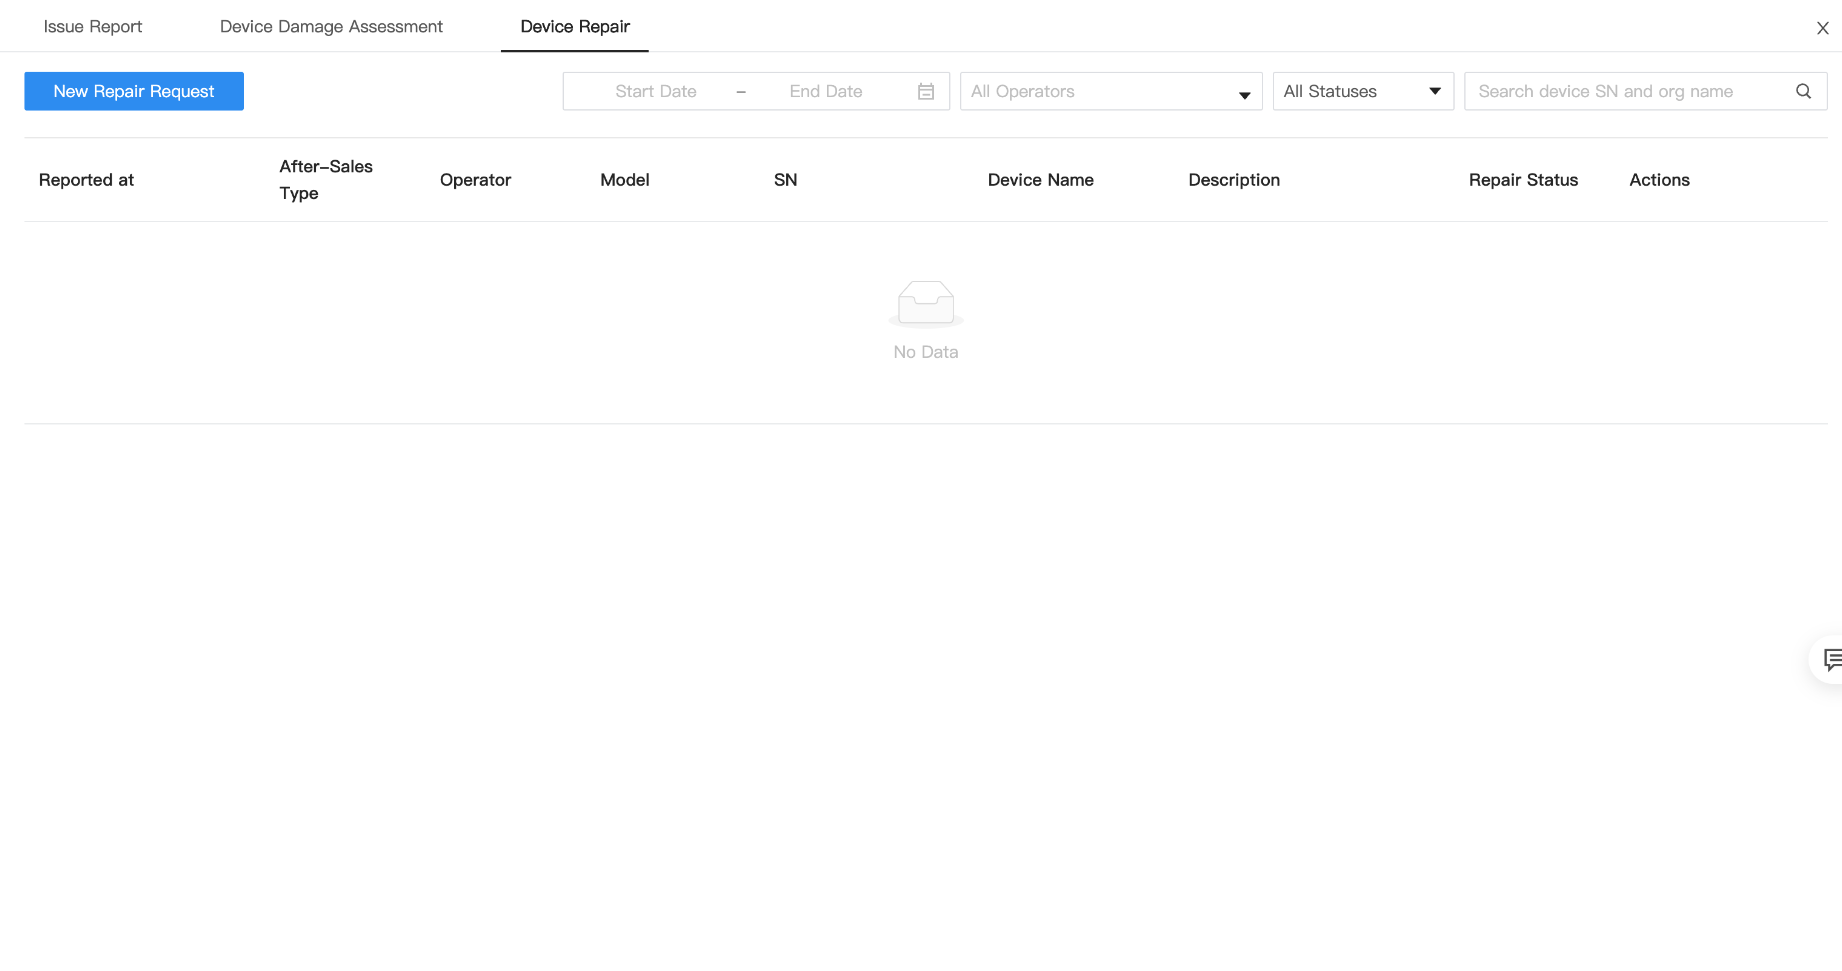
After completing a device issue report or damage assessment, if the analysis results do not resolve the issue, click Request Repair to initiate a repair. A DJI dealer will visit the customer's site after the request is submitted.
Quick Battery Swap
This function is only available for DJI Dock 4.
DJI Dock 4 supports quick battery swap from the device list for rapid operation rotation:
- One-Tap Automatic Swap: After you click swap, the dock automatically switches to the battery with the higher charge level.
- Swap Status Display: Displays swap progress during the process.
- Battery Slot Status: In multi-battery scenarios, displays each slot's status, including battery presence and charge level.
Cloud Service Switching
Super admins and organization admins can go to Organization > Devices > Dock/Ground Station > Actions > More > Cloud Service Switching to remotely switch the cloud service of docks/ground stations. Select multiple docks/ground stations to switch their cloud service in a batch.
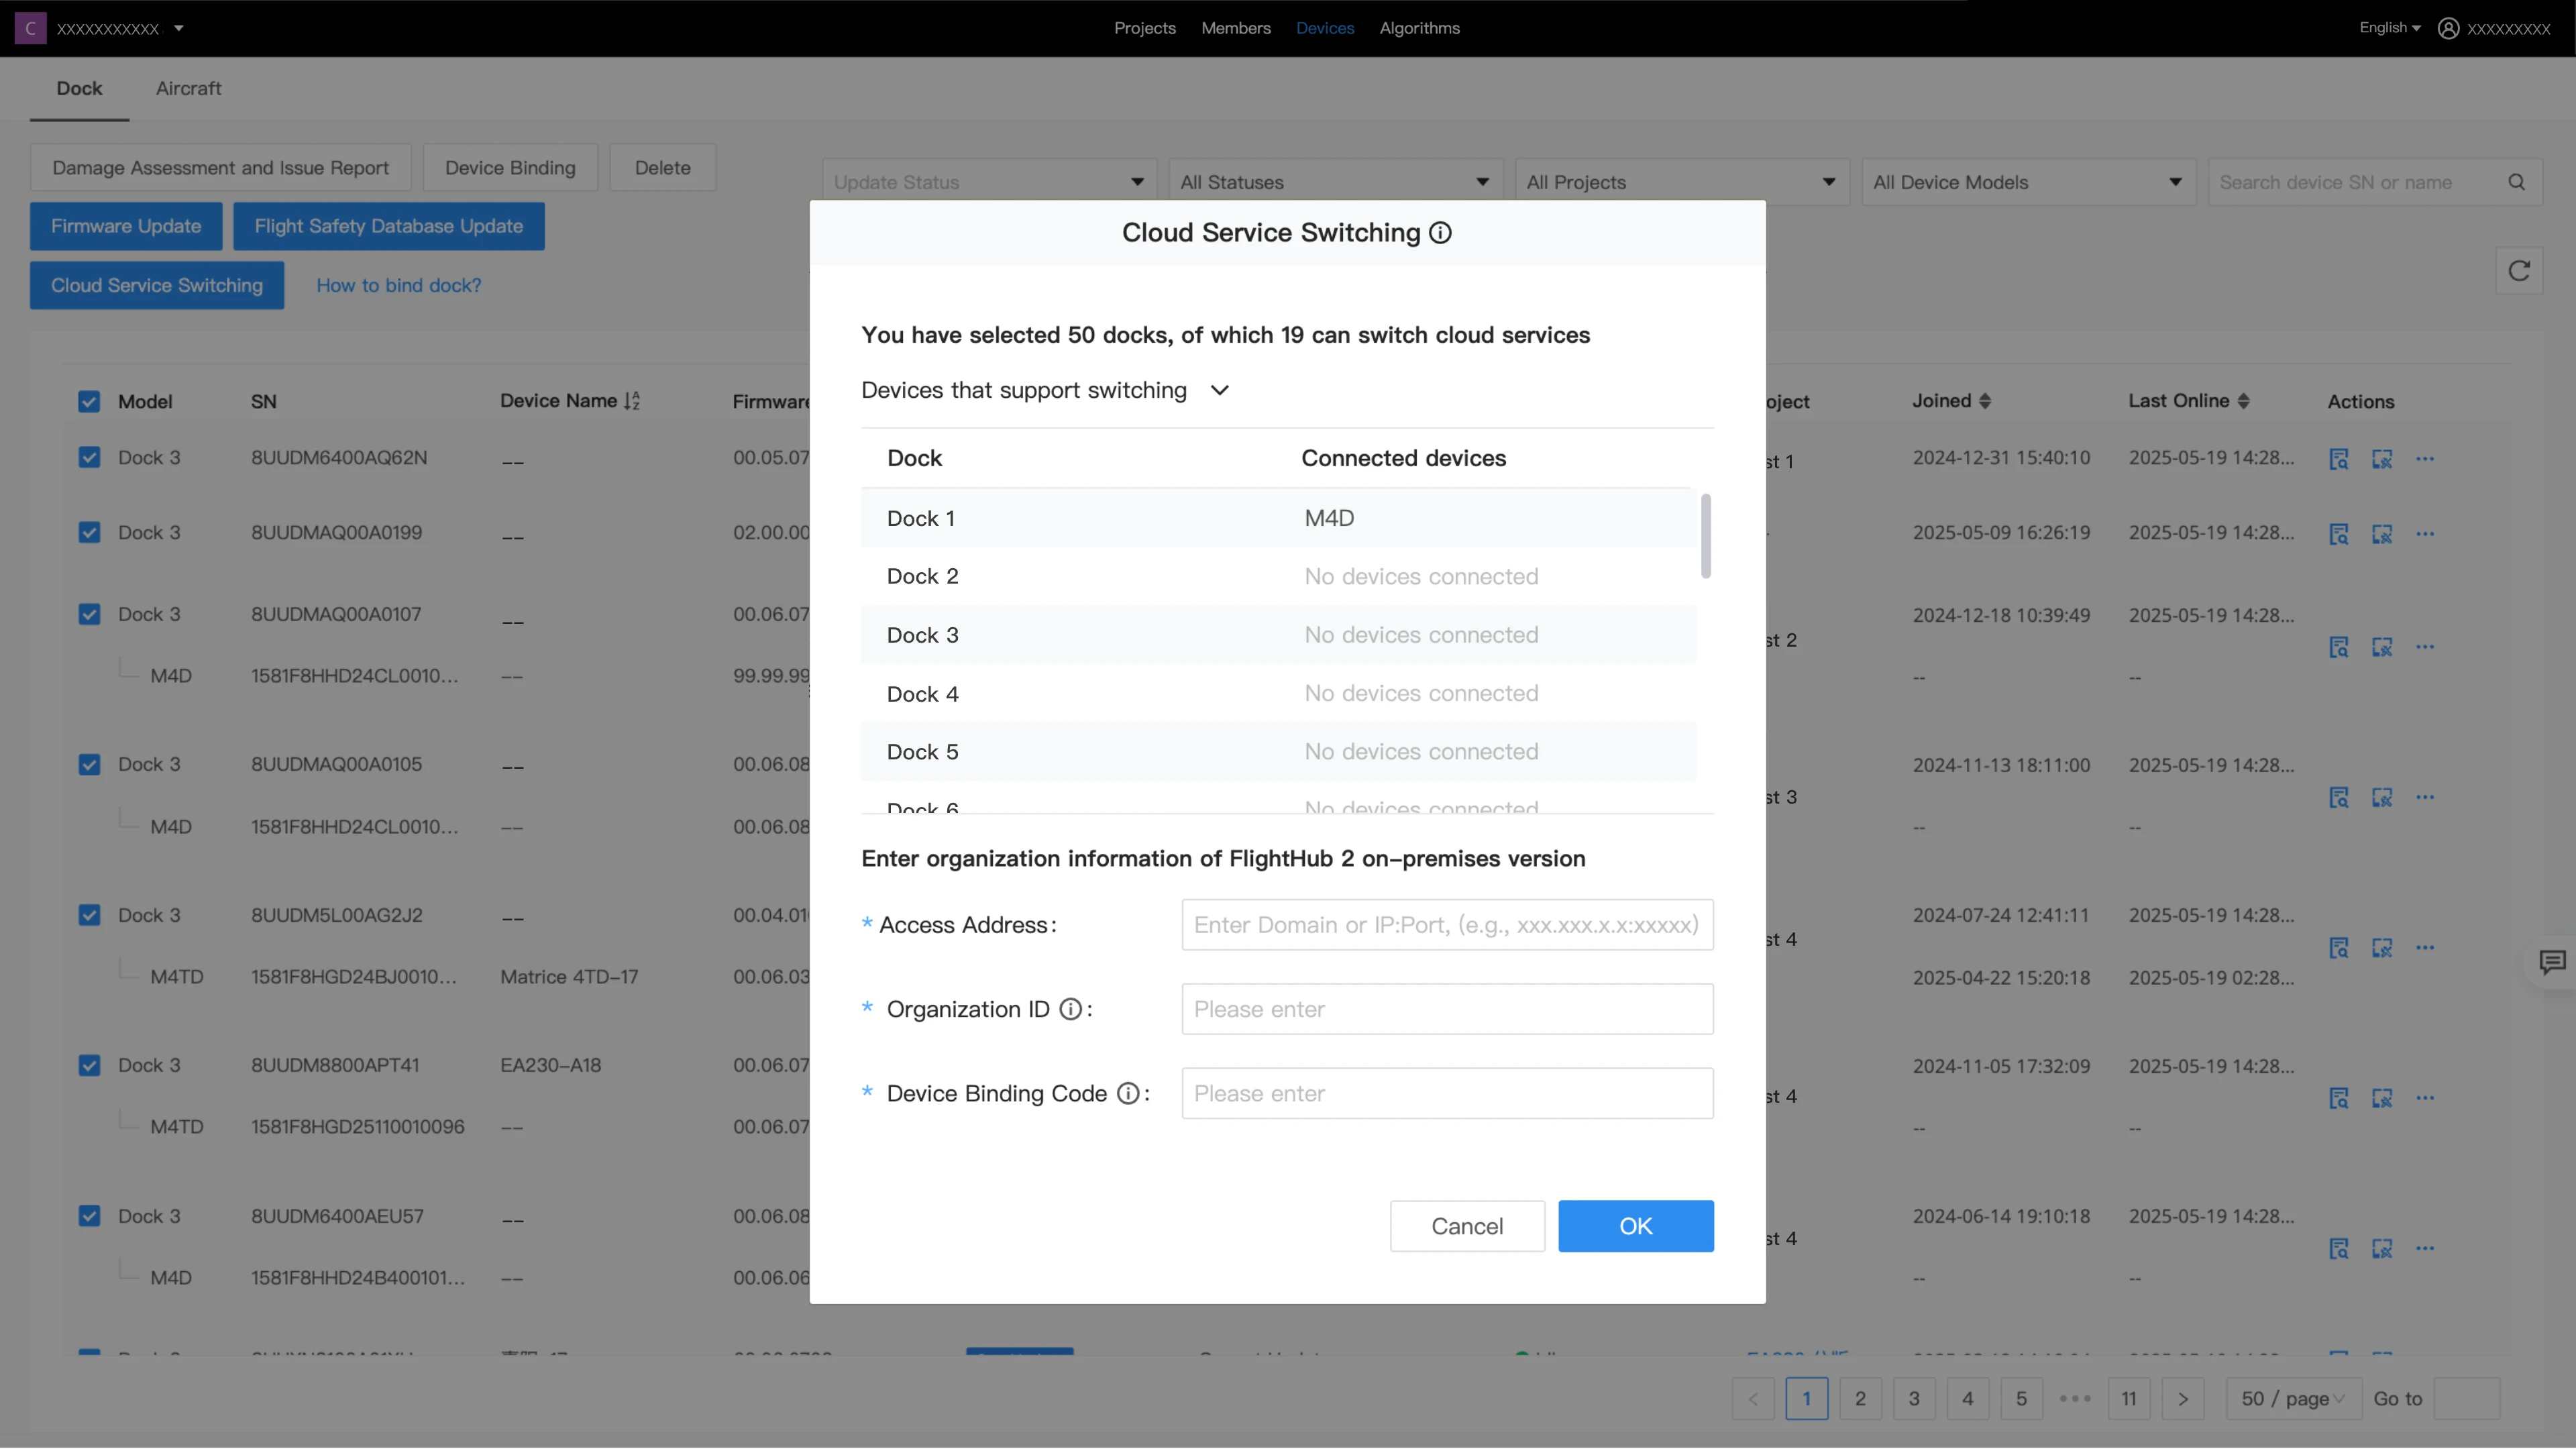
Cloud Service Switching changes the cloud service and organization that a dock/ground station is connected to. The following scenarios are supported:
- Switch between Public Cloud Organizations: Switch a device from public cloud organization A to organization B, either within the same server region or across server regions. For example, a device can switch from an organization on the China server to an organization on the Europe or US server.
- Switch between Public Cloud and On-premises Environments: Switch from FlightHub 2 public cloud to FlightHub 2 on-premises, or from FlightHub 2 on-premises to FlightHub 2 public cloud.
- Switch between On-premises Environments: Switch from one FlightHub 2 on-premises environment to another.
- Switch from a Third-Party Cloud Service to FlightHub 2: Switch devices connected to a third-party cloud service to a FlightHub 2 public cloud organization or on-premises environment.
Switching from a Third-Party Cloud Service to FlightHub 2
After selecting the switching type, follow the on-screen instructions to confirm or enter the device information, original organization information, and target FlightHub 2 organization information. The target organization information is populated from the current FlightHub 2 organization by default. Confirm the information, initiate the switch, and view the result.
Notes:
- Currently supported devices are DJI Dock 3, DJI Dock 4, and O4 Ground Station.
- Make sure all media files generated by flight tasks have been uploaded before switching cloud services. Otherwise, media files may be lost.
- Cloud Service Switching can be initiated when the device is idle. The process takes approximately 1 to 2 minutes. Do not perform other operations on the device during switching.
- After switching the cloud service of a dock/ground station, the following are migrated:
- (1) The aircraft and relay connected to the dock/ground station.
- (2) Dock/ground station data and devices, such as device damage assessments and issue reports, warning messages, onboard algorithms, the Flight Safety Database, and real-name registration status.
- The following are not migrated when the dock/ground station cloud service is switched: free quotas provided for device binding.
Successful Switch: The device goes offline in the current organization. You can manage it in the target organization, where it restarts automatically.
Switch Failure:
Error Code Reason Solution 324071 Server error Try again later. 324072 Server error Try again later. 324073 Server error Try again later. 324074 Server error Try again later. 324075 Incorrect information or the target environment's network is unreachable Check that the information is correct and the target environment's network is accessible. 324076 Server error Try again later. 325001 Server error Try again later. 325005 The device is busy Try again later. 325006 The device is performing startup checks Try again later. 325007 The device is performing a task Try again later. 325008 The device is processing task results Try again later. 325009 The device is exporting logs remotely Try again later. 325010 The device is updating a custom flight area Try again later. 325011 The device is updating an offline map Try again later. 210229 Incorrect device binding code Correct the device binding code and try again. 210230 Incorrect information or server error Check the information and try again. 210231 Server error Try again later. 210232 The device is bound to another organization Remove the device from the organization it is bound to before switching. 210233 Server error Try again later.
Aircraft Management
You can bind an aircraft to the current organization through DJI Pilot 2. Make sure the remote controller is connected to the internet. Open DJI Pilot 2 and enter the home screen.
- Tap Settings in the upper left corner of the home screen and log in with a DJI account.
- Tap Cloud Service and select the FlightHub 2 cloud service. On the first login, select the organization and project you want to work in. Subsequent logins open the organization and project used last time by default. If your account has not joined an organization, ask an administrator to add it.
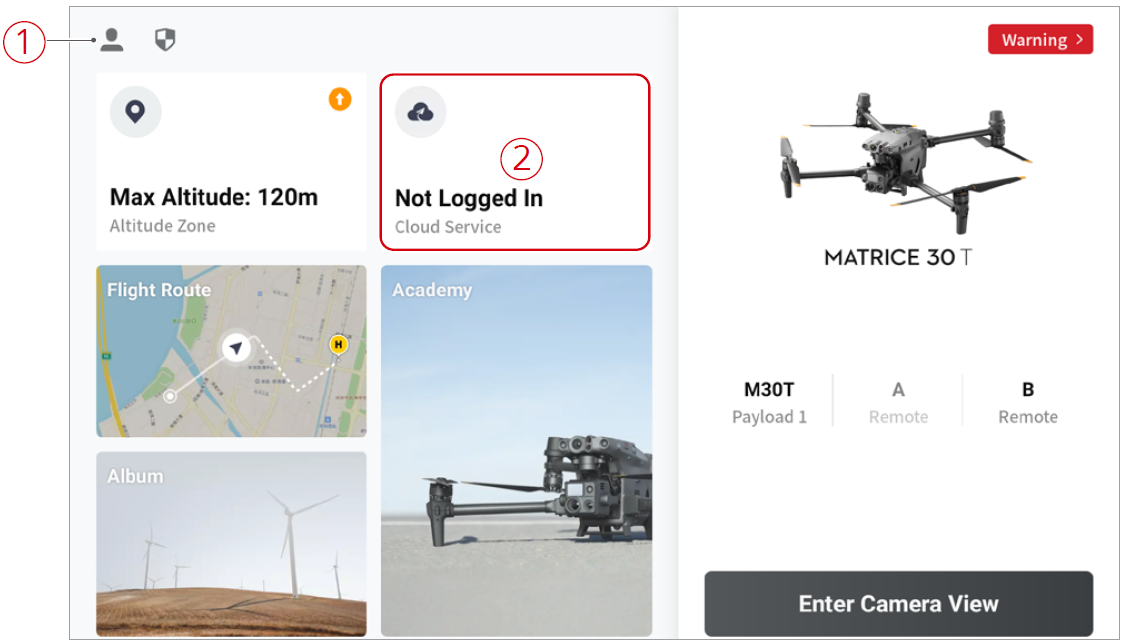
- After logging in, DJI Pilot 2 displays the current project information. Tap Device Binding to bind the aircraft.
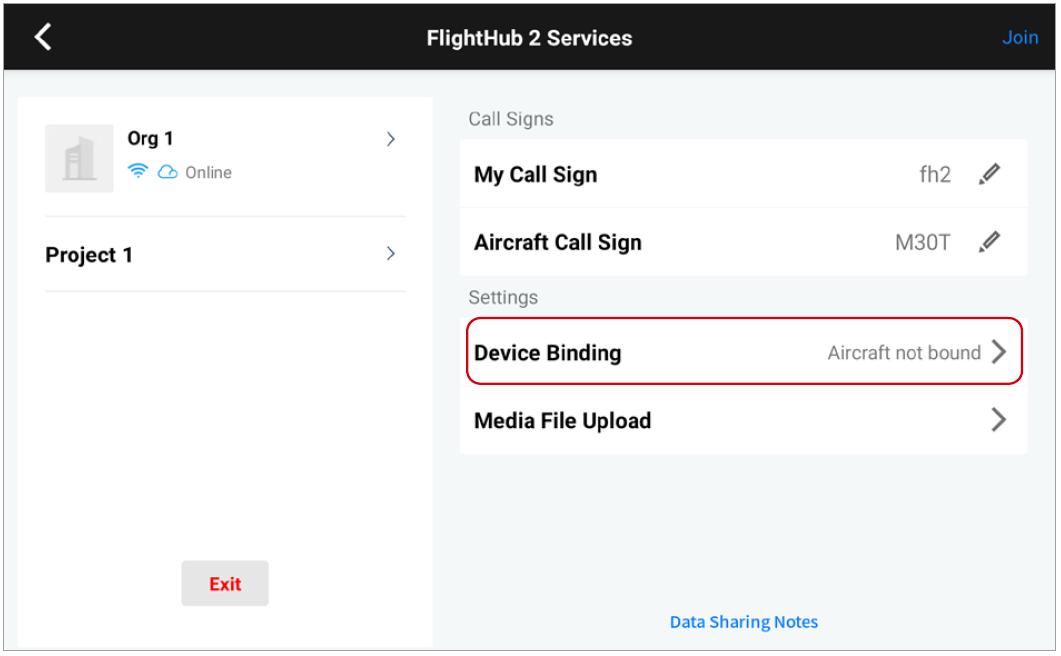
After binding, administrators can view and manage the aircraft on the web-based Devices page.

After DJI Dock 4 and its aircraft are bound, the Devices page displays the device topology, including the dock-aircraft binding relationship, online status, and device information. The Team page also displays the DJI Dock 4 device topology for the current project.

Other Streaming Device Management
On the Other Streaming Device Management page, you can manage or add devices in the organization that connect through RTMP streaming.
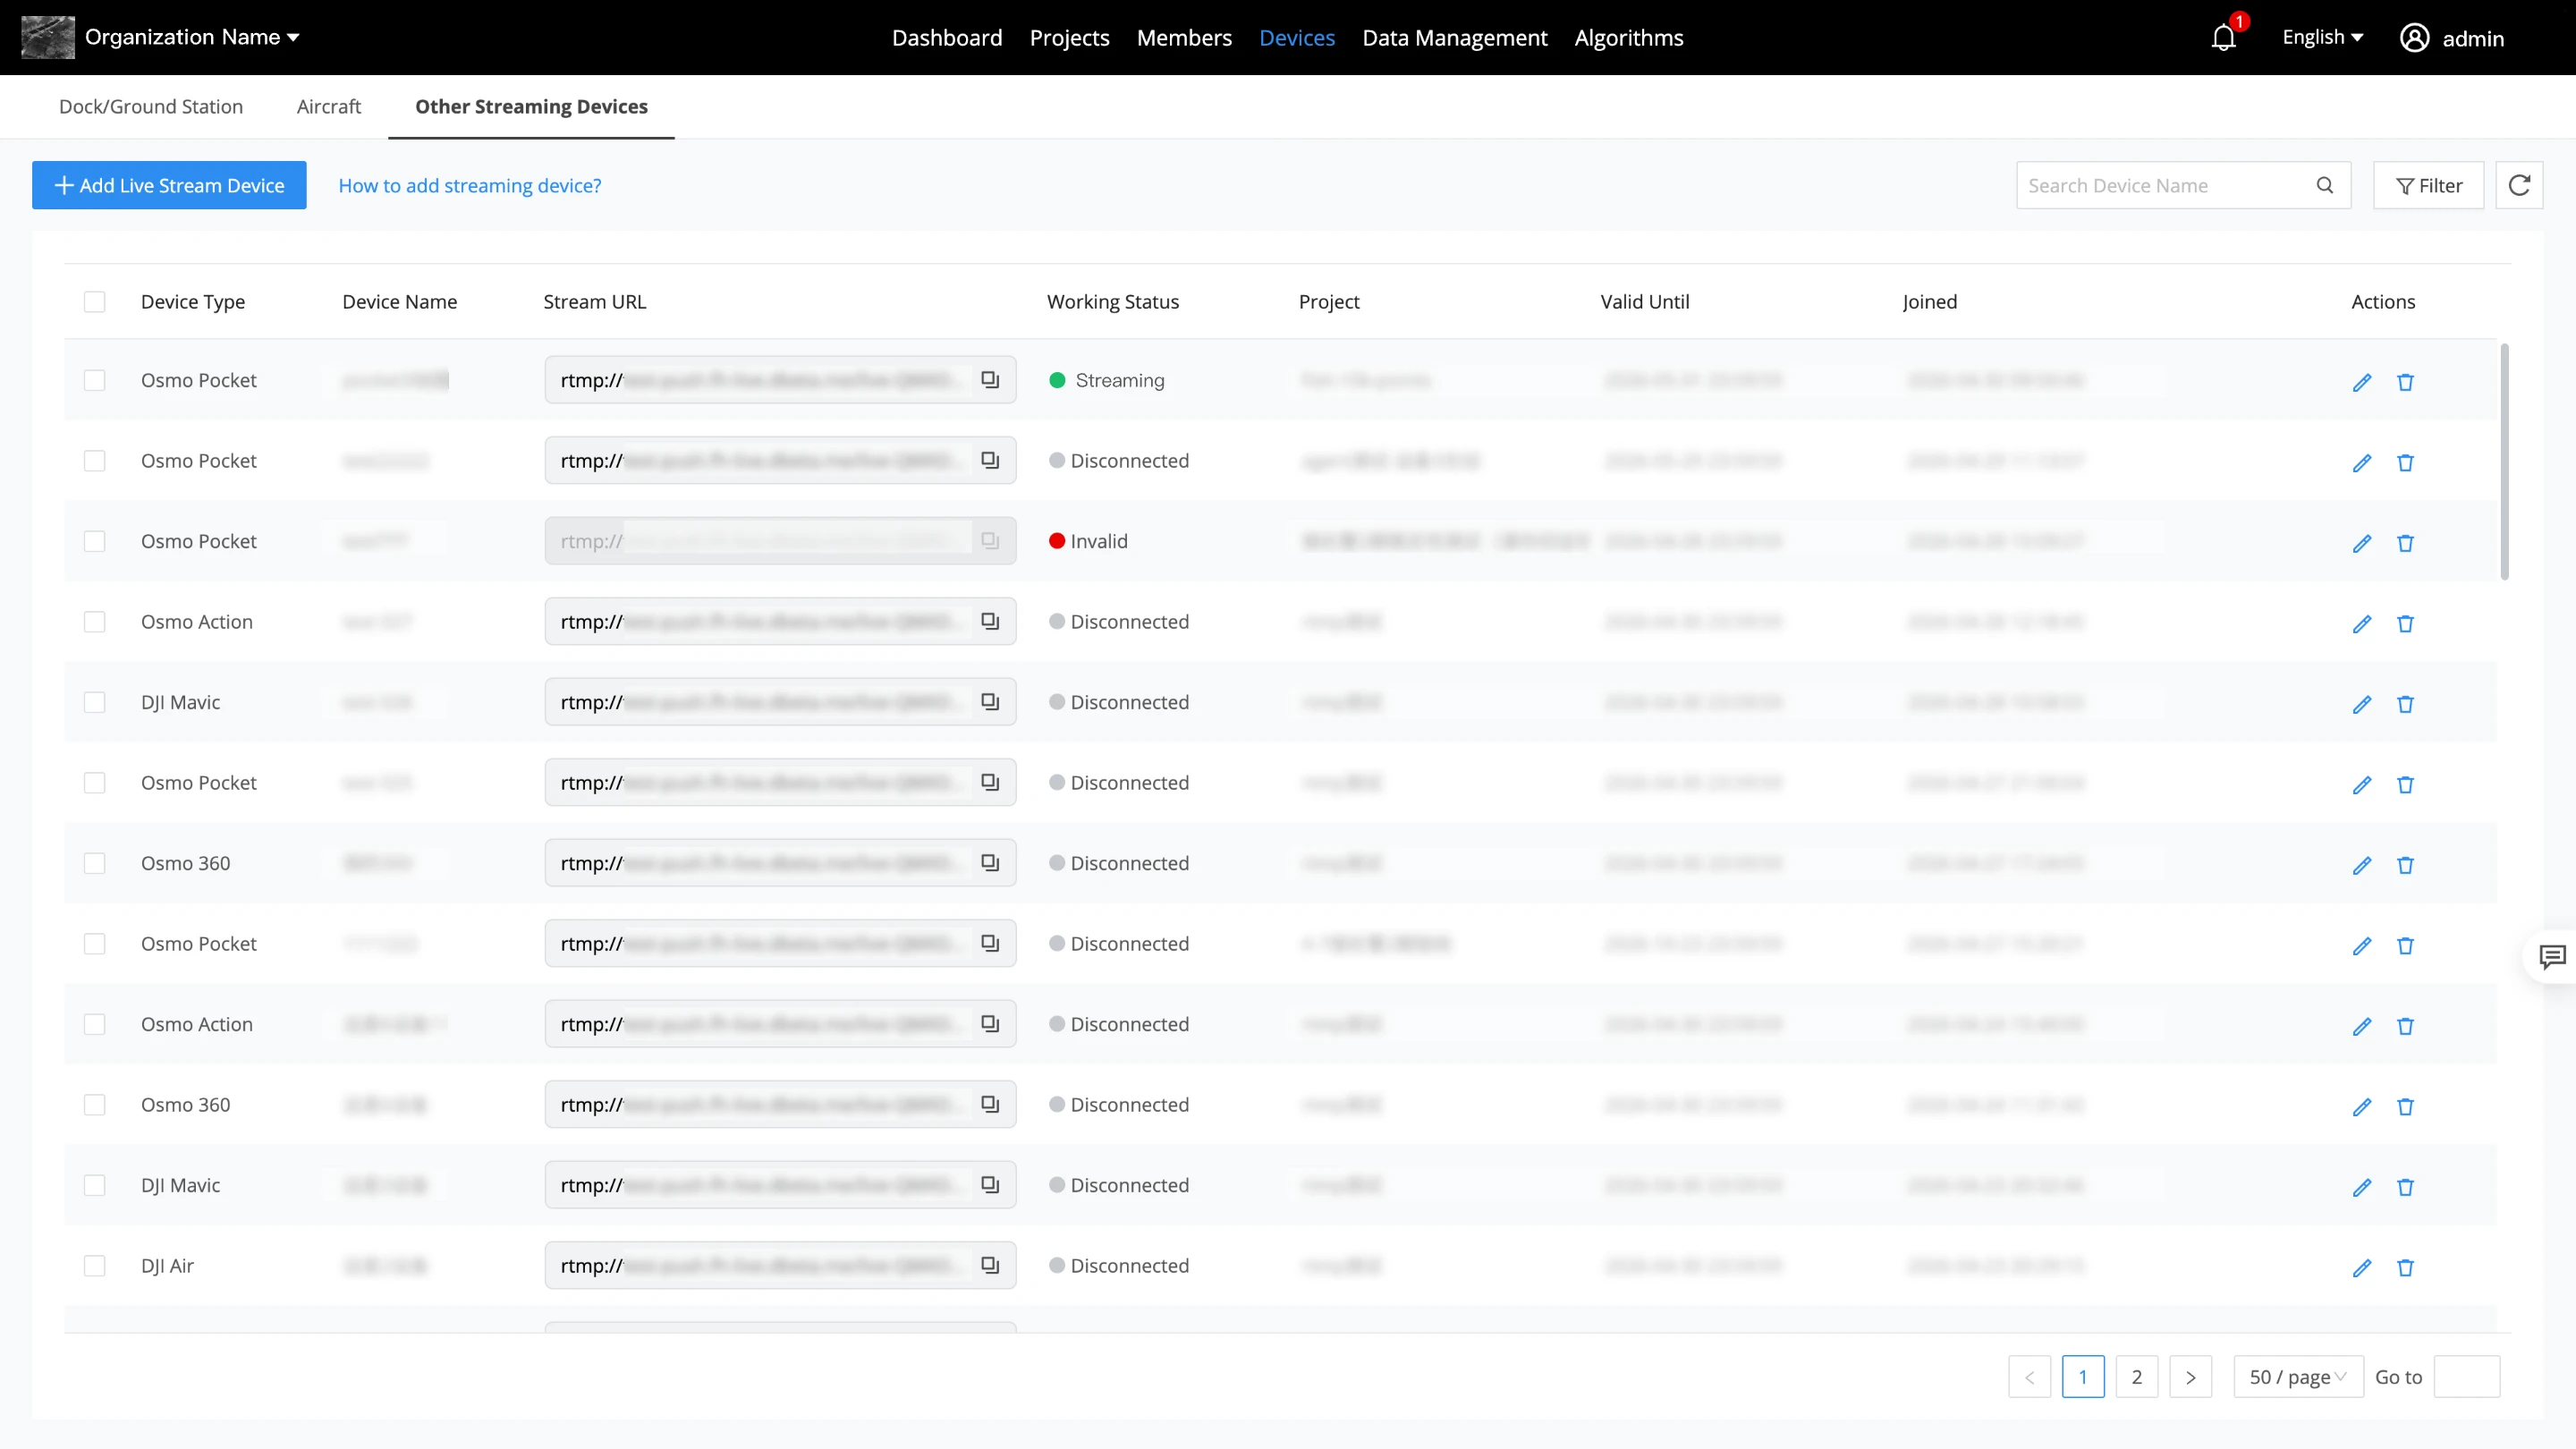
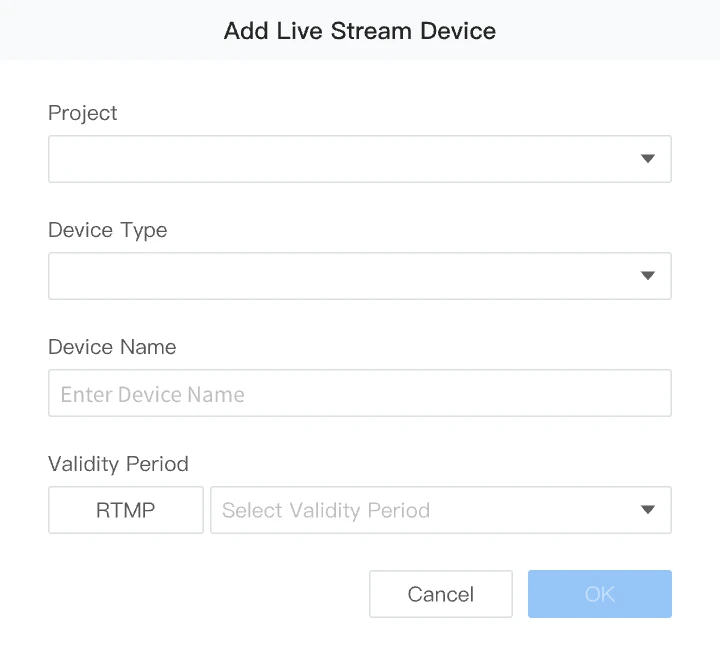
Click Add Live Stream Device and set the device type, device name, associated project, and validity period. The validity period cannot be changed once set. The maximum validity period for the link is 180 days.
After adding the device, copy the generated stream URL to the device's streaming platform, such as the DJI Fly app, to start streaming.
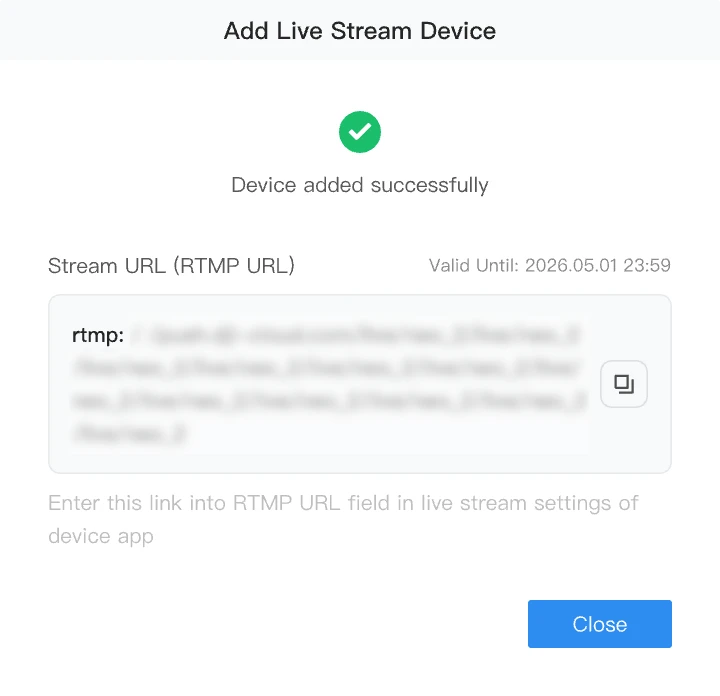
- RTMP streaming access for DJI consumer drones and handheld devices is currently supported only on the public cloud.
- For more help, refer to the DJI Fly App Live Streaming Guide and the DJI Mimo App Live Streaming Guide.
Notes on the On-premises Version
Bind Docks to the On-premises Version
Bind docks to an organization through DJI Pilot 2 On the Cloud Service Configuration page, select FlightHub 2 On-premises Version and enter the organization ID, access URL, device binding code, dock name, and aircraft name.
Bind docks/ground stations to an organization through the DJI Enterprise app On the Cloud Service Configuration page, select FlightHub 2 On-premises Version and enter the organization ID, access URL, device binding code, ground station name, dock name, and aircraft name.
Firmware Manager and Firmware Update
The on-premises version uses Firmware Manager to manage device updates.
Go to Firmware Manager > Upload Firmware to upload a device firmware installation package. After uploading, click  to make the package available throughout the organization. Select devices in the Devices > Dock list to update their firmware.
Notes:
- Only 1 firmware installation package can be stored temporarily for each device type. Uploading a new package replaces the previous one.
- Obtain device firmware installation packages from the corresponding product page on the DJI official website.
View Dock/Ground Station and Aircraft Information
Maintenance Program and DJI Care Enterprise information relies on DJI official online services. Therefore, FlightHub 2 on-premises does not support viewing this information for docks, ground stations, or aircraft.
Device Damage Assessment
Device damage assessment relies on DJI official online services. Therefore, FlightHub 2 on-premises does not support device damage assessment.